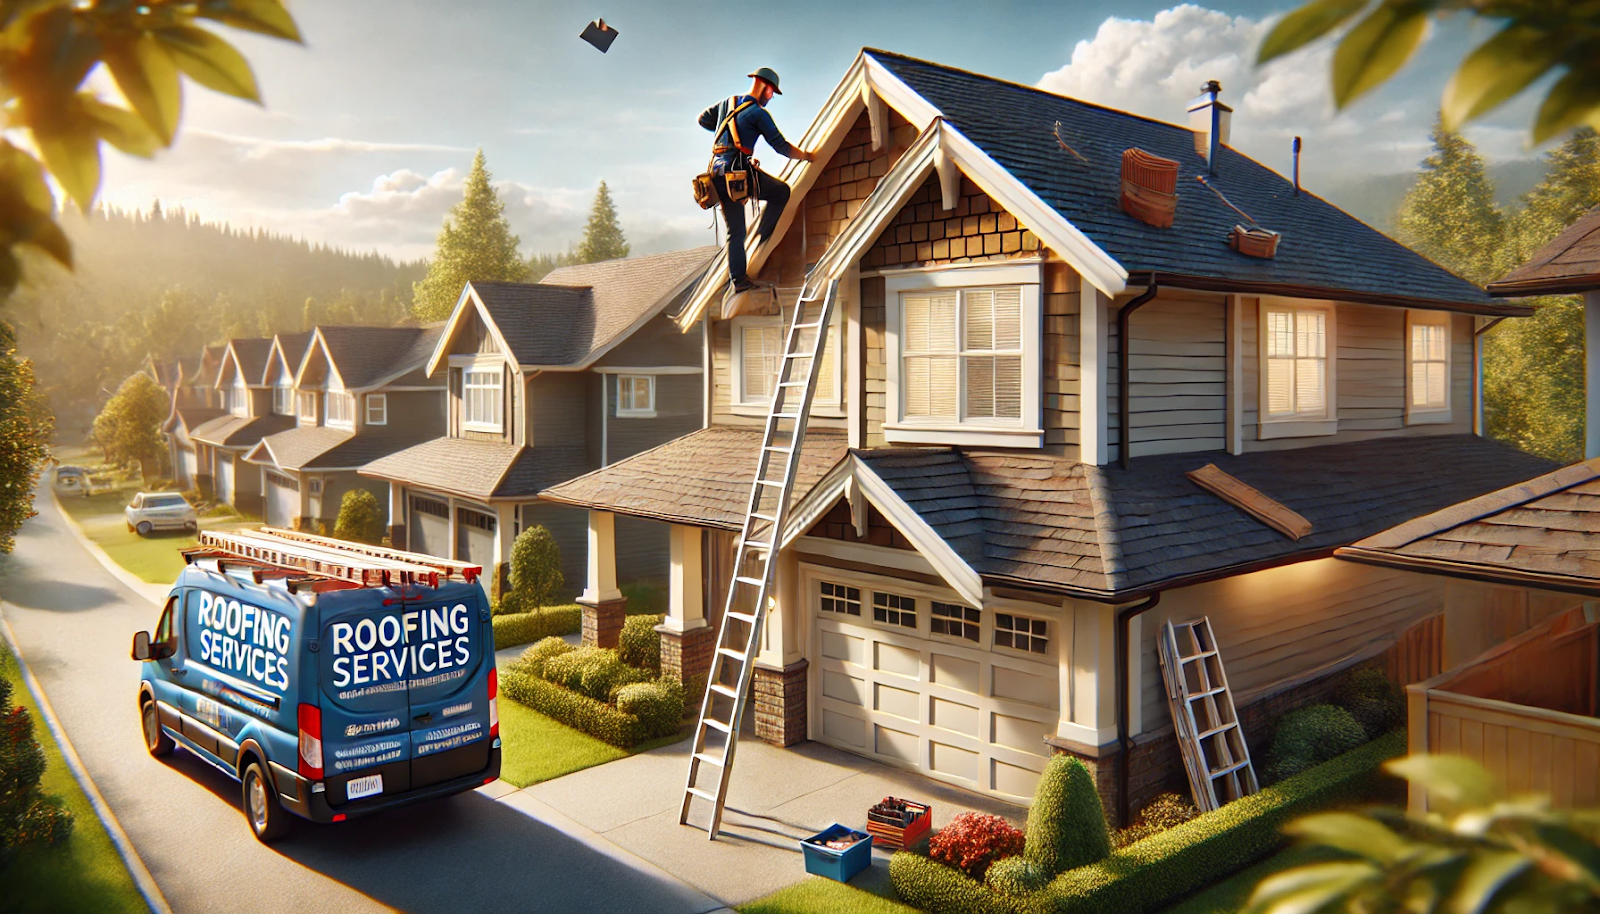
Did a Storm Just Hit? Here’s What You Need to Know About Your Roof
You’re standing in your yard, looking up at your roof, and something doesn’t seem right. A few shingles are missing, a branch is hanging off the edge, and you’re wondering how bad is the damage?
Storms can be unpredictable, and even if your roof looks okay from the ground, there could be hidden issues waiting to cause bigger problems. Whether it was strong winds, heavy rain, or hail, knowing what to do next can make all the difference in protecting your home and your wallet.
This post will walk you through how to assess roof storm damage, what steps to take right away, and when to call in a professional for storm damage roof repair. Let’s start with what you should do first.
The storm has passed, but now you’re left wondering is my roof okay? Maybe you heard the wind howling, hail pounding, or branches crashing, and now you’re concerned about damage to your roof. Before you do anything, take a breath and remember: safety first.
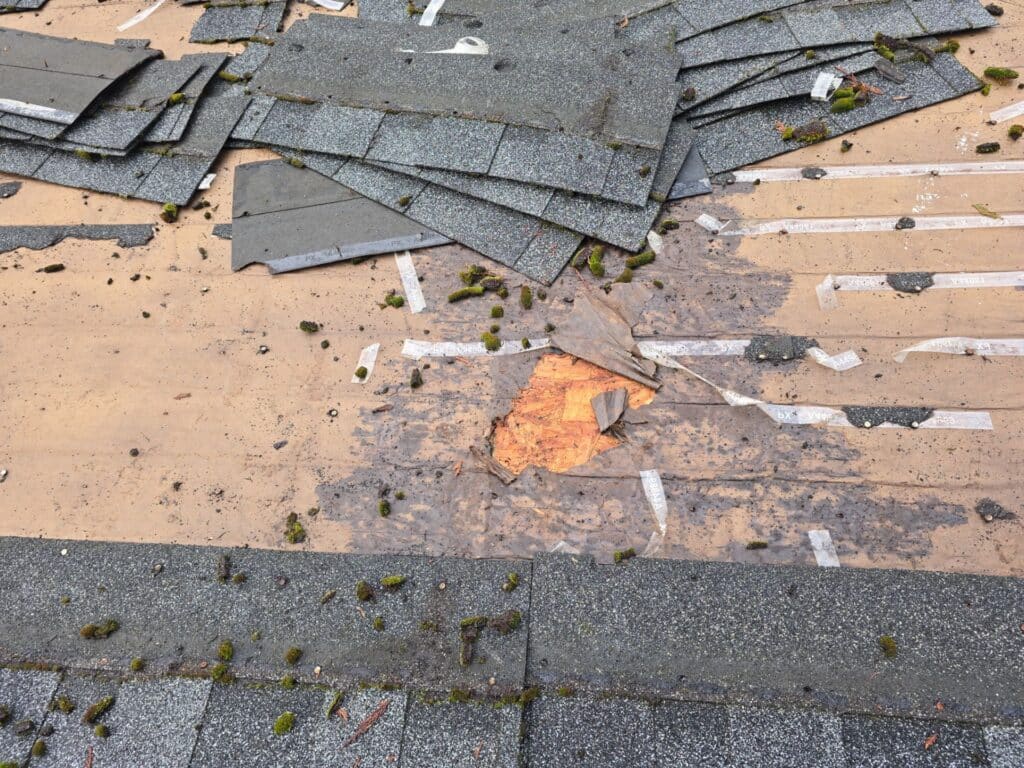
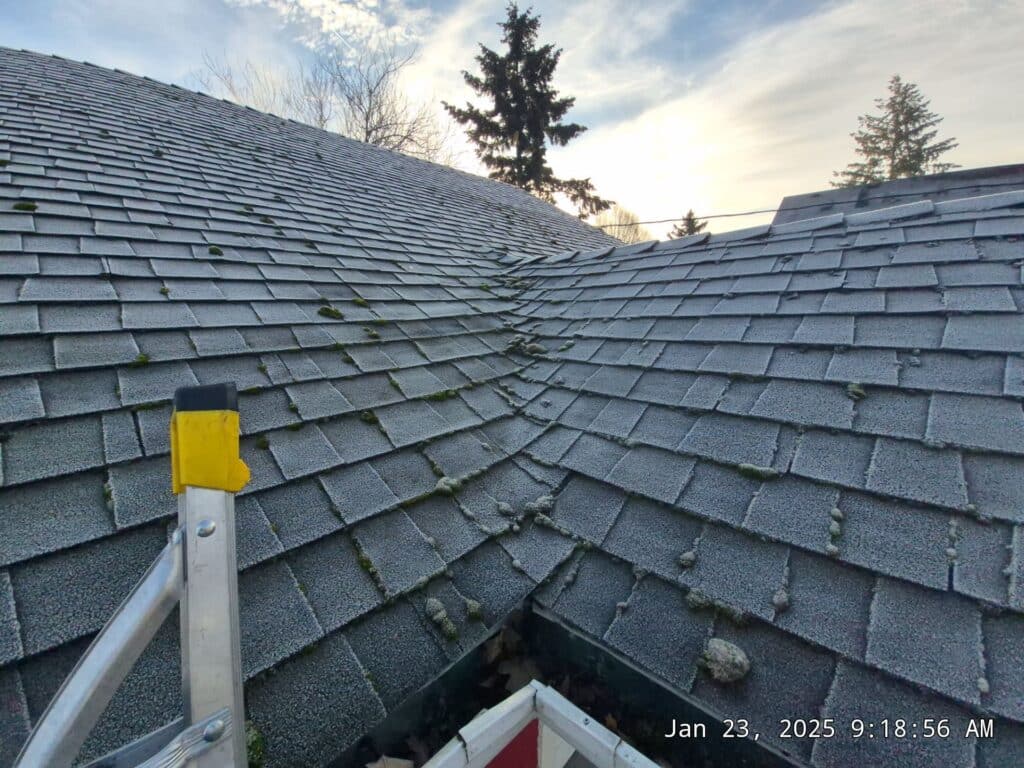
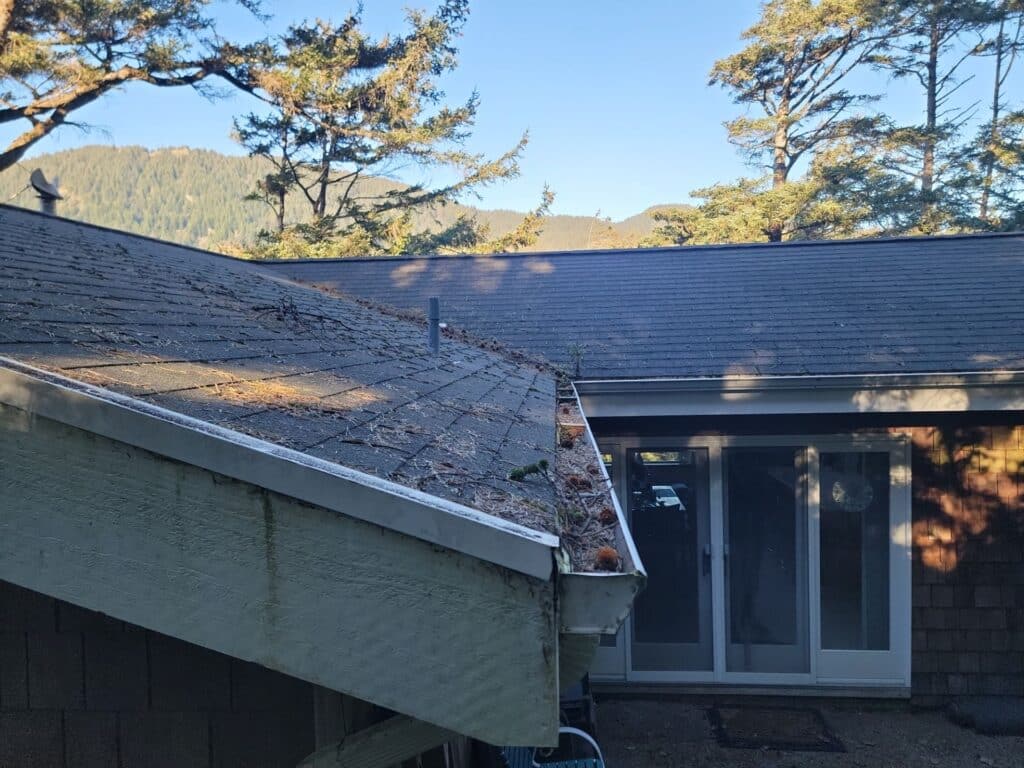
Look outside for any obvious hazards. If you see downed power lines, large debris, or flooding around your home, stay put and call for help. If it seems safe, step outside and check your roof from the ground. Do you notice missing shingles, dented gutters, or tree branches on the roof? If so, there’s a good chance your roof took some damage.
You don’t need to climb up on the roof to spot problems that can be risky, especially right after a storm. Instead, do a quick visual check from the ground. Look for things like missing or curled shingles, cracked flashing, or pieces of roofing material on the ground. If you have an attic, take a flashlight and check for any signs of water damage, leaks, or damp insulation.
Not all damage is obvious, though. Sometimes, the real issues are hidden beneath the surface, which is why a professional roof inspection is a smart move. A reputable roofer can spot things you might miss and let you know if you need a simple roof repair or something more extensive.
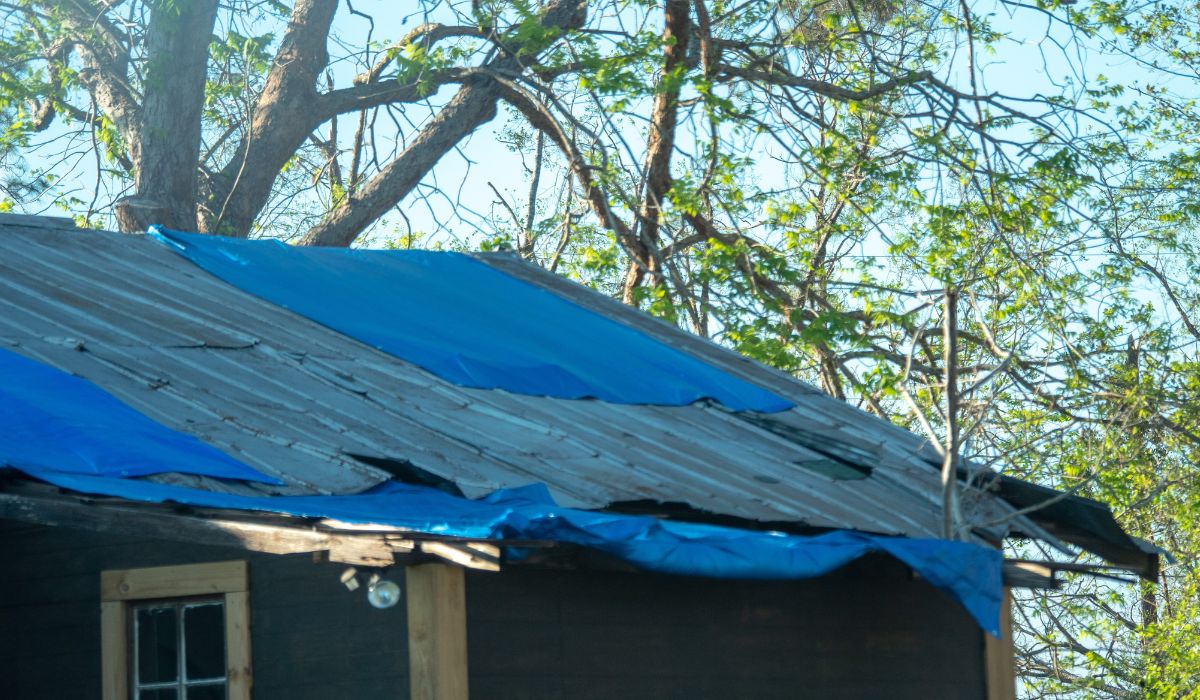
If you notice your roof has storm damage, don’t panic. Small steps can prevent bigger problems while you wait for repairs. If there’s a leak, place a bucket under the drip and move valuables away from the area. If there are exposed sections on the roof and rain is in the forecast, you can place a tarp over the damaged area to keep water out.
However, these are just temporary solutions. It’s best to call a roofing company as soon as possible to inspect the damage and recommend the best course of action.
Not all storms leave behind the same kind of damage. Wind, hail, and heavy rain can each take a toll on your roof and home in different ways.
Sometimes, roof damage is obvious like when you find shingles in your yard. Other times, it’s more subtle. If you notice any of the following, it’s time to get your roof inspected:
A professional roof inspection can confirm whether you need a roof repair or if it’s time to replace your roof.
This is one of the biggest questions homeowners ask after a storm: Do I need a full roof replacement, or will a repair be enough? The answer depends on how extensive the damage is.
The cost depends on factors like the type of roof, extent of damage, and your homeowners insurance policy. Some homeowners insurance policies will help cover the costs if the damage to your roof was caused by a covered event like hail or wind.
If you decide to file a claim, your insurance company will send an adjuster to inspect the damage. If your claim is approved, they may pay for part (or all) of the repair or roof replacement, depending on your insurance policies.
If the cost of repairs is high, it’s worth seeing if your homeowners insurance will cover it. However, if the damage is minor and close to your deductible, it might not be worth filing a roof damage claim. A reputable roofing contractor can help you decide whether it makes sense to involve your insurance company or just handle the repair out of pocket.
After a storm, one of the first things homeowners ask is: "Will my insurance cover this?" The answer depends on your insurance policy and how your roof is valued.
Insurance companies generally use two types of policies when covering roof storm damage:
Not sure which one you have? Contacting your insurance company or speaking with your insurance agent can help clarify.
Most homeowners insurance policies cover wind or hail damage as long as it wasn’t due to wear and tear or a pre-existing issue. If your roof has storm damage from high winds or hail marks from a recent storm, you’ll likely have a viable claim. However, policies can vary some won’t cover water damage unless it’s directly caused by the storm (like a hole in the roof allowing rain in).
Your roof damage claim could be denied if:
If your claim is approved, it’s important to make sure the scope of work matches what’s actually needed to protect your home. A storm damage roof inspection by a reputable roofing company can help ensure your claim is properly valued.
Insurance companies want proof. The more evidence you provide, the smoother your insurance claim process will be.
After the storm, take clear photos of the damage to your roof. Capture missing shingles, hail damage to your roof, and any water damage inside your home. If possible, get a professional roof inspection some roofing companies even assist with marking roof damage using chalk so adjusters can see the extent of the issue.
Once you file a claim, your insurance company will send an adjuster to inspect the damage. While they are trained to assess storm damage, they don’t always catch everything. That’s why many homeowners choose to have a roofing contractor present during the inspection. A reputable roofing company can point out hail marks, wind damage, and other hidden issues to make sure your claim is valued correctly.
If your roof damage claim is denied, don’t assume it’s final. You can:
Sometimes, insurance companies underestimate the cost of repairs or argue that the damage occurs over time rather than from a single storm. If this happens, a storm damage roof inspection from a trusted roofing contractor can help build a stronger case.
After a storm, many homeowners rush to get a roofing contractor, but choosing the right one is critical. The best contractors should be:
A professional roofer should also provide a clear breakdown of the repair or replacement process, including the roof material, type of roof, replacement cost, and how they’ll handle the scope of work.
After a big storm, you may see door-to-door roofing companies offering quick fixes. Be cautious. Many of these are storm chasers contractors who show up, take deposits, and either cause more damage or disappear without completing the work.
Signs of a scam roofing company:
Always check reviews, ask for credentials, and confirm they are a reputable roofing company.
Before you choose a contractor to get your roof replaced or repaired, ask:
Choosing the right roofing contractor makes all the difference in how smoothly your roof claims process goes and whether you get a quality new roof that lasts.
If you've ever had to deal with storm damage to your roof, you know how frustrating it can be. Even if you got everything repaired, the thought of another storm rolling in can be stressful. The good news? There are ways to protect your home and minimize future damage so you’re not caught off guard next time.
Think of your roof like your car it needs regular check-ups to stay in good shape. A professional roof inspection at least once a year can catch small problems before they turn into big ones. Loose shingles, worn-out flashing, or clogged gutters might not seem like a big deal now, but during a storm, they can make your home more vulnerable.
A simple example? A homeowner we worked with thought their roof was fine after a recent storm. When we checked, we found a few cracked shingles and some minor roofing wind damage. They decided to fix it, and sure enough, a few months later, another storm hit. Their neighbors had storm damage roof replacement bills to deal with, but their home was safe because they took action early.
If your roof damage was severe enough to require a replacement, it’s worth considering storm-resistant materials. Modern roofing technology has come a long way impact-resistant shingles, metal roofing, and reinforced underlayment can all help your roof stand up to high winds and hail.
We’ve seen homeowners replace older asphalt shingles with Class 4 impact-resistant shingles, and it made a huge difference. Not only did it help protect their home, but in many cases, their storm damage roof insurance claim resulted in lower premiums because of the upgrade.
Beyond materials, there are a few extra steps you can take to reinforce your roof against future storms. Simple things like securing loose flashing, reinforcing roof decking, and ensuring proper attic ventilation can make a big difference when the next storm hits.
One homeowner in a wind-prone area had multiple shingles blow off with every storm. They upgraded to a roofing system with high-wind-rated shingles and additional fasteners, and for the first time in years, their roof held up without a single missing shingle. These types of preventative measures can save you from repeated repairs and insurance claims.
Dealing with storm damage to your roof can be stressful, but taking the right steps immediately after a storm can make the process much easier. First, make sure your home is safe. Then, check for visible damage from the ground and call a professional for a storm damage roof replacement or repair evaluation.
If your roof needs major repairs, don’t wait too long to file a storm damage roof insurance claim. Many insurance policies have time limits, and the longer you wait, the harder it can be to prove the damage was caused by the storm.
Most importantly, consider long-term solutions to avoid dealing with the same problem in the future. Investing in storm-resistant materials and regular inspections can help protect your home and reduce future insurance claims.
When in doubt, reach out to a trusted roofing professional like IBEX Roof. A knowledgeable roofer can help you understand whether you need a repair or full replacement, guide you through the insurance claim process, and make sure your home is protected for years to come.
After a storm, look for missing or cracked shingles, dented gutters, water stains on ceilings, or granules in your gutters. If you're unsure, a professional roof inspection can confirm if there's hidden damage.
It depends on your policy. Most storm damage roof insurance claims cover damage caused by wind or hail, but some policies may only cover the actual cash value of your roof rather than the full replacement cost. It’s always best to check with your insurance provider.
Most insurance policies require you to file a claim within six months to a year after the storm, but it varies by provider. The sooner you act, the better your chances of getting your claim approved.
You might be able to replace a few missing shingles, but be cautious small issues can sometimes hide bigger problems. A professional roofer can assess the damage properly and make sure your roof is fully repaired.
If you live in a storm-prone area, consider impact-resistant shingles, metal roofing, or reinforced asphalt shingles. These materials are designed to withstand strong winds and hail better than standard shingles.
You’re planning a roofing project, and now you’re standing in the home improvement store, staring at stacks of shingles. How many shingles are in a bundle? How much area does one bundle actually cover? Do you need three, four… or way more than you thought?
Get too few, and your project comes to a halt while you make another trip. Buy too many, and you’ve just spent extra money on materials you don’t need. Either way, it's frustrating.
The good news? Figuring out how many bundles you need is easier than you think. In this post, we’ll break it all down how many square feet a bundle of shingles covers, how to calculate exactly what you need, and some simple tips to avoid waste.
If you’ve ever walked into a home improvement store to buy shingles, you’ll notice they’re not sold one by one they come in bundles. A shingle bundle is simply a set of shingles packaged together to make handling and installation easier.
Think of it this way: Imagine trying to carry individual shingles up a ladder one at a time. Not exactly practical, right? Bundles make the whole process more manageable.
Now, here’s where it gets tricky. Not all bundles contain the same number of shingles. It depends on the brand, type, and thickness of the shingles. For example, a bundle of standard 3-tab shingles usually has around 26 shingles, while thicker architectural shingles have fewer because they take up more space.
Fun fact: The term "bundle" comes from how shingles were originally tied together in stacks to make transportation easier. Even though packaging has changed, the name stuck!
If you're measuring your roof, you might assume everything is calculated in square feet. But roofers and suppliers prefer a different unit: the roofing square. One roofing square equals 100 square feet of roof area.
Why? Because it simplifies the math. Instead of dealing with thousands of square feet, roofers break everything down into squares. If your roof is 2,000 square feet, that means you have 20 squares. It makes estimating materials much easier.
A good rule of thumb is that three bundles of standard shingles make up one roofing square (100 square feet). That applies to both 3-tab shingles and most architectural shingles.
But it’s not always that simple. Some premium shingles are thicker and heavier, meaning you might need four or even five bundles per square.
Let’s say you’re using a high-end designer shingle that’s thicker than standard options. Instead of needing three bundles per square, you’ll need four. That small difference might not seem like a big deal at first, but it adds up fast when you’re ordering materials for an entire roof.
If you’re not sure, check the packaging or use a shingle calculator to be safe. Getting the right amount upfront means fewer unexpected trips to the store.
So, how many square feet does one bundle of shingles cover? The answer depends on the type of shingle you choose:
Shingle coverage isn’t always exact because thickness, design, and brand specifications can change things. That’s why two different bundles might not cover the same amount of space, even if they look similar.
Let’s say you have a 1,500-square-foot roof and you’re using standard 3-tab shingles. Since one square is 100 square feet, you’ll need 15 squares of shingles. At three bundles per square, that’s 45 bundles total.
But if you choose a thicker, premium shingle that requires four bundles per square, suddenly you need 60 bundles instead of 45. That’s a big difference!
If you’re not confident in your numbers, a shingle calculator can help you figure out exactly how much to buy based on your roof’s size and slope.
Nobody wants to get halfway through a roofing project only to realize they don’t have enough shingles. At the same time, buying too many means spending money you didn’t need to. So, how do you figure out exactly how much to order?
It’s actually pretty simple.
Roofers use an easy formula to estimate how many bundles of shingles are needed:
Total Roof Area (sq. ft.)÷100×3=Bundles Needed
Why? Because one roofing square equals 100 square feet, and most shingles come in bundles of three per square.
Let’s say your roof is 2,000 square feet. Here’s how the math works:
2,000÷100×3=60 bundles
So, for a 2,000-square-foot roof, you’d need about 60 bundles of shingles.
| Roof Size (sq. ft.) | Number of Bundles Needed (Standard 3-Tab Shingles) |
|---|---|
| 1,000 | 30 |
| 1,500 | 45 |
| 2,000 | 60 |
| 2,500 | 75 |
| 3,000 | 90 |
Even the best roofing contractor will tell you no matter how carefully you measure, there’s always going to be some waste. Shingles need to be trimmed, fitted, and overlapped in certain areas to ensure your roof is watertight.
That’s why most roofing companies recommend ordering 10–15% extra to account for waste. If your roof has a simple design, 10% is usually enough. But if your roof has multiple peaks, valleys, and dormers, it’s safer to go with 15% or more.
For example, if your calculation says you need 60 bundles, adding 10% for waste means you should order 66 bundles instead.
It’s always better to have a few extra on hand than to run short mid-project.
Yes! The steeper your roof, the more shingles you’ll need. That’s because a steep roof has more surface area than it looks like from the ground.
Picture two houses one with a low-sloped roof and one with a steep A-frame. Even if they both have the same square footage, the steep roof actually has more surface area because of its slope.
Roofers also need to overlap shingles more on steep roofs to keep everything watertight, which increases the total needed.
To get an accurate estimate, multiply your total square footage by the right slope factor:
| Roof Pitch | Multiplier |
|---|---|
| Flat to 3/12 | 1.00 |
| 4/12 to 5/12 | 1.05 |
| 6/12 to 7/12 | 1.12 |
| 8/12 to 9/12 | 1.20 |
| 10/12 to 12/12 | 1.30 |
For example, if your roof is 2,000 square feet with a 7/12 pitch, multiply:
2,000×1.12=2,240 square feet
Now, plug it into the bundle formula:
2,240÷100×3=67.2
That means you’ll need about 68 bundles instead of 60.
This is why hiring an experienced roofing company like IBEX Roof can save you time and money we make sure your estimate includes everything upfront, no surprises.
No matter how precise your measurements are, roofing isn’t as simple as just laying down shingles in a perfect rectangle.
You’ll need extra shingles for:
Let’s say your estimate calls for 60 bundles and you have a complex roof. Adding 15% for waste means you should order around 69 bundles instead.
It’s always better to have a little extra than to run out in the middle of the job.
If you're ordering shingles for a full roof replacement or a large project, it's good to know how many bundles fit on a pallet. This helps with planning, storage, and even delivery costs.
On average, a pallet holds 42 to 48 bundles, but this can vary depending on the manufacturer and the type of shingle. Some thicker architectural shingles take up more space, meaning you might get fewer per pallet. If you're buying in bulk, checking with your supplier or roofing contractor can help you get the right amount without ordering too much or too little.
Shingle prices aren’t just about the upfront cost per bundle. The type of shingle you choose, the weight, and even delivery fees all play a role.
If you're comparing prices, factor in these details so there aren’t any surprises when it’s time to check out.
Shingles aren’t the only thing you’ll need to complete a roofing job. Some materials often get overlooked but are essential for a durable, long-lasting roof.
A good roofing company will make sure you have everything you need so you’re not making last-minute trips to the store in the middle of installation.
If you’re tackling this project yourself, having a simple game plan makes all the difference. Here’s what you’ll need to do:
If math isn’t your thing, no worries a roofing calculator can do the hard work for you. Just enter your roof dimensions, slope, and shingle type, and you’ll get an estimate of how many bundles you need. It’s a quick and easy way to avoid ordering too much or too little.
Not sure if you’ve got the numbers right? A professional roofing contractor can give you an accurate estimate and make sure you’re ordering exactly what you need.
At IBEX Roof, we take the guesswork out of the process. Whether you’re planning a DIY project or need a full roof replacement, our team can help you figure out how many shingles to order, factor in waste, and ensure you don’t run into surprises along the way.
Need an estimate? Reach out to IBEX Roof today, and let’s get your project started!
If you’re staring up at your roof, wondering how you’re going to afford a replacement, you’re not alone. Many homeowners in Oregon find themselves in the same situation, especially after a storm or years of wear and tear. The good news? Your homeowners insurance might cover it! But and this is a big but getting your insurance to pay for a new roof isn’t always straightforward. Let’s break it down so you can navigate the roof insurance claim process like a pro.
Before you even think about filing a claim, grab your insurance policy and read through the fine print. Here’s what you need to know:
Insurance companies love documentation. The more proof you have, the better your chances of approval. Here’s what to do:
A trustworthy roofer company will know how to assess the damage properly and can help you determine if filing a claim is the right move.
Once you have your documentation, it’s time to file your claim. Here’s how:
Pro tip: Have your roofer in your area present during the adjuster’s visit. They can advocate for you and ensure nothing is overlooked.
Once your claim is approved (or even if it isn’t), you’ll need a reliable roofer company to get the job done right. Here’s what to look for:
Getting your insurance to pay for a new roof is one thing—getting the most out of your policy is another. Here’s how to maximize your payout:
If your insurance doesn’t cover the full cost, don’t panic. There are other ways to pay for a new roof:
At IBEX Roof, we understand how overwhelming the roof insurance claim process can be. That’s why we’re here to guide you every step of the way, from documentation to installation. Whether you need a professional inspection, help navigating your claim, or a top-quality roof replacement, our expert team is ready to assist.
If you’re looking for a roofer in your area who knows the ins and outs of roof insurance claims, look no further than IBEX Roof. Contact us today to schedule an inspection and let us help you get the coverage you deserve!
The timeline varies depending on your insurance provider and the complexity of your claim. In general, it can take anywhere from a few weeks to a couple of months. Having thorough documentation and working with a reputable roofer can speed up the process.
If your claim is denied, don’t lose hope! You can request a detailed explanation from your insurance company, provide additional documentation, or even get a second opinion from another roofing contractor. In some cases, filing an appeal with your insurer can help overturn the decision.
It depends on your insurer and policy. While a single claim for storm damage may not impact your rates significantly, multiple claims in a short period could result in higher premiums. It’s always a good idea to discuss this with your insurance provider before filing a claim.
When it comes to roofing, choosing the right type of shingle is crucial for both durability and aesthetic appeal. As roofing technology evolves, homeowners and contractors face an array of options to suit various needs and preferences.
In this blog, we delve into the distinction between 3-tab shingles and architectural shingles—two of the most popular choices in roofing for a new roof installation. By the end of this post, you'll have a clear understanding of which option might be best for your project.
3-tab shingles are a popular and traditional option in roofing that many homeowners recognize. Here's a quick overview:
Definition and Structure: 3-tab shingles have a simple design, characterized by a flat, single-layer form. Each shingle strip contains three tabs or cutouts along its lower edge, giving it a uniform look.
Historical Background: These shingles have been standard in American homes for decades, favored for their affordability and straightforward installation.
Advantages and Disadvantages:
Recent Usage Statistics: While the popularity of 3-tab shingles has decreased with the rise of architectural shingles, they still make up a significant portion of the market, especially in budget-conscious projects.
Architectural shingles, also known as dimensional shingles, have gained popularity for their durability and aesthetic appeal.
Definition and Composition: Contrary to their 3-tab counterparts, architectural shingles are multi-layered, giving them a more dimensional look that resembles traditional wood shake or slate roofing.
Historical Context: Originally introduced in the 1970s, these shingles have become a favorite for high-end and new construction due to their durability and design.
Pros and Cons:
Market Trends and Statistics: Architectural shingles are among the best asphalt shingles in the market, currently taking precedence over 3-tab shingles in many areas due to their long-term benefits and improved appearance.
| Feature | 3-Tab Shingles | Architectural Shingles |
| Design | Flat, uniform appearance | Layered, dimensional look |
| Lifespan | Around 20 years | 30-50 years |
| Cost | Lower upfront cost | Higher upfront cost |
| Installation | Easier, quick | Requires skilled installation |
| Weather Performance | Less durable in extreme weather | Superior wind and weather resistance |
Architectural shingles offer a more varied design and richer aesthetic, often favored in upscale roofing projects. They mimic materials like wood shake or slate, enhancing curb appeal significantly. In contrast, 3-tab shingles provide a simpler, flatter look, which might not add much to property value but serves practicality and budget constraints well.
In the 3 tab vs architectural debate, durability is a decisive factor. Architectural shingles can be considered as 30 year shingles or even longer, making them a preferred choice in regions prone to harsh weather.
While 3-tab shingles win in terms of initial pricing, the longevity and reduced maintenance costs of architectural shingles usually balance out the investment in the long run. For cost-conscious homeowners, initial affordability may sway the decision toward 3-tab options.
3-tab shingles are relatively easier to install, reducing labor costs and time. Architectural shingles, although requiring more skilled installation, offer reduced maintenance once properly placed due to their durability.
Architectural shingles shine in durability, especially in adverse weather. They offer robust wind resistance and general weather resilience unrivaled by composition shingles of simpler designs like 3-tab.
Consider your roofing budget. If budget constraints are tight, 3-tab shingles provide the necessary solution without breaking the bank.
Architectural shingles add depth and sophistication to your home’s appearance. If visual enhancement is a priority for your roof replacement, architectural shingles are the better choice due to their stylish designs.
Evaluation of local climate is critical. Architectural shingles provide superior protection and might be more suitable for areas with harsher weather.
Opt for shingles manufactured with recycled materials if sustainability is a priority. Architectural options may include eco-friendly versions that justify their higher cost through environmental benefits.
Professional roofers often recommend architectural shingles for homeowners planning a long-term stay or aiming for high-end real estate resale. Their input highlights architectural shingles as among the best asphalt shingles available when considering longevity and aesthetics.
At IBEX Roof in Vancouver, WA, we're here to help you choose the perfect shingles for your home. If you're planning to move soon, budget-friendly 3-tab shingles might be all you need. But if you're in it for the long haul, consider architectural shingles—they're durable and look great.
Architectural shingles cost more upfront, but their longevity could save you money over time. Plus, they offer more design options to boost your home's curb appeal.
Ready to pick the best asphalt shingles for your roof? Reach out to IBEX Roof today for expert advice and ensure you make the best choice for your home. We're eager to assist you!
If you're looking up at your roof and noticing discoloration, streaks, or even a fine verdant film creeping across your shingles, you're not alone. Keeping roof shingles clean is crucial not only for maintaining your home’s curb appeal but also for ensuring the longevity of your roof. In this blog post, we’re diving into how to clean roof shingles safely without causing any damage.
Over time, roofs are constantly exposed to the elements, leading to algae, moss, and lichen growth. These not only mar the appearance of your home but can also shorten the lifespan of your shingles. So, knowing how to clean roof shingles effectively yet gently is a homeowner’s essential skill.
Different types of roof shingles such as asphalt, wood, tile, and metal have distinct vulnerabilities and care needs:
Based on recent data, asphalt shingles cover approximately 80% of American homes due to their cost-effectiveness and durability. However, improper cleaning can lead to costly repairs.
Before deciding on a shingle cleaning regimen, it’s important to correctly identify what kind of issue you're facing. Here's what to look for:
Ignoring these can lead to water damage or compromised roof integrity.
Safety first! Here’s your checklist to prepare for cleaning shingles on roof:
It's tempting to reach for bleach when dealing with stubborn stains, but it can harm not only your plants but also the roofing materials. Instead, consider these eco-friendly cleaning alternatives:
| Solution Type | Benefits |
| DIY Vinegar Solution | Biodegradable, gentle cleaning |
| Oxygen-based Bleach | Effective algae killer, no runoff damage |
| Eco-friendly Commercial Cleaners | Specifically designed for roof use |
Recent studies indicate that oxygen-based bleaches have shown effectiveness in 80% of cases without damaging nearby vegetation.
Here’s how to clean asphalt shingles and other types with ease and efficiency:
To extend the life of your shingles, integrate these preventive strategies:
Sometimes, it’s best to leave it to the experts. Professional roof shingle cleaner services provide:
Consider calling in a pro if your roof has extensive coverage of algae or moss.
Technology is making roof cleaning more effective and safer:
A clean roof isn’t just an aesthetic choice—it’s an important part of maintaining your home’s health. By understanding how to clean roof shingles without damaging them, you preserve both your investment and your home’s value. Remember, proactive maintenance can save time and money in the long run. If you’re unsure about tackling it yourself, professional help is just a phone call away.
For more expert advice or if you need assistance, reach out to IBEX Roof at 360-529-3518 today!
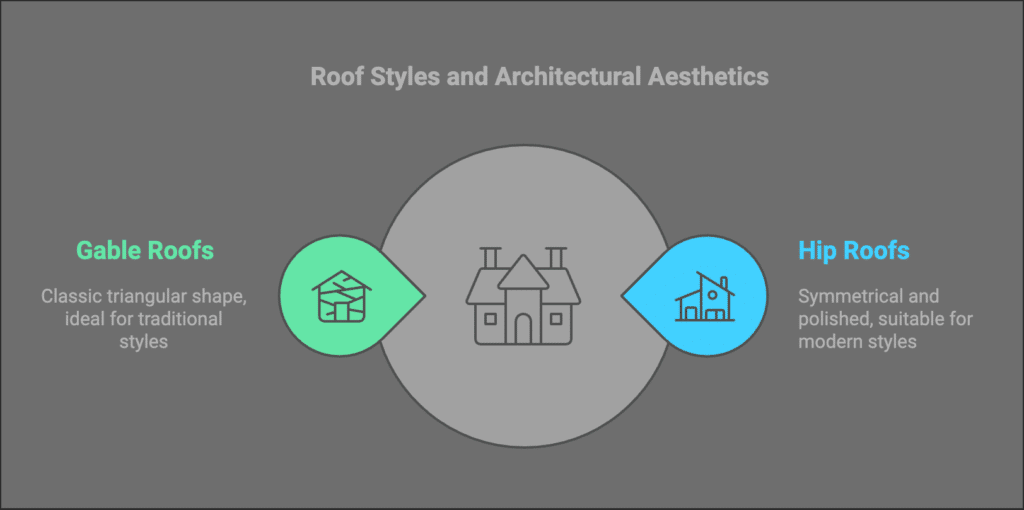
When it comes to residential architecture, the roof is more than just a protective layer over your home—it’s a defining feature that contributes to its overall aesthetic, functionality, and resilience. Among the various roof designs available, two stand out for their widespread use and distinct characteristics: hip roofs and gable roofs. These roofing styles not only shape the visual appeal of a home but also play a crucial role in adapting to different climates and structural needs.
Choosing between the two often hinges on factors like architectural style, weather resistance, and budget considerations. Understanding their unique features and advantages is essential for making an informed decision.
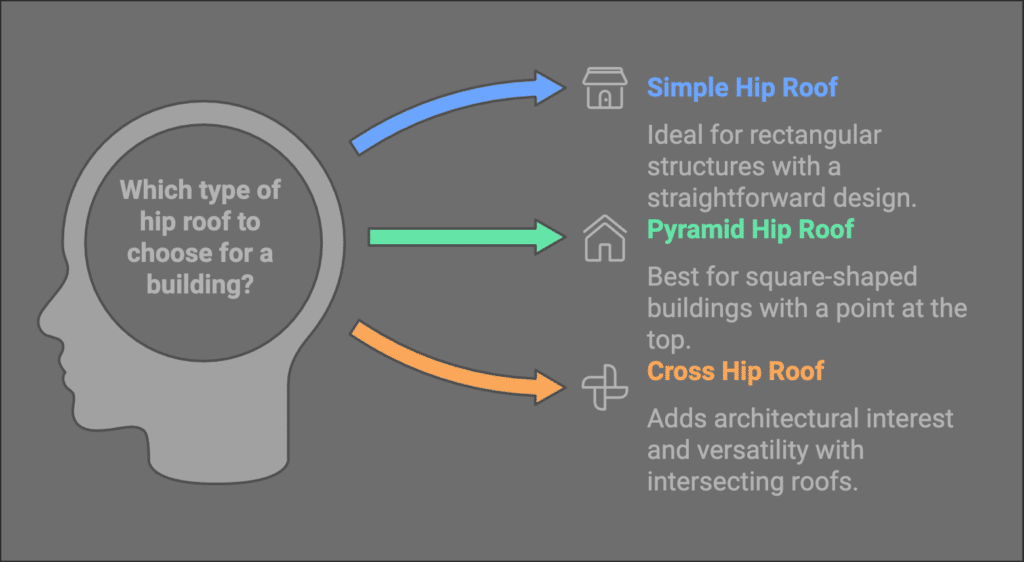
A hip roof, also known as a hipped roof, is a design where all sides of the roof slope downward toward the walls of the structure, creating a clean, symmetrical appearance. Unlike roofs with vertical ends, hip roofs form a continuous slope that converges at the top, offering both aesthetic and practical benefits.
By combining elegance with durability, hip roofs offer a compelling choice for homeowners seeking a balance between style and practicality, despite their challenges.
A gable roof is one of the simplest and most classic roof designs, recognized by its triangular gables formed at either end of the structure. This straightforward design features two sloping sides that meet at a peak, creating an iconic silhouette commonly seen in traditional homes.
With its blend of affordability, classic appeal, and functionality, the gable roof remains a popular choice for traditional homes, though it requires careful consideration of environmental factors in windy regions.
| Feature | Hip Roof | Gable Roof |
| Slope Configuration | All sides slope downward | Two sides slope downward |
| Stability | Highly stable; resists high winds | Less stable; vertical ends catch the wind |
| Aesthetic Appeal | Symmetrical and polished | Classic triangular shape |
| Construction Complexity | More complex; requires additional supports | Simple; easier and faster to build |
| Common Uses | Popular in areas with severe weather | Common in traditional and temperate areas |
Understanding these differences helps homeowners choose a roof style that aligns with their priorities, whether it's stability, aesthetics, budget, or overall functionality.
Selecting the right roof style goes beyond aesthetics. Several practical factors, including climate, budget, and functionality, play a critical role in the decision-making process. Here’s a breakdown of the key considerations:
When choosing between a hip roof and a gable roof, it’s essential to weigh their defining features, advantages, and challenges. Hip roofs offer unmatched stability and weather resistance, making them ideal for areas with extreme conditions, while gable roofs provide simplicity, classic charm, and opportunities for enhanced ventilation and light.
Ultimately, the right choice depends on a careful alignment of factors such as climate, architectural style, budget, and functionality. Consulting with a roofing professional or visiting this website can provide personalized insights to ensure your home’s roof meets your needs and enhances its overall appeal.
Don’t leave this important decision to chance—reach out to an expert to find the perfect roof style for your home today!
Hip roofs are generally more durable in extreme weather conditions due to their inward-sloping design, which provides better resistance to high winds and heavy snow. Gable roofs may require additional reinforcement in storm-prone areas to ensure stability.
Yes, hip roofs are typically more expensive due to their complex design and additional materials required for construction. Gable roofs are simpler and more cost-effective to build, making them a budget-friendly option.
While gable roofs can be used in windy areas, they are more vulnerable due to their vertical ends, which can catch wind. Reinforcing the roof with braces or wind-resistant materials can help improve its performance in such conditions.
Gable roofs offer better opportunities for ventilation and natural light, as their triangular ends can accommodate dormers or windows. This makes them a great choice for homeowners looking to enhance indoor airflow and brightness.
Choosing the right roof style depends on several factors, including your home’s location, architectural style, budget, and functional needs. Consulting a roofing professional can help you evaluate these factors and make the best choice for your home.
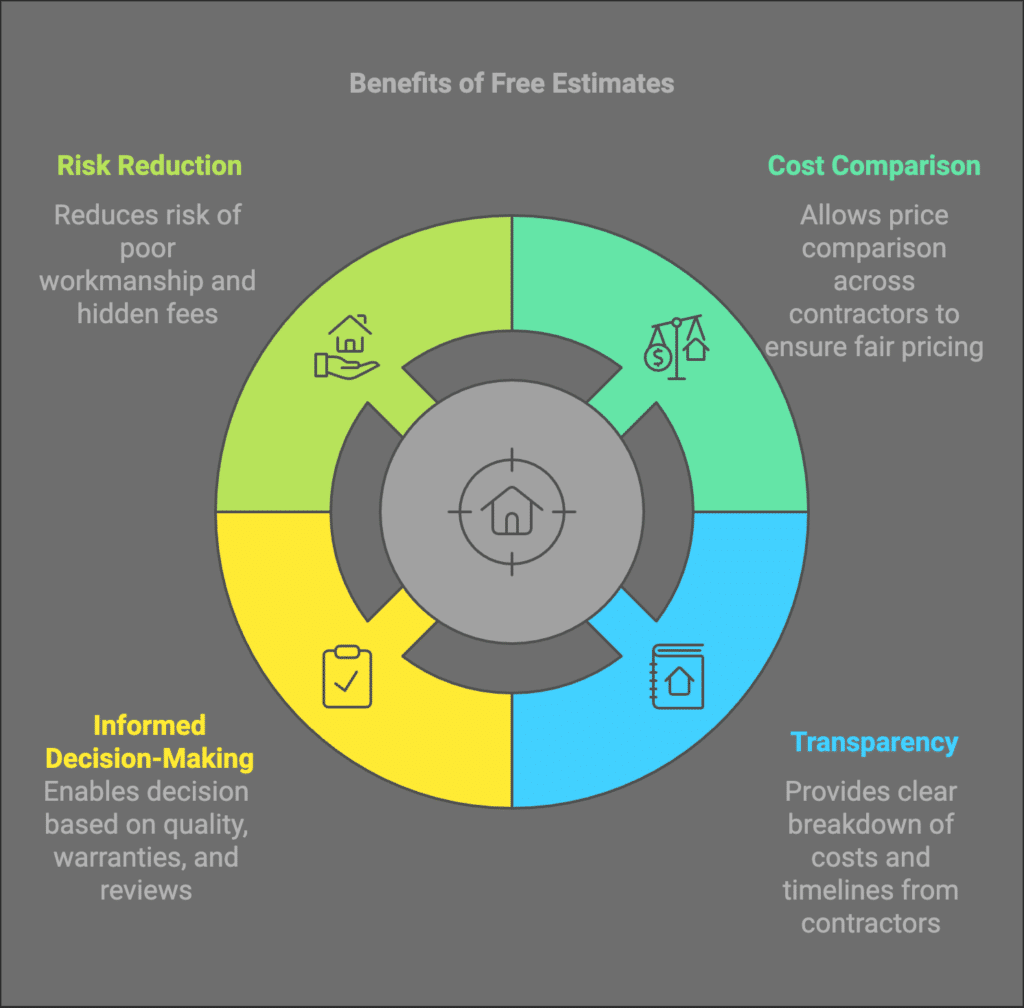
When your asphalt roof begins to show signs of wear and tear—missing shingles, leaks, or aging materials—getting a free estimate for repairs is the first step toward protecting your home and budget. This process not only helps you identify the scope of the repair work needed but also allows you to compare contractors, ensuring you make the most informed choice. By taking advantage of free estimates, you can avoid unnecessary expenses, secure quality service, and prevent costly mistakes down the line.
But how do you go about it? From finding the right contractors to preparing for their visit, there’s a method to the madness. In this post, we’ll walk you through a step-by-step process to simplify the journey and ensure you’re set up for success. Whether you’re a first-time homeowner or a seasoned property manager, these steps will help you navigate the complexities of roof repair with confidence.
Getting a free estimate for asphalt roof repair offers more than just cost savings—it’s a vital part of making an informed decision. Here’s why:
Ultimately, free estimates are about more than numbers—they empower you to choose a contractor who aligns with your budget and quality expectations. Taking the time to go through this process ensures peace of mind and a durable roof repair solution tailored to your needs.
Finding the right contractor is the cornerstone of a successful roofing repair experience. Begin by researching local contractors with a strong reputation. Check online reviews on platforms like Angie’s List, Google, and Yelp for insights into their reliability and customer satisfaction. Don’t overlook recommendations from friends, family, or neighbors who’ve had similar roofing work done.
Local contractors have an advantage—they understand the regional climate and roofing challenges better than out-of-town companies. By choosing a contractor with a good reputation in your community, you can trust their expertise and commitment to maintaining their local standing.
For a comprehensive understanding of the market, reach out to at least three different roofing contractors. This ensures you get a variety of perspectives on pricing, materials, and repair approaches. It also allows you to compare their customer service and responsiveness. Companies like Authentic Restoration, known for specializing in asphalt roofing, often offer free estimates and inspections tailored to your specific needs. This variety will help you make a well-informed decision.
Preparation is key to maximizing the accuracy and value of your roofing estimate. Start by documenting existing roof issues. Take clear photos of visible damage, such as missing shingles, leaks, or sagging areas, and note any recurring problems, like water stains on ceilings.
Next, prepare a list of questions to ask contractors during their visit. These questions might include:
Being prepared demonstrates your seriousness and ensures you don’t overlook critical details.
Once you’ve contacted contractors, schedule inspections at a time that’s convenient for you. During the inspection, contractors will assess your roof’s condition, identify problem areas, and discuss potential repair options. This is also an opportunity for you to gauge their professionalism and communication skills. A good contractor will explain their findings in detail and answer your questions thoroughly.
Ask each contractor to provide a detailed written estimate. The estimate should include:
A detailed estimate ensures there are no surprises down the line and provides a basis for comparison.
Once you have multiple estimates, compare them beyond just the price. Look at the quality of materials, the scope of the proposed work, and the timeline. Pay attention to any unclear terms or hidden fees that might affect the final cost. This comprehensive evaluation will help you choose a contractor who offers the best value, not just the lowest price.
Before committing to a contractor, verify their credentials. Check their licensing and insurance to ensure they are qualified and capable of handling your project. Licensed contractors are held to industry standards, while insurance protects you from liability in case of accidents during the repair process. Skipping this step can lead to costly risks.
After comparing estimates and verifying credentials, it’s time to choose the contractor that best fits your needs. Consider factors like price, service quality, timeline, and warranty terms. A contractor who communicates well and demonstrates professionalism is likely to deliver a better overall experience.
Once you’ve selected a contractor, review the agreement carefully. Ensure that all details, including cost, scope of work, and timeline, align with what was discussed during the estimate process. Don’t hesitate to ask for clarification on any terms you don’t fully understand. Only sign the contract when you are confident that it covers all your expectations.
By following these steps, you’ll not only secure a free estimate but also ensure that you’ve chosen a contractor who can deliver quality repairs for your asphalt roof.
Online estimators are an excellent starting point for homeowners who want a quick, preliminary idea of what their asphalt roof repair might cost. These tools use basic inputs—such as your roof’s size, material type, and the extent of visible damage—to generate an estimated range. Websites like NovaShield and Innovative Roofing offer user-friendly calculators tailored to roofing projects.
To use these tools effectively:
While helpful for ballpark figures, online estimators should not replace professional inspections. Instead, use them to guide your expectations before reaching out to contractors.
If your asphalt roof damage results from a covered peril, such as storm damage or falling debris, your homeowner’s insurance might help cover the repair costs. Working with your insurance provider effectively involves these steps:
Navigating insurance claims can feel daunting, but it’s worth the effort if it offsets your repair costs significantly. Always maintain open communication with both your contractor and insurance provider to ensure smooth coordination.
Securing a free estimate for asphalt roof repair doesn’t have to be overwhelming. By following a structured approach—researching local contractors, contacting multiple professionals, preparing for inspections, and comparing estimates—you can make an informed decision that protects your home and your wallet.
Remember, a free estimate is about more than just saving money. It’s an opportunity to understand your roof’s condition, vet reputable contractors, and ensure the repairs meet your expectations. By leveraging tools like online estimators and consulting with your insurance provider when applicable, you can further streamline the process.
Don’t wait for roofing issues to escalate. Start your journey toward a well-maintained asphalt roof today. Reach out to local contractors, request your free estimate, and take the first step toward safeguarding your home with confidence.
Most reputable roofing contractors provide free estimates without any obligation or hidden fees. However, always confirm this when contacting a contractor to avoid surprises. A trustworthy company will clearly outline their policy upfront.
The timeline varies depending on the contractor and the complexity of the inspection. On average, a contractor can inspect your roof and provide a detailed estimate within 1-3 business days after the inspection.
Some key questions to ask include:
Are you licensed and insured?
What warranties do you offer on materials and labor?
How long will the repair process take?
Can you provide references or reviews from past clients?
Online estimators are a great starting point for understanding approximate costs, but they cannot replace a professional inspection. Contractors assess factors like structural integrity, specific damage, and local material costs that online tools cannot capture accurately.
Yes! Most contractors are happy to work with homeowners who plan to file an insurance claim. Be sure to inform your contractor about your insurance coverage upfront, as they can help document the damage and provide the necessary information for your claim.
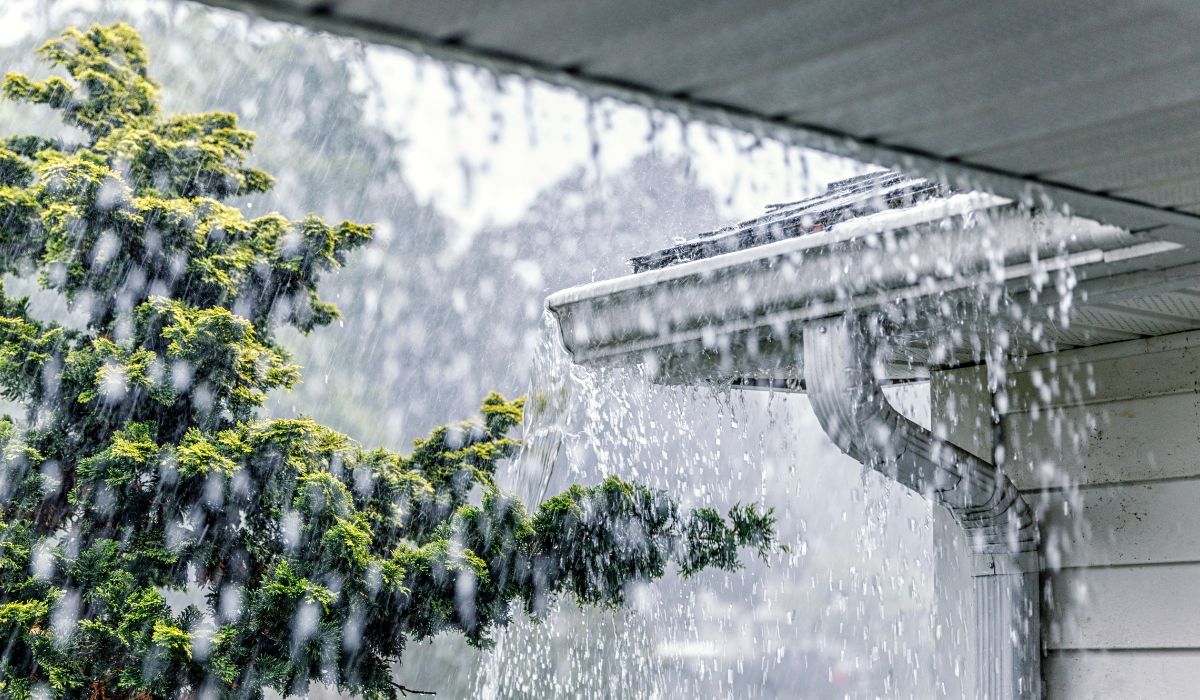
When rain starts to pour and you notice droplets inside your living room, panic can set in. Whether it’s due to a sudden storm or the consequences of long-term wear and tear, a damaged roof can spell disaster for homeowners. Quick action is crucial to minimize water damage to your property, and that's where a roofing tarp comes in handy. This guide will walk you through effectively using an emergency roof tarp as a temporary roof cover to protect your home from leaks.
Several factors can lead to a leaking roof. Here’s a quick overview of some common causes:
| Cause | Description |
| Damaged Shingles | Missing or cracked shingles that expose the underlayment. |
| Flashing Issues | Improperly sealed or damaged flashing around chimneys and vents. |
| Weather Conditions | Heavy rainfall, snow, ice dams, and wind can exacerbate existing issues. |
Being proactive in identifying the signs of leaks is essential. Look for these indicators:
Before you grab that emergency roof tarp, remember that your safety is paramount. Consider these essential safety tips:
Tarping your roof requires several tools and materials. Here’s a list to ensure you have everything you need:
First, locate the source of the leak. Take your time to inspect both the interior stains and the exterior roof for any visible damage.
To effectively cover the damaged area, you need the right size tarp. Measure the affected area using the following tips:
When accessing your roof, remember:
| Safety Protocol | Description |
| Ladder Placement | Ensure it is on stable ground. |
| Spotter | Have someone assist you. |
| Steady Movement | Move slowly to maintain balance. |
Lay the tarp over the leak, ensuring it covers the affected area. Here’s how to secure it properly:
To prevent your temporary roof cover from blowing away, follow these tips:
Using a roofing tarp provides immediate relief from leaks but is not a long-term solution. Monitor the condition of the tarp regularly to ensure it continues to hold up.
While tarping can save your home from immediate damage, consider planning for a permanent repair:
Consider integrating these seasonal tasks into your home maintenance schedule:
| Task | Frequency |
| Roof Inspection | At least twice a year |
| Gutter Cleaning | At least twice a year |
| Debris Removal | After storms or strong winds |
If your roof requires replacement or serious repairs, think about the benefits of using high-quality roofing materials. Investing in durability can save you from future headaches.
It is essential to place a tarp on your roof as soon as the bad weather has cleared, ensuring protection against potential follow-up storms. Leaving a tarp in place for extended periods isn’t advisable, so it's crucial to seek repairs as soon as possible. If you're in need of urgent assistance with emergency roof repairs or require help in placing a tarp, reach out to IBEX Roof. Our team of expert roofers is here to provide you with immediate support and guidance in addressing your roofing needs efficiently and effectively.
When it comes to preserving the integrity of your home, don’t hesitate—act quickly to avoid potential issues down the line!
In the world of real estate, the question of what adds value to a home is pivotal for homeowners aiming to make sound investments. Whether you're planning to sell or simply want to enhance your living space, understanding which improvements yield the highest returns is crucial. At IBEX Roof, we recognize the significant role of strategic enhancements, particularly with quality residential roofing, in elevating your property's value.
Home value is more than just a figure; it's a reflection of your property's potential to attract buyers and increase equity. Several factors play into home valuation, including location, current market trends, and the quality of improvements made. Strategic enhancements can lead to increased comfort, improved aesthetic appeal, and a substantial rise in property value.
Among the best home improvements, upgrading your roofing stands as a top contender. A solid roof is not only vital for structural integrity but also boosts curb appeal significantly. Here's why roofing is a quintessential improvement:
Selecting the appropriate roofing material is crucial for maximizing ROI. Below is a comparative table of popular materials and their potential impact on home value:
| Material | Durability | Aesthetic Appeal | Cost Efficiency | Value Addition |
| Asphalt Shingles | High | Moderate | High | Moderate |
| Metal | Very High | High | Moderate | High |
| Slate | Extremely High | High | Low | Very High |
Each material offers distinct advantages, so consulting with residential roofers like IBEX Roof can help tailor decisions to your home's needs.
Kitchens and bathrooms often make or break a deal. Their functionality and style are paramount in adding value. Here's how you can maximize ROI with these remodels:
Eco-friendly improvements are not just trends; they are long-term investments that dramatically impact value. Buyers increasingly seek sustainable homes, making such enhancements wise.
These improvements add significant value through reduced energy bills and potential tax incentives, meeting the growing demand for sustainable homes.
Curb appeal is your home's first impression, and as they say, first impressions last. Enhancing curb appeal is one of the most effective home improvements.
Don't forget the role of a stunning roof. At IBEX Roof, we specialize in quality roofing that complements the aesthetic of your home while ensuring high value.
Post-pandemic, outdoor spaces have become coveted extensions of indoor living. Creating functional outdoor areas adds to your home's appeal and value immensely.
From essential updates in roofing with the expert touch of IBEX Roof to strategic kitchen and bathroom remodels, knowing what adds value to a home can guide you in making the best choices. Remember, strategic renovations not only enhance your living experience but also ensure significant returns.
For personalized consultation, reach out to IBEX Roof, your reliable residential roofers, at 360-529-4707. Our team is committed to delivering excellence in all your residential roofing needs, ensuring your home improvement projects are successful investments.
Facing roofing issues when it rains is a common concern. As you wonder whether to call in professionals, the question arises: do roofers work in the rain? Let's explore this topic and unravel the intricacies of rain roof work.
If you discover that your roof is leaking, especially when there’s rain in the forecast, it’s crucial to act quickly. Roofers may assess the situation and recommend a roof replacement or install a new roof. Depending on the type of roofing material, like shingle roofing or metal roofing, the roofing project could vary significantly.
When it starts to rain, the risks of water damage to your home’s interiors increase. Roofing companies often offer roofing services to help mitigate this damage. In some cases, roofers install a roof even in adverse conditions, although they can’t guarantee a roofing job will be perfect if it’s raining.
Roofing in the rain involves significant challenges that impact both safety and the quality of roof installation.
Rain creates slick surfaces, increasing the risk of slips and falls.
Completing major tasks, like tearing off an old roof, becomes challenging under rainy conditions:
Water infiltration may cause long-term structural issues such as:
Misunderstandings persist about rain roof work. Here’s what you should know:
Despite challenges, certain tasks can proceed cautiously:
Shingles can be repaired or installed because:
Protecting exposed sections with tarps allows work to pause until conditions improve.
In urgent situations, minor repairs might continue despite light rain.
Rain can reveal vulnerabilities useful for thorough roof inspections to prevent leaks.
Flashings are crucial for water protection and can be managed in light rain.
Drizzling conditions highlight clogged gutters, allowing for effective cleaning.
For homeowners in Portland, dealing with unpredictable weather is a familiar challenge. Roofing contractors in Portland, like IBEX Roof, are ready to provide expert advice and efficient solutions. When you need reliable assistance, whether rain or shine, we're just a call away.
For quality roofing in the rain and beyond, contact IBEX Roof at 360-529-4707 to schedule your consultation. Let's ensure your home remains safe and protected through every season.
By understanding the nuances of rain roof work, homeowners can make informed decisions that prioritize both safety and quality, safeguarding their most valuable asset— their home.
