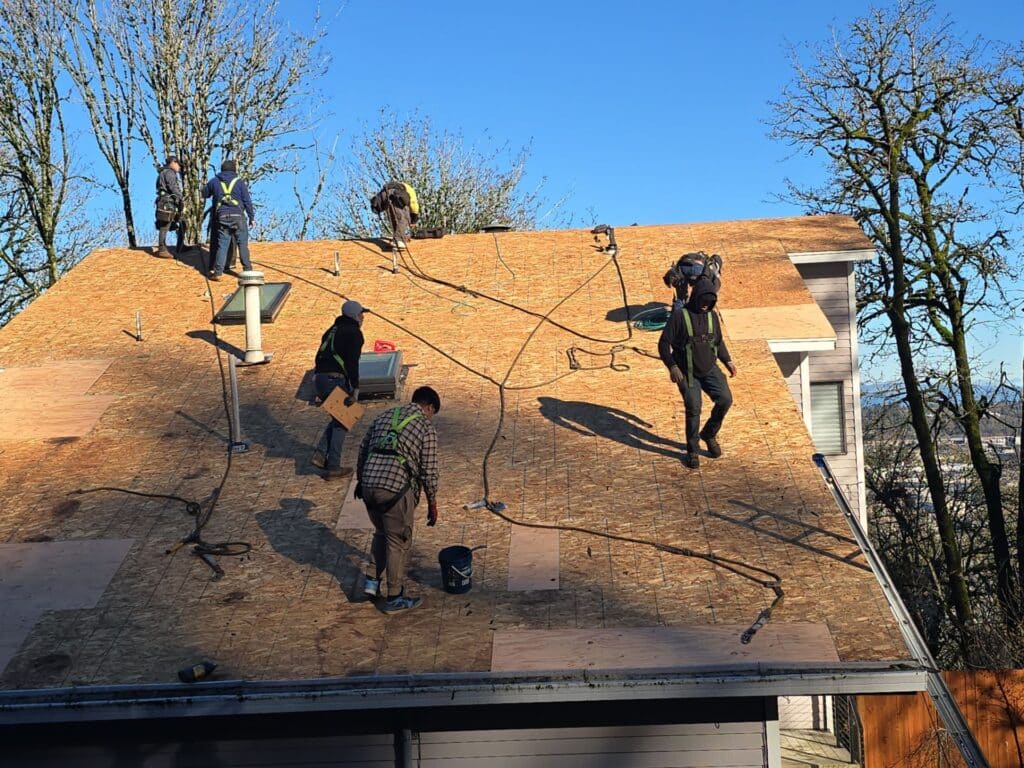
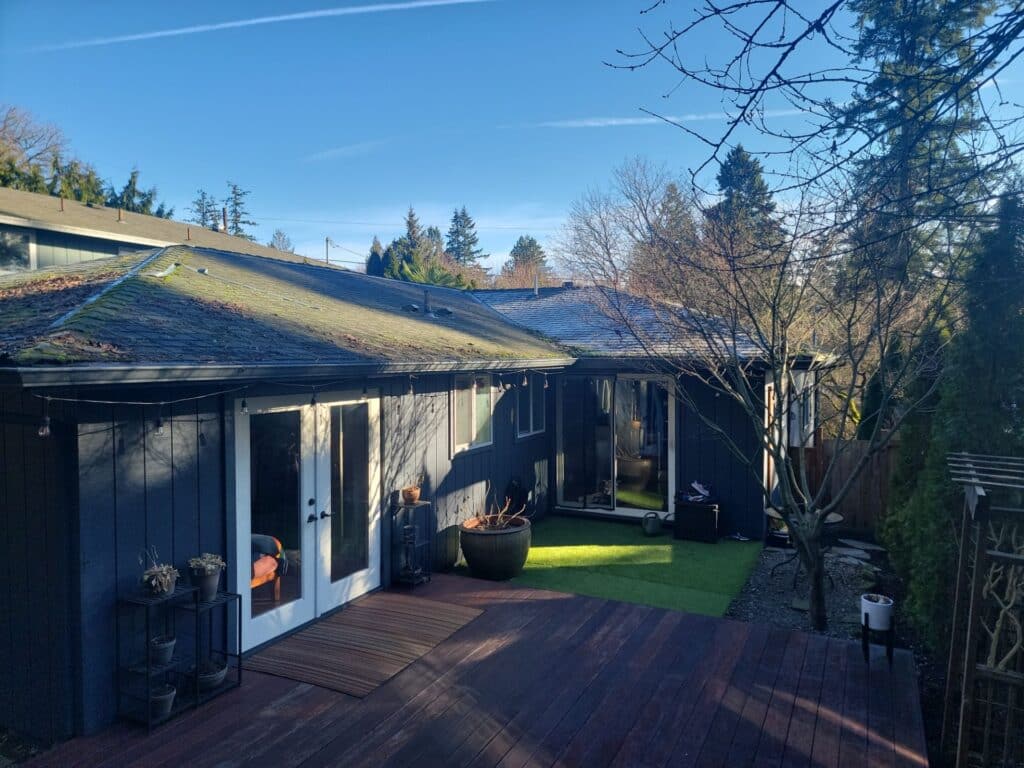
Are you staring up at missing shingles after a rainy season, wondering if it’s time to finally tackle that old roof? Or maybe you’re gearing up to list your home and worried a worn-out roof could scare buyers away. If “roof replacement” or “replacing a roof in Washington” has been on your mind, you’re not alone.
Maybe your attic has started feeling stuffy because insulation and ventilation aren’t doing their job. Or you’ve noticed leaks after storms and realize that “replacing an old or damaged roof” might be the key to protecting your investment. Choosing to install a “new roof” isn’t just about fixing shingles it’s about long-term value, energy efficiency, and peace of mind in the rainy Pacific Northwest.
In this post, we’ll walk through how a roof replacement can impact your home’s value, what materials and upgrades (like insulation and ventilation) make the most sense in Washington, and when it makes sense to repair versus replace. Let’s talk about what really matters for your home and your wallet.
Your roof does more than shield your home from Washington’s steady rain and seasonal winds it plays a big role in how your home holds up over time. When a roof is in poor condition, it’s not just about leaks or missing shingles. It can lead to moisture issues, poor insulation, ventilation problems, and even higher utility costs.
In fact, appraisers and inspectors often flag worn roofs not because they look bad, but because they raise questions about what else might be going wrong underneath. A roof that’s nearing the end of its lifespan can impact energy efficiency, comfort, and even your homeowner’s insurance rates.
Maintaining a roof in good condition gives you more than just protection it helps keep your home operating smoothly and efficiently year-round. If your current roof is showing signs of age, staying ahead of it could save you from more expensive repairs down the line.
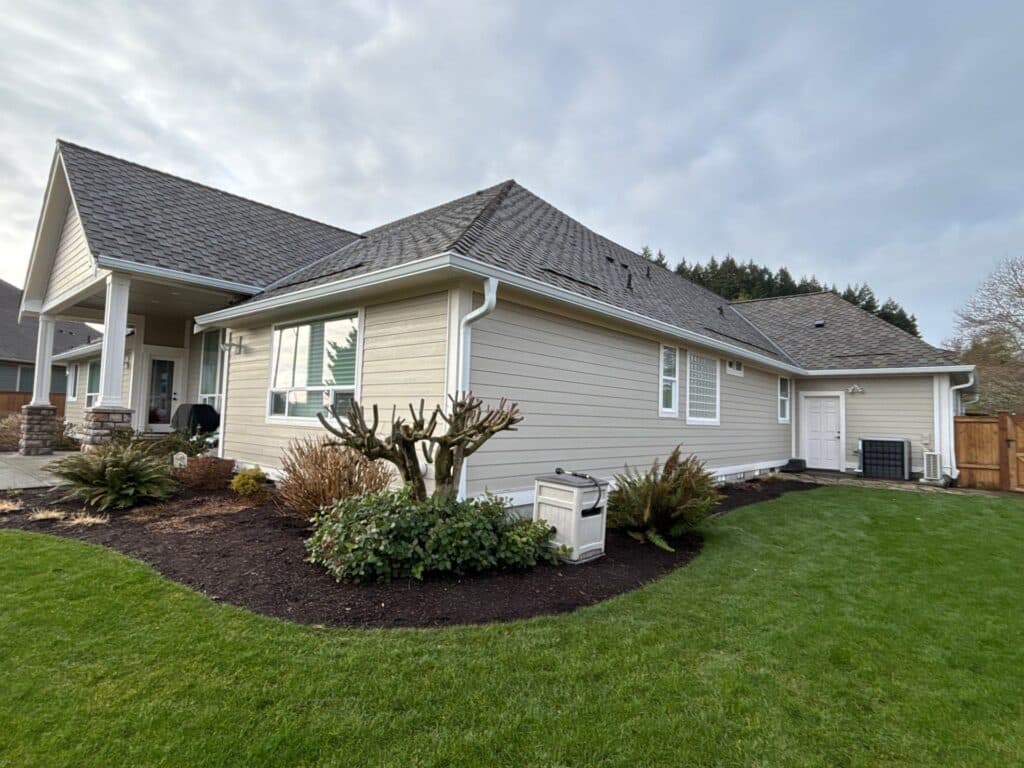
If you're thinking about selling your home, a new roof can help it stand out. Most buyers today won’t even tour a home if the roof looks worn out in online photos. And once they do visit, they’re looking at the roof first especially in Washington where weather damage is common.
A new roof increases curb appeal and reduces buyer hesitation. It also helps during negotiations. Instead of credits for repairs or price reductions, you hold firm on value. That’s why a new roof is a good investment especially when buyers want homes in move-in ready condition.
In the 2024 Cost vs. Value Report, homeowners recovered around 61.1% of the cost of a new asphalt shingle roof during resale. For metal roofs, the ROI jumped to about 65.9%, thanks to longer lifespan and better performance in weather-prone areas.
| Roofing Material | Avg. Cost | Avg. ROI on Sale |
|---|---|---|
| Asphalt Shingles | $10,000–$18,000 | ~61.1% |
| Metal Roof | $20,000–$44,000 | ~65.9% |
When you replace your roof before selling, you give buyers a reason to feel confident and that confidence can lead to stronger offers and faster closings.
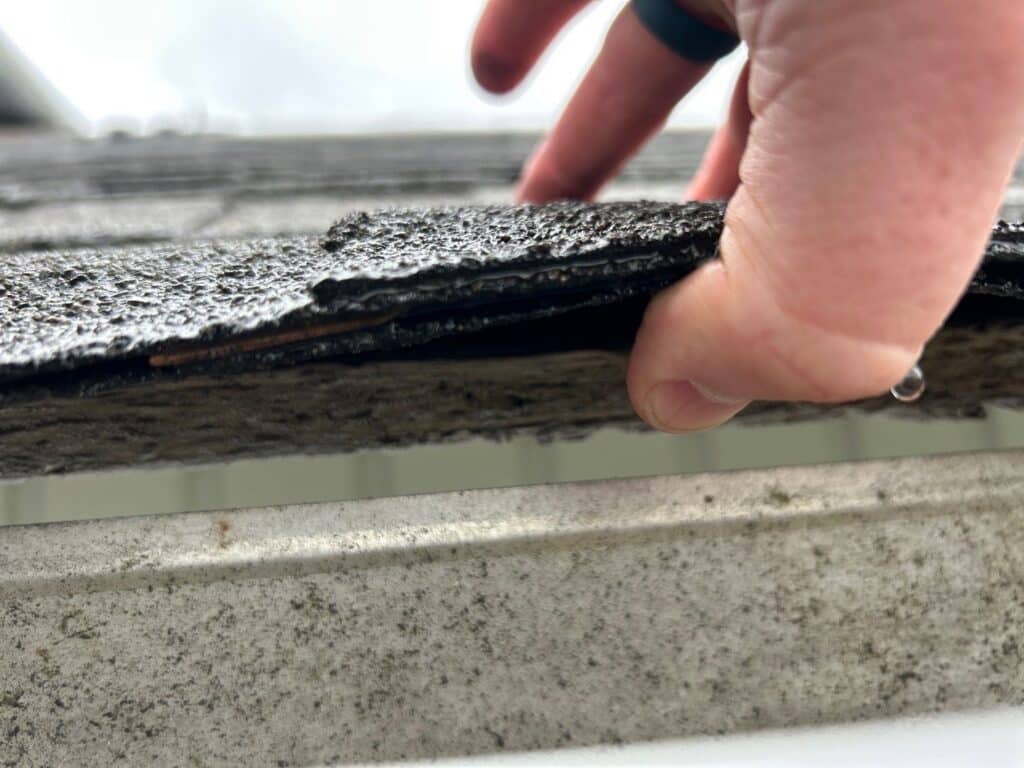
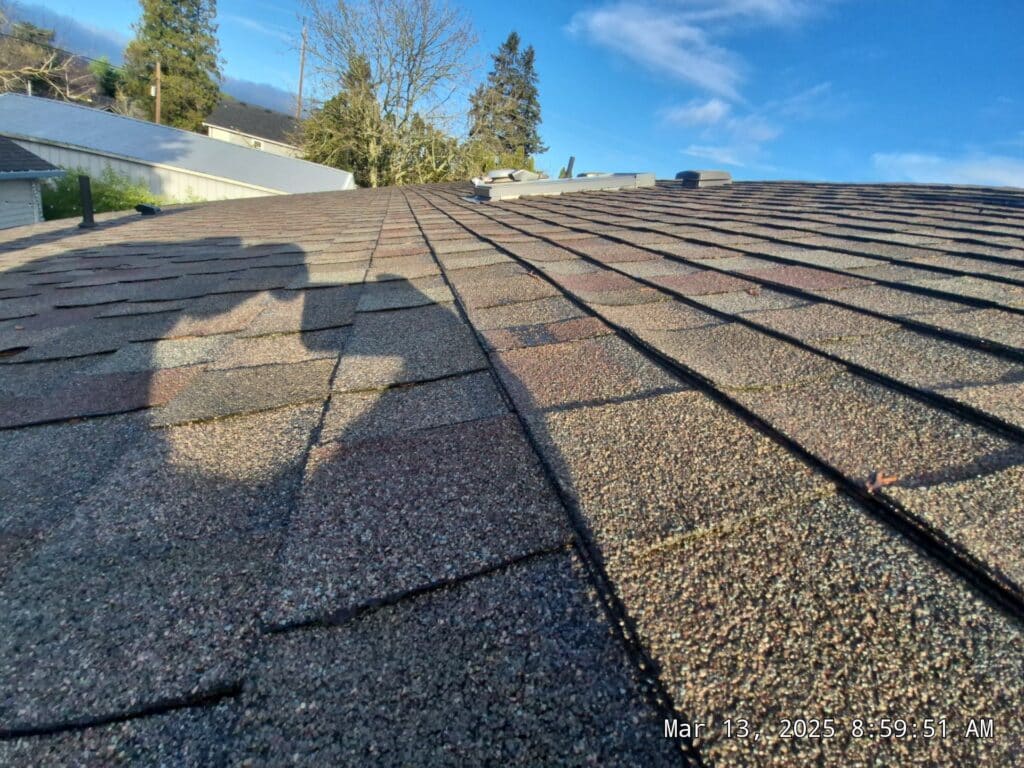
If your roof is leaking in just one area or a few shingles have come loose, a repair might be all you need. But if the roof is more than 15–20 years old, showing signs of sagging, or has layers of old repairs, it might be time to consider a full replacement.
Many homeowners find that short-term fixes only go so far. Over time, repair costs can add up and they don’t always address underlying issues like poor ventilation or insulation. A new roof not only corrects structural problems but can also improve energy efficiency, reduce long-term maintenance, and help protect the value of your home.
Ask yourself: is the current roof just a little worn, or is it affecting the overall condition and comfort of your home? If it’s the latter, replacing the roof could be the smarter investment.
When it comes to roof replacement, timing matters. You don’t want to replace it too early and lose resale momentum or too late and risk a failed inspection. Doing it right before listing your home can help you get the best return on your investment.
Here’s why the timing works:
Timing tip:
In Washington, the market tends to heat up in spring and early summer. That’s when buyers are most active and contractors are busiest. Schedule your new roof installation just ahead of that window to maximize visibility and value.
The cost to replace your roof in Washington depends on the roofing material, your home’s size, and whether your roof needs structural fixes. Here's what most homeowners spend in 2025:
| Roofing Type | Avg. Cost Range | Notes |
|---|---|---|
| Asphalt Shingles | $10,000–$18,000 | Most common and affordable option |
| Metal Roofing | $20,000–$30,000 | Durable, energy-efficient choice |
| Tile or Slate Roofing | $30,000+ | Premium aesthetic, high-end homes |
A full roof replacement is a major home improvement, but it’s often well worth the investment. Homeowners typically recover 60–70% of the cost through resale value and even more when factoring in shorter time on market and reduced buyer concerns.
If you’re considering replacing your roof, get a few local quotes to understand your specific costs. And remember, it’s not just about shingles it’s about insulation, ventilation, energy savings, and protecting the long-term value of your home.
It’s true, replacing your roof can lead to lower insurance premiums, especially if the new materials meet modern safety and efficiency standards. Insurers tend to offer better rates when a roof reduces the risk of fire, wind, or water damage.
In Washington, some insurance providers offer discounts if you choose roofing materials that are rated for high-impact resistance or are ENERGY STAR-certified. These types of roofs are built to better handle the Pacific Northwest's wet seasons, and they tend to reduce long-term wear and tear.
Plus, if your current roof is in poor condition or nearing the end of its lifespan, replacing it can remove potential red flags during a roof inspection that insurers may use to justify higher premiums.
Source: Insurance Institute for Business & Home Safety, ENERGY STAR Roofing Guidelines
You don’t need to be selling your house to benefit from a roof upgrade. If you’re a Washington homeowner with a roof that’s showing its age, or you’ve had to repair it more than once in recent years, a full roof replacement might not just be smart it might be necessary.
A new roof isn’t just about looks or fixing a leak. It’s about protecting your home, boosting energy efficiency through better insulation and ventilation, and reducing the chances of big-ticket repairs later. It’s a home improvement project that delivers peace of mind and a clear return on investment.
At IBEX Roof, we help Washington homeowners understand whether they need a repair or replacement never upselling what you don’t need. If your roof is in poor condition, we’ll walk you through your options, materials, and installation timeline, always with transparency and care.
Want to learn why a new roof may be worth the investment for your home?
Contact IBEX Roof today to schedule a roof inspection and talk with a local expert.
Ever noticed a small stain on the ceiling and wondered if it’s just a spill upstairs or something much worse? If you’ve got a leaking roof, the signs usually show up quietly: a faint water spot, a musty smell, maybe even a patch of mold on your ceiling. And before you know it, that small issue can turn into a much bigger repair.
Finding a roof leak early is key, especially if you live in places like Vancouver, WA, where rainy seasons can test even the best roofs. Whether it’s damaged or curled shingles, clogged gutters, or aging materials, understanding what to look for can save you time, stress, and money on a major roof repair later. This post will walk you through how to inspect, detect, and address leaks before they get worse.
Roof leaks rarely happen out of nowhere. Most of the time, they build up quietly over time until you suddenly spot water damage in your home. For homeowners, knowing what typically leads to a leak can help you catch it before it spreads.
Understanding what causes these issues makes it easier to inspect and prevent them before they turn into a full leaking roof repair.
Sometimes, the signs of a roof leak are obvious a puddle on the floor or a steady drip during a storm. But in most cases, they’re more subtle and easy to ignore until the damage spreads.
Catching these clues early helps you avoid more costly repairs and keeps your attic and insulation dry and mold-free.
Before climbing on the roof, start where the leak leaves its first clues inside your attic. This is often the easiest way to find a roof leak without needing a ladder or risking a fall.
Finding these signs early means you can act fast, fix a roof leak before it spreads, and call a professional roofer if needed.
Understanding where leaks typically begin can help you take quicker action. These problem spots are often small, easy to miss, and quietly allow water into your home until the damage becomes obvious.
Knowing where to look helps you find the source quickly and decide if it's something you can monitor or if it's time to call a professional roofer.
When trying to find a leak in the roof, sometimes you’ll get your best clues by simply stepping outside and looking up. A quick visual check done safely from the ground or with a ladder can help you spot the telltale signs.
These are the kinds of issues that don’t necessarily scream “leak” at first glance, but with time, they’re often the root cause of major repairs.
Sometimes the signs of a leak are all there, but no matter how hard you look, you can’t find the exact location. That’s where this simple, low-tech water spray test can make all the difference.
It’s a smart way to find a roof leak before it causes more serious water damage inside the house.
Some leaks are obvious. Others hide inside walls or quietly drip onto insulation before you ever notice a ceiling leak. That’s when finding the exact location of the leak takes a little more effort.
Start with a flashlight and trace along the rafters and roof sheathing in your attic. You’ll find that water often runs along beams before it drops so where you see a wet spot isn’t always where the leak starts.
Next, look for water stains or discoloration along joists or behind a light fixture. These are signs of water damage that may have built up slowly over time. If you still can't locate the source, a moisture meter or even an infrared camera can help detect areas behind the ceiling where dampness hides. One homeowner used this approach and discovered that a leak near the soffit was caused by a split in the flashing around a roof vent something they’d never have seen from the outside.
The goal is to catch it before it causes mold growth and damage inside the house.
When you're dealing with a leaky roof repair and the rain’s still falling, the priority is damage control. These quick fixes can give you a bit of breathing room while you plan a more permanent repair.
Place a bucket or tarp under the drip to catch water and protect flooring. If you can safely access the attic, press roofing tape over visible cracks or holes on the underside of the roof to slow the leak.
For areas where shingles are missing or flashing is damaged, cover the top of the roof with a waterproof tarp. Just be sure to anchor it tightly to prevent further issues. These steps won’t stop the problem, but they help minimize water damage until a roofing professional can inspect the roof and fix the leak properly.
Prevention can save you from the stress of unexpected repairs and the cost of a full roof replacement. Taking a few seasonal steps keeps your roof in better shape, especially during heavy rain or snow.
Clean your gutters at least twice a year to avoid backup. Clogged gutters can send water over the edge and under shingles near the roofline, which often leads to stains and leaks inside the house.
Trimming branches above your roof keeps leaves and debris from building up in valleys and slowing drainage. It also protects your roof from damage during windstorms.
Schedule a roof inspection with a professional roofer once a year. They’ll check for cracked flashing, exposed nail holes, and other small problems that you might miss.
And if your flashing is rusted or your plumbing vent boots are worn out, don’t wait. Replacing them before the rain hits could save your ceiling and insulation from soaking damage.
Some things are better left to the pros especially when safety or long-term repairs are involved. If you’ve walked through all the signs and still can’t locate the source, it’s time to get help.
When your roof may have widespread damage, missing or damaged shingles, or signs of sagging, a roofing professional can do a full inspection and pinpoint problems on top of the roof that aren’t visible from below.
Also, if your attic smells musty or shows mold near rafters and roof sheathing, a roofer can help determine whether the issue comes from a ventilation problem or water seeping through flashing or nail holes.
Companies like IBEX Roof, a trusted roofing company in Vancouver, WA, offer local homeowners expert inspections and repairs. On average, leaky roof repair costs range from $800 to $1,500 depending on the size and scope so acting fast can save you from bigger bills and worse damage down the line.
Ever stared up at your roof wondering if that leak, missing shingle, or sagging spot means you’re in for a major expense or just a quick repair?
If you’re like most Portland homeowners, figuring out how much a new roof might cost or even what a roofing quote includes can be confusing if you haven’t gone through it before. Whether you're considering a roof replacement estimate, looking into roof repair estimates, or just curious if it's time to get free roof estimates, knowing what to expect makes the process a whole lot easier.
In this post, we’ll walk through how roofers in Portland actually put together roofing quotes, what’s included, what affects the price, and how to compare estimates with confidence so you can make smart decisions for your home and your budget.
Think of a roofing estimate as your personal roadmap to planning your roofing project. It's not just a number it’s a breakdown of what your roof needs, what the job involves, and how much it will likely cost based on your roof size, materials, and scope of work.
For Portland homeowners, getting free roofing estimates is one of the smartest first steps you can take. It gives you a clearer picture of what to expect and helps you compare roofing contractors before you commit to anything. Whether you're trying to understand the roof replacement cost, or you're just curious about fixing a leak, the right estimate helps you stay in control of both the budget and the process.
Before you sign a contract or even think about scheduling your project, you should know exactly what the estimate includes. A clear quote doesn’t just protect your wallet it helps you plan, avoid surprises, and feel confident you’re getting fair value from a reputable roofing contractor in Portland.
Here are some of the most common parts of a roofing estimate, and why they matter:
After reviewing these details, you should have a strong sense of what your quote includes, what your money is going toward, and what questions to ask next.
Getting a quote starts with an inspection and this part can make or break the accuracy of your estimate. The best Portland roofers will walk your property, get on the roof when safe, and take time to look closely at both the obvious and not-so-obvious issues.
Here’s what typically happens during the inspection:
Whether you’re replacing a few shingles or getting a full roof replacement, this part of the process helps ensure your quote is built around your home not a generic average.
Roofing quotes aren't one-size-fits-all. The roof estimate cost in Portland can vary depending on several things that aren't always obvious at first. If you're comparing bids, keep these in mind:
A bigger roof takes more materials and more time. Steeper roofs also require more safety setup and labor. For example, a single-story ranch in West Linn will usually cost less to re-roof than a multi-level home in Oregon City with sharp angles.
Choosing between asphalt shingles, metal, or cedar shakes changes both the look and the cost of a new roof. Architectural shingles are common in Portland for their balance of durability and price, but metal roofs can be a smart long-term choice—even if the upfront cost is higher.
If your house has multiple layers of old shingles, removing them adds both time and cost. Some homes in older Portland neighborhoods have two or even three layers built up over time.
Poor airflow or hidden damage under old shingles can lead to higher costs once the tear-off begins. A reputable roofing contractor should flag these things during inspection, so you’re not surprised later.
Rain, moss buildup, and local permit rules all play a role. Homes in the Pacific Northwest often need moisture-resistant materials, and permits can add to your timeline or final cost.
Getting an accurate estimate means understanding how these details affect your specific home, not just comparing numbers from a calculator to get a price. That’s why it helps to get multiple quotes from reputable roofing contractors who know local conditions.
There’s no single answer to how much a new roof costs in Portland because every home is different but most residential and commercial roofs fall into a typical range depending on material and scope.
In 2025, the average cost for a standard asphalt shingle roof in Portland falls between $9,000 and $16,000. If you’re looking at architectural shingles, expect a slightly higher price for better durability and appearance. Metal roofs can range from $18,000 to $30,000 depending on complexity, and tile or cedar shake options may be even more.
Of course, factors like roof size, pitch, and the materials and labor involved can shift that number. A smaller roof in Oregon City might cost less, while a steep roof with complex features in inner Portland might push the estimate higher.
Some contractors offer financing options, and insurance might cover certain repairs or replacements, especially if damage was caused by storms. Always ask what’s available when you request a free estimate.
Every roof is unique. The best way to understand your new roof cost is to get a tailored quote based on your home's exact needs.
When you start comparing roofing quotes, the cheapest number isn't always the best deal. In fact, a low price can be a red flag if it means the contractor is cutting corners or leaving out key details.
Here’s what to watch for:
If an estimate seems vague or just lists one lump-sum number, that’s a sign to dig deeper. Good estimates should break down materials, labor, warranties, and cleanup so you know exactly what you're paying for.
If one quote is way lower than the others, ask why. Are they using cheaper roofing material? Are permits or disposal fees missing? Do they offer a workmanship warranty?
Before you sign off, ask these smart questions:
The goal isn’t to find the cheapest bid it’s to find the best roofing contractor who’s honest, clear, and experienced with Portland homes. When you compare roofing estimates the right way, you protect your home and your budget.
Roofing calculators can be helpful if you're just starting to plan your budget and want a rough idea of what to expect. If you’ve never replaced a roof before, plugging in your roof size, material type, and location into an online tool can give you a ballpark number based on average roof costs in your area.
That said, calculators don’t climb ladders. They can’t see water damage, ventilation issues, or signs your roof deck needs attention. What they miss can impact your final cost which is why you shouldn’t use them as a replacement for a professional inspection.
If you live in Oregon City, West Linn, or anywhere around the metro area, you’ll find a few helpful local tools to get started. Try the IBEX Roof cost calculator for general planning, or check out sites from Portland roofers who provide free estimates to compare ranges.
Still unsure? Talk to a local roofing pro. A real quote based on your home is always better than guessing.
Most roofing quotes are valid for 30 to 90 days, but it depends on the materials and the contractor you choose. Prices can shift based on demand or supplier costs.
Yes, but focus on value, not just price. Some contractors may adjust for materials or timeline if you're upfront about your budget.
In most cases, yes, but always ask. A good roofing contractor should know the local rules and include any required permits in the total.
Look beyond the total price. Review how materials, warranties, and labor are listed. Are both estimates based on the same scope? One may include cleanup or repairs the other doesn’t.
It happens. If your roofer discovers problems under the shingles or in the roof deck, they’ll usually pause work to show you the issue and update the estimate. The key is clear communication and transparency.
There’s no reason to guess what it might cost to replace your roof when Portland roofing contractors are ready to take a look and give you a clear answer for free.
Getting free roof estimates means you can compare the cost factors, scope, and materials before making any decisions. It’s a risk-free way to see if a contractor understands your goals, your timeline, and your budget.
Whether you're fixing a few shingles or planning a full roof replacement, start with a conversation. Local companies like IBEX Roof and other reputable roofing pros in Portland can help you find the right solution without pressure.
Ready to learn what your project might cost? Reach out today and get your quote from experienced, local pros who know how Oregon roofs work.
You’re staring at water stains on your ceiling, shingles scattered in the yard, or maybe a roofer just told you the damage is worse than it looks. Now you're wondering: Will my homeowner’s insurance cover this and will they actually replace my roof, or just patch it up?
It's a question every homeowner faces at some point, especially with the unpredictable weather we get here in Vancouver, WA. And the answer? It depends on a mix of your policy details, the type of damage, and how it’s reported.
Whether you're just starting the claim process or deciding if it's even worth calling your insurer, this guide will walk you through what to expect. We’ll break down when insurance covers repairs versus a full replacement, how your deductible comes into play, and why choosing a knowledgeable roofing contractor in Vancouver WA can make all the difference.
When you pay into homeowner’s insurance, part of that coverage goes toward protecting the structure of your home, this includes the roof. This part of your policy is called dwelling coverage. It usually kicks in if your roof is damaged by things like high winds, heavy rain, hail, or a fallen tree after a storm. But it won’t help if your roof is just old or if you’ve put off maintenance for too long.
For example, if a windstorm blows off part of your roof, your insurance might step in. But if your shingles are curling from years of sun exposure, they’ll likely say that’s on you.
Whether your insurance will replace your roof or just cover a patch job comes down to a few key things. The biggest one? How bad the damage is. If it’s isolated to one area, your insurer might only approve repairs. But if the damage affects the overall function or structure, that’s when a full replacement becomes more likely.
The age of your roof also matters. If it’s newer and well-maintained, you’re more likely to get full coverage. But if it’s near the end of its life, your insurer may reduce the payout or deny it altogether.
When you file a roof insurance claim, how much money you get depends on whether your policy pays based on Actual Cash Value (ACV) or Replacement Cost Value (RCV).
With ACV, your payout is reduced for age and wear. So even if your roof costs $15,000 to replace, you might only get $6,000 if it’s 15 years old. That’s tough if you were hoping insurance would fully cover the work to repair or replace your roof.
RCV policies are more generous; they cover the full cost to replace your roof at today's prices, minus your deductible. But keep in mind, more and more insurers are moving toward ACV for older roofs, especially here in the Northwest where weather can wear shingles down faster.
Say your roof was damaged in a storm and your policy only offers ACV. You might have to come up with the rest on your own, even if you were just trying to repair your roof, not fully replace it.
Insurance adjusters look closely at the damage and decide whether a partial repair will do the job or if your roof needs to be completely replaced. If only a few shingles blew off, they’ll likely lean toward a roof repair. But if the damage affects larger areas or compromises the entire system like leaking into the attic they may approve a full roof replacement.
We’ve had homeowners work with a roofing company in Vancouver WA after a windstorm, only to find the insurer suggested fixing a patch. Once the contractor showed how the water had spread underneath the shingles, the insurance company agreed to cover the full replacement.
Most homeowners insurance policies cover damage caused by things out of your control such as strong winds, hail, falling branches, fire, or even weight from snow. These are considered “covered perils.”
But damage from everyday wear, poor upkeep, or age? That usually won’t be covered. If your shingles are curling, or you’ve had small leaks ignored for years, the insurer may deny your claim.
The clearer you are on what’s included, the better prepared you’ll be if you ever need to make a claim.
This is where a lot of homeowners get stuck. Filing a claim might help cover the cost of roof repairs or even a full replacement, but it’s not always the best move long-term. You’ll want to think about your deductible, how much of the repair the insurance will actually pay, and whether it could raise your future premiums.
Say you’ve got a $2,000 deductible and the damage quote is $3,500 your insurer’s only going to chip in $1,500. That might not be worth the claim, especially if you’ve already had one or two in recent years.
Talking to a local roofing company before calling your insurer can help you weigh your options based on your roof’s actual condition.
This happens more than you’d think. Insurance companies often use their own software or adjusters who may not be familiar with current local costs or your roof’s specific needs. That’s why the quote from your roofing contractor may be higher; they're basing it on actual material and labor costs in Vancouver WA.
If there’s a gap, don’t panic. A good contractor will help you document the difference and explain it to the insurer. Some even work directly with adjusters to make sure the scope of work is accurate and fair. It’s not about padding the numbers, it's about making sure your roof is repaired or replaced properly the first time.
Insurance adjusters look closely at the damage and decide whether a partial repair will do the job or if your roof needs to be completely replaced. If only a few shingles blew off, they’ll likely lean toward a roof repair. But if the damage affects larger areas or compromises the entire system like leaking into the attic they may approve a full roof replacement.
We’ve had homeowners work with a roofing company in Vancouver WA after a windstorm, only to find the insurer suggested fixing a patch. Once the contractor showed how the water had spread underneath the shingles, the insurance company agreed to cover the full replacement.
Most homeowners insurance policies cover damage caused by things out of your control strong winds, hail, falling branches, fire, or even weight from snow. These are considered “covered perils.”
But damage from everyday wear, poor upkeep, or age? That usually won’t be covered. If your shingles are curling, or you’ve had small leaks ignored for years, the insurer may deny your claim.
The clearer you are on what’s included, the better prepared you’ll be if you ever need to make a claim.
This is where a lot of homeowners get stuck. Filing a claim might help cover the cost of roof repairs or even a full replacement, but it’s not always the best move long-term. You’ll want to think about your deductible, how much of the repair the insurance will actually pay, and whether it could raise your future premiums.
Say you’ve got a $2,000 deductible and the damage quote is $3,500 your insurer’s only going to chip in $1,500. That might not be worth the claim, especially if you’ve already had one or two in recent years.
Talking to a local roofing company before calling your insurer can help you weigh your options based on your roof’s actual condition.
This happens more than you’d think. Insurance companies often use their own software or adjusters who may not be familiar with current local costs or your roof’s specific needs. That’s why the quote from your roofing contractor may be higher; they're basing it on actual material and labor costs in Vancouver WA.
If there’s a gap, don’t panic. A good contractor will help you document the difference and explain it to the insurer. Some even work directly with adjusters to make sure the scope of work is accurate and fair. It’s not about padding the number, it's about making sure your roof is repaired or replaced properly the first time.
It depends on what caused the leak. If a storm blew off shingles and water got in, your policy likely covers it. But if the leak came from old age or a roof that wasn’t maintained, insurance usually won’t help. We’ve seen both cases where one homeowner had a leak after a windstorm and got it fully covered. Another waited too long and was left footing the bill.
It might. Some insurers raise premiums after a claim, especially if you’ve filed before. It’s not automatic, though, and it often depends on the cause of damage. If it’s weather-related and your area saw a lot of claims, the rate hike could happen whether you filed or not. It’s worth weighing the repair cost against the risk of a higher rate.
Yes and it could actually save you money. A newer roof means less risk for the insurance company, and some offer discounts for upgraded materials or proper installation. Just be sure the work was done by a licensed contractor and you’ve got documentation to back it up.
Absolutely. While some insurance companies suggest preferred vendors, you’re not required to use them. Choosing a local roofing company you trust means you’re getting someone who knows Vancouver WA codes and how to properly advocate for you during the claim process.
Roof damage is stressful enough without having to decode insurance fine print. That’s where working with an experienced local roofer makes all the difference. A contractor who knows how insurance claims work can help document the damage properly, meet with the adjuster if needed, and make sure the estimate covers what you really need, not just the bare minimum.
At IBEX Roof, we specialize in residential roof repair and roof replacement right here in Vancouver WA. We’ve helped homeowners get full coverage when they thought they were only approved for a patch job. Our team offers free, fast, and accurate estimates so you know exactly what to expect, no surprises.
Book a free inspection today and let’s make sure your roof is protected and your insurance claim works in your favor.
Have you ever noticed water spots on your ceiling after a heavy rain and thought, “Where on earth is that coming from?” If you're like many homeowners, you're probably wondering why your roof leaks in heavy rain, especially when it looks fine on sunny days.
The truth is, heavy rain has a way of revealing problems that stay hidden until it's too late. And let’s be honest no one wants to be caught scrambling for buckets in the middle of a storm. Whether it’s a small drip or a bigger issue soaking into your ceiling, these leaks don’t just go away. In fact, they can quietly lead to bigger problems and costly roof repair if left unchecked.
At IBEX Roof, we've helped countless homeowners track down the sneaky culprits behind roof leaks in heavy rain. With help from your trusted roofing company, you can catch the signs early, understand the real risks, and protect your home from further damage.
In this post, we’ll walk you through exactly why your roof might be leaking when it rains, the risks of ignoring the warning signs, and simple steps you can take today to keep your home safe and dry.
Roof leaks in heavy rain aren’t always from something obvious, and that’s what makes them so frustrating. According to recent reports, nearly 40% of building damage is tied to water problems, many of which start with small leaks during heavy rainfall. The main reasons are often simple, but the damage can sneak up on you if not addressed early.
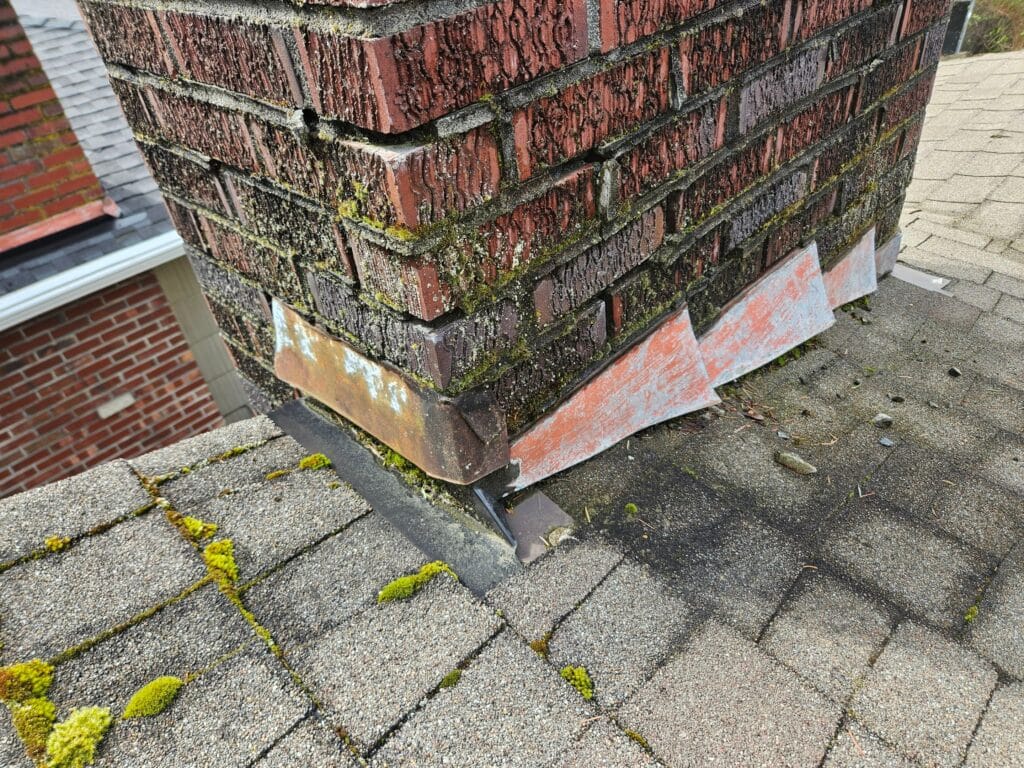
When it’s raining heavily, your chimney can be one of the first places water finds a way in. Over time, the flashing surrounding the chimney starts to wear down, or the mortar between bricks develops cracks from prolonged periods of rain and temperature shifts. Homeowners often see water dripping near their fireplace or small spots on the ceiling close to the chimney. A local roofing contractor can spot if the metal roof flashing surrounding the chimney has lost its seal, which is a common cause of leaks.
The flashing around your roof’s edges and features like valleys and joints works like armor, keeping water out. But if the flashing is improperly installed, rusted, or cracked, rainwater will slip right through. This is one of the common reasons a roof leaks during heavy rain. Imagine rain hitting your roof and following the nail or crack straight inside your home it’s a quiet issue that becomes a bigger headache fast.
Skylights brighten up your space, but they can also invite water in if they weren’t installed properly. A seal that’s worn out or gaps left during installation can easily lead to water leaking from the ceiling during rainfall. It’s not always obvious at first; sometimes, it starts as small spots on the ceiling that grow each time it rains. Many leaks caused by improperly installed roof skylights only show up during storms, which can leave homeowners caught off guard.
When gutters are packed with leaves and debris, water backs up instead of draining off the roof. During heavy rainfall, this overflow can push water under your shingles or into fascia boards, eventually showing up as dark streaks or wet patches on your ceiling. This is a classic cause of leaks that many homeowners miss until they see water damage inside their home.
Ridge vents are meant to let your attic breathe, but if they’re damaged or installed the wrong way, they can let rain in instead. During prolonged periods of rain, even a small crack in a ridge vent can allow water to slip through and drip down onto your ceiling. It’s a subtle issue that’s often overlooked until you need roof repairs for leaks you didn’t expect.
Even a roof replacement doesn’t guarantee you’re safe from leaks if the job wasn’t done right. Poor workmanship or defective materials can leave gaps, especially around areas like flashing or vent boots. Some homeowners are shocked to find their roof only leaks sometimes typically when heavy rainfall is driven by wind. This inconsistency can make it harder to trace the cause of leaks without a thorough inspection.
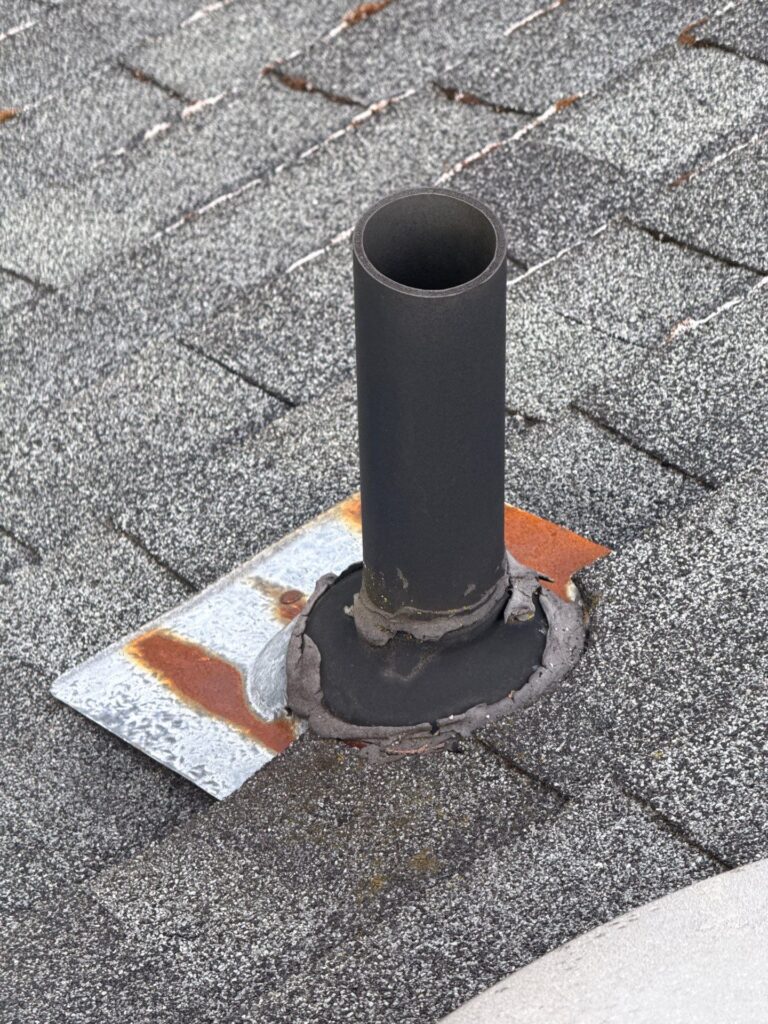
The rubber boots that seal the area around your vent pipes can dry out and crack over time, especially after long exposure to sun and weather. When heavy rain hits, water runs down the pipe and into your home, often soaking through the ceiling below. It’s one of the most common types of roof leaks because these boots rarely last as long as your roof itself.
Roof valleys handle a lot of water flow during storms. If leaves and sticks pile up, they trap water and create a mini dam. That standing water finds the path of least resistance, often slipping under shingles or seeping into small gaps. This is especially risky for flat roofs, where water doesn’t drain as quickly. Homeowners often see small water spots on the ceiling near these valleys, a sure sign that clogged roof valleys are causing leaks.
When you spot the signs early, you can save yourself from much bigger repairs later. Some clues are obvious, but others sneak up over time.
This one is hard to miss. If you notice water leaking from the ceiling during heavy rain, it’s a clear signal that water has found a way past your roof’s defenses. It could be coming from a small crack in your flashing, a nail pop, or even the integrity of the metal roof failing over time. No matter the cause, a roofing contractor should check it out right away before it gets worse.
Sometimes, the first warning signs aren’t drips but small, discolored spots on your ceiling or walls. These brown or yellow stains are often caused by prolonged water exposure from a slow leak during heavy rain. Left untreated, you might even notice a damp smell or visible mold growth. These clues mean your roof could be leaking even if you don’t see active drips yet, and they’re a strong signal that roof repairs are needed.
Let’s be honest, it’s easy to ignore a small spot on the ceiling or hope that water leak in the ceiling is just a one-time thing. But every time it rains, and water sneaks in, it’s doing quiet damage behind the scenes. On average, water damage claims in the US hit around $14,000 and much of that starts with a leak that could have been caught early.
When water starts coming into the interior of your home, it weakens important structures like wooden beams and insulation. Even a small amount of water can sit quietly, causing pooling water to back up the roof areas and soak into the materials that hold everything together.
It’s not just the structure at risk. Mold grows quickly in damp conditions, and what starts as water spots on the ceiling can turn into health concerns, especially for anyone sensitive to indoor air quality. The longer water can seep into your home, the higher the chances of needing costly remediation.
And here’s the thing roof repairs that could have been simple become full-blown replacements when ignored. Compromised flashing are cracks that widen over time, improperly driven roofing nails let water follow the nail inside your home, and clogged gutters stop water from flowing down properly and cause it to back up on the roof.
If the damage gets too far, it can even lower your property value or complicate insurance claims. No homeowner wants to hear that their insurance won't fully cover the repair because maintenance was delayed.
If you catch water leaking from the ceiling when it rains, your first move is to control the situation fast. Place buckets under active drips to catch water and prevent further damage to floors and furniture. You can also use plastic sheeting or sealing tape to help stop water from entering more areas, at least until the rain eases up.
One homeowner told us they noticed a spot on the ceiling during heavy or prolonged rain and thought it was minor. But that small leak soaked through attic insulation and caused water damage before they could act. Taking simple steps right away makes a huge difference.
Temporary fixes only go so far. The smartest move is to bring in a roofing contractor who can take care of the roof specifically and find the real cause of leaks. Whether it’s compromised flashing around the chimney, a chase top issue, or improperly driven roofing nails, a professional can spot the hidden problems and fix them properly.
Every time it rains, you want to know your roof is protecting your roof and home the way it should. Roof leaks often hide in tricky roof areas, and it takes experience to track them down. Don’t wait for water to back up on the roof or pool under shingles getting expert help early saves time, money, and stress later on.
Keeping water away from your home isn’t just about reacting to leaks it’s about staying ahead of them. Regular care makes all the difference in protecting your roof and home, especially with the heavy rainfall we’ve been seeing.
Think of inspections like a health checkup for your home. A roofing contractor can catch the early signs of trouble, like compromised flashing or improperly driven roofing nails, before they lead to water damage. Homeowners often ask if they can inspect the roof themselves.
While you can spot obvious signs like water spots on the ceiling or visible cracks, professionals check deeper areas like flashing surrounding the chimney and roof valleys where water can seep unnoticed. Plus, regular maintenance can extend the life of your roof by up to 25%.
Clogged gutters are a common reason water to back up on the roof. When debris blocks water drainage, it causes pooling water to back into roof areas, especially around valleys and fascia. During an annual roofing maintenance inspection, your roofer should clear your roof and gutters of any debris to help stop water from flowing down properly and causing leaks.
One homeowner told us they thought a small amount of water in the gutter wouldn’t be a problem. But after heavy rainfall, sitting water backed up and started causing leaks around the chimney and roof valleys. Keeping gutters clear really does prevent headaches later.
Over time, flashing surrounding the chimney or other roof areas can wear down, especially from severe weather and horizontal rain. The integrity of the metal roof flashing surrounding the chimney is crucial to stop water from entering your home. Materials like the common type of pipe boot, made from synthetic rubber called neoprene, naturally age and crack.
Checking these parts regularly and fixing issues early keeps water away from the interior of your home. Without this maintenance, water from heavy or prolonged storms finds its way in through the smallest gaps. And yes, that includes those annoying leaks caused by improperly installed roof flashing!
If you’re seeing water spots on the ceiling or that slow drip every time it rains, it’s your roof’s way of telling you something’s not right. Roof leaks in heavy rain usually don’t happen out of nowhere they build up over time from small problems, like clogged gutters or cracked flashing around the chimney.
The good thing? These problems don’t have to turn into big headaches. Keeping up with basic maintenance, like clearing your roof and gutters and checking your roof areas for wear, can save you a lot of trouble. It helps stop water from creeping into places it shouldn’t, like the interior of your home.
But here’s the thing ignoring leaks never works out well. What starts as a little spot on the ceiling can grow into major water damage, higher repair bills, and even issues with your home’s value. So if you’ve noticed any signs no matter how small it’s smart to get ahead of it. Book a roof inspection before the next round of heavy rain hits. It’s a simple way to protect your home and save yourself from bigger repairs down the line.
Have you ever wondered if your roof could be hiding problems you just can't see from the ground? It's a common situation most homeowners only think about their roof when something starts leaking or when it's time to sell. But catching issues early could save you thousands of dollars, protect your home's value, and even give you peace of mind during storm season.
In 2025, the average roof inspection cost ranges anywhere from $150 to $600 depending on factors like your roof's size, complexity, and inspection method. Whether you're a first-time homeowner or someone trying to extend the life of your current roof, knowing what to expect can help you make smarter decisions.
At IBEX Roof, we often see clients surprised by how a simple inspection can uncover hidden wear, storm damage, or aging that could lead to much bigger (and more expensive) problems down the line. The good news? A professional inspection might not cost as much as you think and it's usually worth every penny.
Imagine finally relaxing after a long day, only to notice a small water stain spreading across your ceiling. That's often how homeowners discover roof problems when it's already too late. Regular roof inspections help catch these issues early before they turn into costly repairs or a full roof replacement.
Your roof is your first line of defense, whether it's protecting your family during a storm or keeping your energy bills in check through proper ventilation. Many roofing companies recommend inspections after strong storms, when selling a home, or if your roof is aging. If you're dealing with older shingles, tree debris, or a recent weather event, a professional roof inspector can spot trouble you might miss from the ground.
At IBEX Roof, we've helped homeowners avoid thousands in repairs just by finding small leaks or worn spots early. Whether you're buying, selling, or just caring for your home, an inspection may save you more than you realize.
The bigger the roof, the more ground (or shingles) an inspector has to cover. A larger roof size usually means more time and a more detailed inspection, which naturally influences how much you might expect to pay.
If your roof has steep slopes, multiple levels, or hard-to-reach areas, it's simply trickier to inspect. Complex roofing material layouts or unusual designs require careful attention, which can affect the final cost of a roof inspection. We’ve seen homeowners with charming but steeply pitched roofs surprised when they learned how much extra effort those angles require during an inspection.
Where your home is located also plays a role. A roof in a remote or hard-to-reach area might require more travel or special equipment. Even regional weather patterns can make roof inspections more involved in some areas compared to others.
Not all inspections are the same. Some are hands-on, with a roofing contractor walking your roof and attic, while others use drone inspection or infrared tools to check for hidden moisture or damage. Depending on what type of inspection is right for you, the process can vary. For example, a homeowner worried about leaks after a storm might benefit from an infrared scan to detect moisture trapped under the shingles.
A highly trained roof inspector will spot details that others might miss from tiny cracks to early signs of roof repair needs. Choosing someone with certifications and experience ensures you get a detailed report that truly reflects the condition of your roof.
So, how much does a roof inspection really cost? It depends on several things like the type of inspection, the size and complexity of your roof, and whether you're dealing with a standard home or a larger commercial building. For example, drone inspections might suit modern homes with difficult-to-reach areas, while a more traditional inspection could be just right for a simple roof.
Infrared inspections are becoming popular for spotting issues inside the attic or behind walls without having to pull things apart. No matter the method, you should always receive a detailed report outlining the condition of your roof, including photos and repair recommendations if needed.
Here’s a simple breakdown so you know what to expect when you schedule a roof inspection:
| Type of Roof Inspection | Best For | Notes |
|---|---|---|
| Physical Roof Inspection | Most homeowners | In-person inspection with full report |
| Drone Inspection | Complex or high roofs | Captures images safely without stepping on the roof |
| Infrared Roof Inspection | Moisture & hidden damage | Detects issues not visible to the eye |
Many roofing companies, including IBEX Roof, recommend choosing the inspection type based on your home's unique needs rather than just cost. Remember, finding minor issues today can prevent costly repairs tomorrow.
A professional roof inspection is more than just a quick glance at your shingles. It’s about understanding the full picture of your roof's health. When a homeowner reaches out because they noticed a small roof leak, the inspection often reveals hidden issues they never expected. Here's what’s usually involved:
During an exterior roof inspection, the inspector checks for missing or damaged shingles, flashing issues, or signs of wear that could compromise the integrity of your roof. This is often where early signs of trouble show up, like cracked shingles or weak spots near chimneys.
An interior roof inspection digs deeper, especially into ceilings and walls, looking for water stains, mold, or rot that signals water sneaking past the surface. This is critical because what looks fine on the outside might be telling a different story inside.
In the attic, a good inspector checks for proper ventilation, moisture buildup, or sagging areas. Often, issues like improper airflow go unnoticed until they shorten the lifespan of your roof or create problems inside your home.
A structural assessment ensures the entire roofing structure not just the surface is doing its job. This is vital, especially for older homes where age or past repairs may have compromised the framework.
At the end of it all, you get a detailed report and recommendations, outlining the overall condition of your roof, clear photos, and steps to address any concerns. Whether it’s a minor repair or something bigger, you’ll know exactly what your next move should be.
How often should you really inspect your roof? It depends, but most roofing contractors recommend an annual inspection. This gives you a chance to catch small problems before they grow into bigger ones. Think of it like a yearly check-up for your roof to make sure it stays healthy.
If you've recently weathered a heavy storm, a post-storm roof check is a smart move. Even if everything looks fine from the ground, wind, hail, or debris can cause damage that's not always visible without a closer look. We've seen homeowners avoid major repairs just by spotting a lifted shingle after a storm.
And if your roof is older, inspections become even more important. An inspection based on roof age helps you plan ahead for maintenance or a possible new roof without surprises. Many people don’t realize how quickly wear can accelerate once a roof hits its later years.
You might wonder if you could just grab a ladder and inspect your roof yourself. Sure, you can perform a basic visual inspection from the ground or even from the attic. Look for things like missing shingles or water stains. But the real question is will you spot the early signs that a professional roof inspection would catch?
While DIY checks can help you notice obvious damage, they often miss subtle issues like poor ventilation, hidden moisture, or minor sagging. These are the kinds of problems that quietly shorten the lifespan of your roof or cause costly damage later.
Hiring a professional roof inspector brings expertise you simply can't replicate with a flashlight and binoculars. They know where to look, how to document what they find, and how to recommend the right solution whether that’s a quick roof repair or a more detailed infrared inspection.
Plus, many roofing warranties require a thorough inspection by a certified professional to stay valid. If you're buying or selling a home, or just want to be sure your roof remains in top condition, investing in regular roof inspections could save you far more money in the long run than you'll pay for a roof inspection upfront.
If you’re wondering whether scheduling a roof inspection is actually worth it, you’re not alone. Many homeowners hesitate until they notice a stain on the ceiling or find shingles in their yard. But the real value comes from catching problems early. A simple roof leak inspection could uncover a minor crack that, left unchecked, could later lead to extensive water damage inside your home.
We've worked with homeowners who were shocked to learn that what they thought was just wear and tear turned out to be early signs of major deterioration. Because they acted quickly, they avoided replacing large portions of their asphalt shingle roof. Regular inspections aren’t just about spotting damage they give you peace of mind knowing the health of your roof is under control and help you make informed choices about repairs or maintenance.
A lot of homeowners worry about inspection costs, but the good news is there are smart ways to reduce what you pay for a roof inspection without cutting corners. One way is to bundle with roof repairs. Many roofing contractors will reduce or even waive the inspection fee if you move forward with repairs or maintenance they recommend.
Another simple but powerful tip is to keep up with regular inspections. Spotting and fixing small issues early will always cost less than handling major repairs later. Think of it like routine roof maintenance it keeps your roof working for you, not against you.
Lastly, you’ll want to ask about a free roof inspection. Some roofing companies offer them as part of seasonal promotions or after storms to help homeowners identify damage. Just be sure you’re working with a reputable inspector who gives you an honest assessment, not just a sales pitch for a new roof you don’t need.
Technology is changing the way roof inspections are done, making them safer, more accurate, and often faster. One of the biggest shifts is the use of drones. Drone inspections give inspectors a clear, high-definition view of areas that are hard to reach, especially on tall or complex roofs, without anyone having to set foot on the roof.
Infrared inspections are another game-changer. These tools help spot moisture hidden under the surface of an otherwise normal-looking asphalt shingle roof. This means you can catch leaks and insulation problems early, often before they cause any visible damage.
Some modern roofing companies are even integrating inspections with smart home systems. Imagine getting a notification when your roof might need attention, much like you would for your HVAC or security system.
Industry studies in 2025 are showing more homeowners embracing these different types of roof inspections, not just because they are advanced, but because they help make sure your roof remains a well-maintained roof, saving money and reducing surprises down the road.
Since drone inspections are becoming more common, many homeowners wonder about the price. While the cost of a roof inspection using drones can vary depending on the size and shape of your roof, homeowners often find that it's worth it for the detailed photos and safer approach. For example, we had a homeowner with a large typical roof who chose a drone inspection and was able to spot several hidden issues without anyone stepping on the roof.
Yes, in some cases you can. Some roofing contractors offer a free roof inspection especially after a storm or as part of a seasonal promotion. Just be sure to ask upfront and confirm what's included so you know you're getting a complete picture of your roof’s condition, not just a quick look.
Yes, in some cases you can. Some roofing contractors offer a free roof inspection, especially after a storm or as part of a seasonal promotion. For example, at IBEX Roof, we occasionally provide free inspections to help homeowners assess potential storm damage or routine wear. Just be sure to ask upfront and confirm what's included so you know you're getting a complete picture of your roof’s condition, not just a quick look.
Generally, most insurance policies don't pay directly for roof inspections. However, they might require a professional inspection before covering roof repairs after a storm or other damage. Regular roof maintenance and inspections can also help you when it's time to file a claim because you'll have a record showing that you took care of your roof.
While it's not always required, getting your roof inspected before listing your home can be a smart move. Many buyers feel more confident purchasing a house when they know the roof is in good shape. Plus, spotting and fixing small problems early can keep negotiations smoother and help you sell faster.
Skipping regular roof inspections might seem like you're saving money, but it often leads to bigger expenses later. We’ve worked with homeowners who waited until they saw visible leaks, only to find out that small issues had turned into major damage. Staying ahead with routine inspections helps extend the life of your roof and saves money in the long run.
At the end of the day, your roof does a lot more than just sit there it protects your family, your home, and your investment. The cost of a roof inspection is often a small price to pay for peace of mind, especially when it helps you avoid larger roof repairs down the road. Whether you're looking at a typical roof on a starter home or maintaining a more complex design, the benefits of regular roof maintenance are hard to ignore.
So, if you haven’t had your roof inspected in a while, or if you're planning to buy or sell a home soon, now is the time. A simple step like scheduling a professional inspection could make a big difference in protecting your home.
Ever catch yourself staring at your roof and wondering… what are shingles actually made of?
You're not alone. Most of us don’t think much about what’s up there until a leak happens, shingles go missing, or it’s time for a roof replacement quote that makes you do a double take.
Here’s the deal: the materials your shingles are made of matter. They affect how well your roof holds up in bad weather, how long it lasts, and how much it’ll cost you over the years. And with all the different types of shingles out there, it helps to know what you’re looking at and what you’re paying for.
So if you’ve ever asked yourself, what are shingles made of, or wondered which type might be best for your home, you’re in the right place. In this post, we’ll break it all down: what shingles are made of, how they’re made, the most popular types, and even how some of them can be recycled.
If you're trying to figure out why some roofs seem to last for decades while others wear out fast, it all comes down to what the shingles are made of. Especially with asphalt shingles the most popular choice for homeowners there’s more going on than just what you see on the surface.
This is the layer that gives your shingles their shape and strength. Today, most modern shingles are made with a fiberglass mat because it's fire-resistant, durable, and holds up well in different weather. Older shingles used organic materials like paper or wood fiber, but they don’t offer the same level of reliability.
Think of it like the frame of your house everything else gets built on top of it.
Next comes the asphalt coating, which seals the mat and helps keep water out. It’s a key part of what makes asphalt roofing such a trusted option. When it rains, this layer works to stop moisture from seeping into your roof. It also keeps the shingle flexible, so it doesn't crack or split when temperatures swing.
Imagine your roof as a shield this is the layer doing most of the heavy lifting when it comes to waterproofing.
Those little colored bits on top of your shingles? They’re more than just for looks. Granules protect the asphalt from sun damage, help with fire resistance, and even come in reflective options that can make your home more energy-efficient. Some shingles may also have algae-resistant granules to prevent those dark streaks you see on older roofs.
If you've ever noticed how hot a car roof gets in the sun, you’ll appreciate how these tiny granules help your home stay cooler.
This is the part that bonds the shingles together. When installed, the sun activates a sticky strip that helps each shingle hold onto the next. That way, during high winds or storms, your shingles are less likely to lift or blow off.
Think of it like roofing glue that works automatically once it heats up it’s simple but effective.
You won’t see this once the shingles are on your roof. The release film is only there while the shingles are in the package. It stops the adhesive strip from sticking to the other shingles too soon. Once they’re installed, the film has done its job and doesn’t play a role anymore.
Basically, it keeps things neat during shipping, so your roofer doesn’t have a mess on their hands before the job even starts.
Did You Know?
Asphalt shingles are installed on more than 75% of U.S. homes as of 2024.
That’s not just a fun fact it tells you just how trusted this roofing material really is.
If you've ever held a roofing shingle, you might not think much of it but there's actually a lot going on in that single piece. The way shingles are made is a big reason why some roofs last longer and hold up better than others.
It starts with a base layer, usually fiberglass. This gives the shingle its strength, kind of like the bones of a house. That base gets soaked in asphalt, which is what makes it waterproof and able to take on weather without falling apart.
While it’s still hot, granules are pressed into the top. These are those gritty bits you can see and feel they give shingles their color, help block sunlight, and keep the asphalt from breaking down too fast.
Once that’s done, a strip of adhesive goes on. That’s what helps shingles stick together when they’re installed especially important when the wind picks up. After cooling, the shingles are trimmed, stacked, and packed up for delivery.
So next time you're on your porch during a rainstorm, just remember: your roof’s holding up thanks to a pretty smart manufacturing process.
Not all shingles are created equal and if you're looking at replacing your roof, it’s worth knowing what your options are. Here’s what homeowners are actually using, and why.
This is the most common roofing choice out there, and for good reason. They're simple, cost-effective, and they do the job well. You’ve probably seen 3-tab shingles or architectural shingles in your neighborhood already.
They’re great if you want a roof that goes on fast, lasts 20–30 years, and doesn’t require a ton of upkeep.
If you're going for that classic, natural look maybe for a cottage-style home or something with character wood shingles or shakes can be a good fit. They’re usually made from cedar and offer a lot of charm.
Just know they do take a bit more care, especially in areas with a lot of moisture or bugs.
Metal roofing used to be mainly for barns and industrial buildings, but it's become a stylish pick for homes too. It lasts a long time, holds up in storms, and reflects heat so it can help keep your home cooler in the summer.
If you're in an area that gets hail or high winds, this might be worth a closer look.
These are the premium picks. Slate and clay tile roofs look amazing, last pretty much forever, and are great if you're aiming for a more traditional or high-end aesthetic.
The tradeoff? They’re heavy so your home needs to be able to support the weight and they’re more expensive upfront.
Want the look of wood or slate without the extra hassle? Composite shingles are made from a mix of materials, and they’ve come a long way in recent years. They’re light, easy to install, and often made from recycled products, which is a plus if you’re thinking green.
They’re a smart choice if you want something low-maintenance but still stylish.
If you’ve been trying to figure out whether to go with composite or stick with traditional shingles, you’re not alone. It’s one of the most common questions homeowners ask during a roof replacement.
If you’re after a longer-lasting, low-maintenance roof and you’re okay spending a bit more upfront, they might be the better fit. But if you just need something reliable and budget-friendly, asphalt still gets the job done.
When it’s time for a new roof, the old one doesn’t have to end up in a landfill. That’s good news not just for the planet, but for anyone who wants to make smarter, more sustainable home choices.
Most asphalt shingles are made with materials that can actually be reused in things like paving roads. It’s a pretty cool process and it’s growing fast. In fact, recycling just one ton of shingles saves about a barrel of oil. Multiply that by a whole neighborhood, and you’re making a real difference.
If you're working with a roofing contractor, ask if they offer recycling as part of the removal process. Some cities even have drop-off locations. Plus, more shingle brands are now offering green certifications and reflective materials that help with energy efficiency.
Bottom line? If you're getting a new roof, it’s a chance to do something good without extra effort.
Not all roofs are built the same and where you live plays a big part in what works best. Here’s a quick look at what makes sense based on your climate:
It all comes down to choosing a roofing material that works with not against your environment.
Choosing a roofing material isn’t always simple but it matters more than you might think. Your roof does a lot: it protects your home, keeps energy costs down, and adds curb appeal whether you’re planning to stay or eventually sell.
In this post, we covered the basics of what roof shingles are made of, how they’re built, and the pros and cons of each type. From classic asphalt shingles to long-lasting slate or composite roofing, there’s no one-size-fits-all answer but there is a choice that fits your home, your climate, and your plans.
If you're still not sure which roofing option makes the most sense for you, or if you'd like to talk through your options with someone who’s seen it all, reach out to the team at IBEX Roof. We’ll walk you through what works best based on your needs, location, and budget.
Still have questions or ready to get started? Let’s talk contact us today for a free consultation and feel confident in the roof over your head.
When you look up at your roof, all you see are shingles or maybe metal panels—but there’s a whole lot more going on underneath! One of the most critical yet often overlooked parts of your roof is roof sheathing (also known as roof decking). It’s the unsung hero that provides the strength and stability your roof needs to hold up against the elements.
So, what exactly is sheathing on a roof, and why does it matter? Let’s dive in.
Roof sheathing is the base layer of wood panels that sits directly on top of your roof’s framing. It acts as the foundation for your shingles, tiles, or metal roofing, ensuring everything stays in place and your roof can handle whatever Mother Nature throws its way.
There are two main types of roof decking:
When it comes to the best roof sheathing, you’re usually choosing between two materials: OSB (oriented strand board) roof sheathing and roofing plywood. Each has its pros and cons.
Both materials work well for most roofs, and your choice will depend on budget, climate, and personal preference.
Roof sheathing thickness matters because it determines how much weight your roof can support. Typical thicknesses include:
Your contractor will determine the right thickness based on building codes, climate, and roofing material.
Plywood sheathing is the most common type of sheathing used as roof sheathing. It provides a strong base for the rest of the roofing components and is an ideal choice for roof sheathing.
When considering what you need to know about roof sheathing, remember that it must be able to hold the weight of heavier material without compromising the structure. If you have an old roof, you might need to replace your sheathing to ensure longevity.
Every roofing project should start with a guide to roof sheathing, detailing how sheathing can hold up against the elements. If you choose to replace roof sheathing, plywood for roof sheathing is often the best for your roof.
Ultimately, the right material for roof sheathing will support the roof rafters or trusses effectively, ensuring your home remains safe and sound.
Roof sheathing is a crucial component of your roof system, providing support for the entire roof. It’s essential to know about roof sheathing to maintain a fortified roofing structure. Generally, roof sheathing should be replaced during a roof replacement or if damaged roof sheathing is identified during a roof inspection.
Understanding the types of roof sheathing is vital; there are two types of roof sheathing commonly used for roof applications. Roof sheathing is typically made from plywood or oriented strand board (OSB), which can hold the weight of the roof. If your roof sheathing wasn’t properly installed or is too old, it may need to be replaced, especially if you’re dealing with a roof repair situation.
Your sheathing is designed to last decades, but there are some signs that it might need replacement:
If your roof is being replaced, your contractor will inspect the sheathing to see if any boards need swapping out. This is an important step to ensure your new roof lasts as long as possible.
Replacing sheathing can add to the cost of a new roof, but it’s often necessary. Here’s why:
Some roofing contractors include a set number of replacement boards in their estimates, while others charge separately. Always ask how sheathing replacement is handled before signing a contract!
Your roof sheathing may not be visible, but it plays a crucial role in keeping your home safe and secure. Whether you opt for OSB roof sheathing or roofing plywood, ensuring you have the right material and thickness will help extend the life of your roof.
If you’re considering a new roof or suspect your sheathing might need an upgrade, reach out to IBEX Roof—we’re here to help you make the best decision for your home. A strong roof starts with a solid foundation, and that foundation is your roof sheathing!
Hello, there, Portland homeowners! Have you ever looked up at your roof and noticed some unwelcome green visitors settling in? That’s right—we're talking about roof moss. It's a common issue here in our lush, green city. But fear not; we've got all the information you need to tackle moss removal and keep your roof healthy and long-lasting!
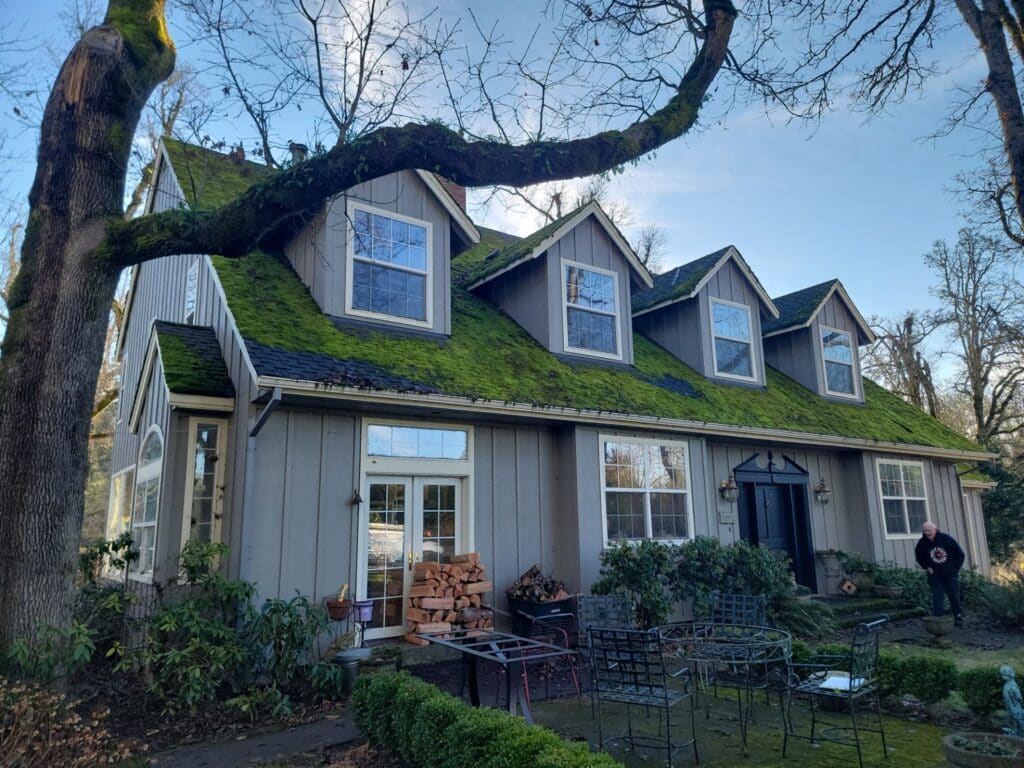
Moss is more than just a bit of green fuzz. It’s a simple plant that loves Portland’s damp, moderate climate. It thrives in shaded areas and holds moisture like a sponge on your roof shingles, leading to potential damage if left unchecked. Moss can be charming in a forest but not on your roof!
Why should you care about some green fuzz on your roof? Well, here’s the kicker—moss can cause significant damage over time, making it essential to clean your roof regularly. It retains moisture, which can lead to roof shingles warping or even rotting. Moving from moss removal into costly roof repairs isn’t a journey you want to take.
Ouch, nobody wants that!
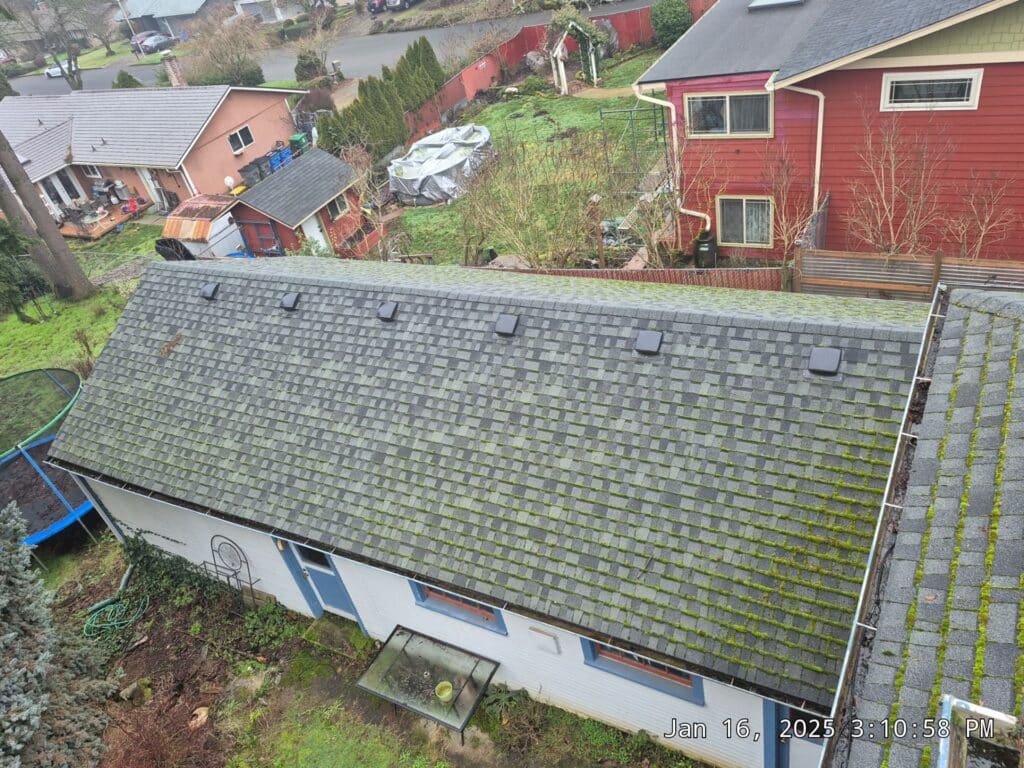
Spotting moss early can save you a headache later. Here are some telltale signs:
Routine roof maintenance inspections are vital. Here's how you can stay ahead:
A careful eye today can prevent a significant moss headache tomorrow!
Not all moss removal requires chemicals. Here are some eco-friendly options:
| Pros | Cons |
| Eco-friendly | Labor-intensive |
| No chemical use | Might not reach all areas |
If you need to bring out the big guns, chemical treatments might be necessary.
Using chemicals requires a careful approach, making sure you follow Portland’s environmental guidelines.
Sometimes the best solution is calling in the cavalry—a roof cleaning service.
Professional help ensures that moss removal doesn’t compromise the integrity of your roof’s structure. The cost might be higher upfront, but it protects the roof’s longevity.
Regular roof maintenance can prevent moss from returning:
Alter the environment to make it less moss-friendly:
Consider materials that naturally resist moss growth. Options like metal roofs or specially treated shingles can save you from future problems, while a proper cleaning method can help remove the moss that may accumulate over time.
Portland offers plenty of local resources for roof care:
Be aware of Portland’s regulations on chemical use for moss removal. Adhering to these ensures you’re not harming the local ecosystem while protecting your roof.
To recap, effective moss removal from your roof involves timely inspection, choosing the right removal method, and ongoing roof maintenance. Remember, a little prevention goes a long way in preserving the integrity of your roof shingles and ensuring your roof isn’t unexpectedly stained, leaking, or damaged!
It’s time to inspect your roof. If you see the beginnings of a moss invasion, take action today to secure your home and its value. Got stories or questions about your mossy encounters? Share them in the comments below—we’d love to hear from you!
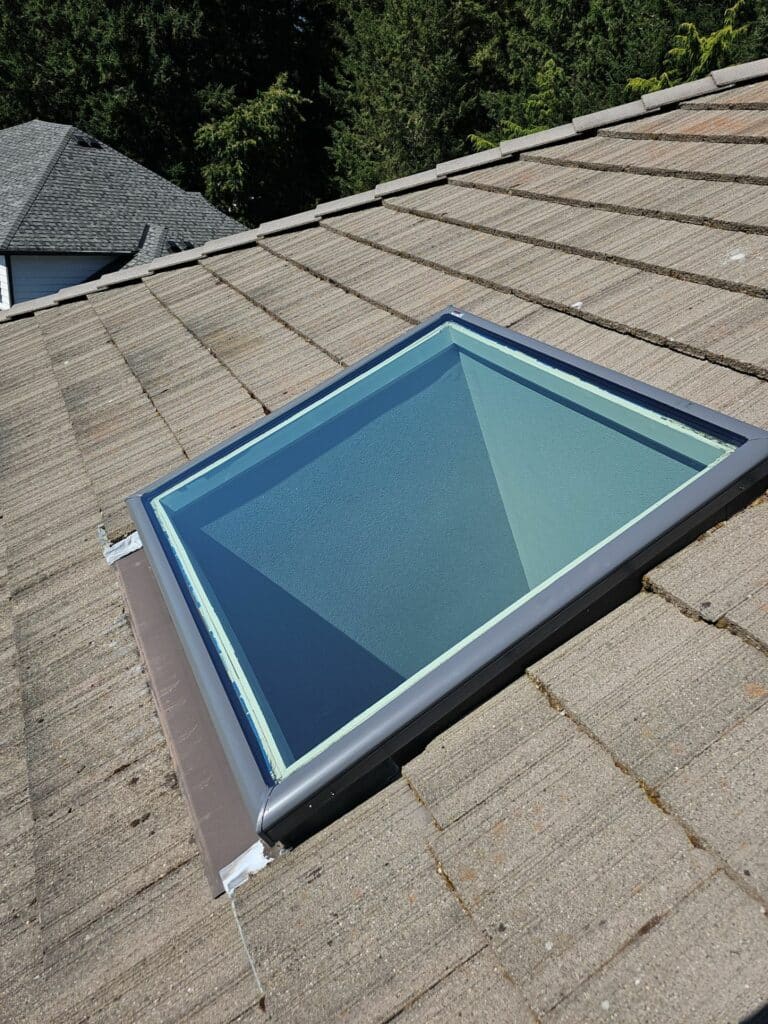
Skylights for bathrooms are an amazing addition to any house. They turn drab, dark bathrooms into bright, natural light-filled areas. They provide numerous benefits, offer various design options, and if installed correctly, can dramatically improve the aesthetics and functionality of your bathroom. This guide covers everything you need to know about bathroom skylights, from their benefits to types, installation tips, common concerns, and maintenance requirements.
Installing a skylight in your bathroom can help a lot by providing natural daylight and fresh air. A solar powered fresh air skylight can eliminate condensation that forms, improving ventilation. If your bathroom is windowless, consider a Velux sun tunnel® skylight to brighten the space.
During your renovation, you might knock a hole right in the roof to install a plumb skylight set. The solar powered feature allows you to open the skylight for exhaust and fresh air, enhancing the ambiance around the vanity. This essential for your bathroom upgrade will elevate your home’s appeal.
With skylights and roof windows, you can let the sun shine in, making your bathroom feel brighter. The pitch of the roof is crucial; proper installation ensures water protection. Opt for argon-filled pane options to minimize heat loss during winter and keep it cool hot in summer.
By installing skylights, you’ll stay in the loop on energy-efficient designs. A 10-year warranty can provide peace of mind, ensuring that your investment in windows and skylights pays off.
Natural light can have transformative effects on your bathroom. Here are some key benefits:
Yes, some skylight windows, specifically vented ones, can aid with ventilation. By allowing moist, damp air to escape, they help maintain air quality, reducing the risk of mold and mildew.
A strategically placed roof window can help control humidity levels in your bathroom. Proper ventilation reduces the buildup of steam and condensation, thereby preserving the integrity of bathroom fixtures.
When choosing a bathroom skylight, the options are abundant. Here are a few popular types:
Velux Skylights are renowned for their durability and efficiency:
| Feature | Description |
| Durability | Made from high-quality materials that ensure longevity. |
| Energy-efficient | Often come with double glazing to enhance thermal performance. |
| Versatility | Available in various models such as fixed, vented, and solar-powered. |
A solar tube, also known as a sun tunnel, channels natural light through a reflective tube from your roof to the bathroom ceiling, making them perfect for small spaces.
Advantages of Solar Tubes:
| Feature | Traditional Skylights | Sun Tunnels |
| Size | Larger and more robust | Smaller, compact design |
| Light Distribution | Direct and intense | Diffused and even |
| Installation Cost | Generally higher | More affordable |
| Aesthetic | Offers a clear view of the sky | Limited to light provision |
While DIY installation is possible, it can be complex and risky. Professional installers offer:
Many homeowners express concerns with sun tunnel skylight installations in bathrooms due to potential issues like condensation forming and bad weather affecting flashings. Proper ventilation with a bathroom exhaust or exhaust fan is essential to keep the bathroom fresh and prevent stale air.
When considering where to put a skylight, the roof structure must support it effectively. Light would enter the en suite through built-in glass windows, but glare from the sun may vary based on the design. An opening skylight with a diffuser can help control brightness.
For one room, using a sun tunnel skylight can redirect light into the room without the worry of excessive glare. The three layers of argon gas insulation in modern skylights enhance energy efficiency, making them a pleasant addition even in challenging climates.
Condensation is a common issue, but it can be minimized:
If condensation is not managed, mold can indeed form:
Rain sensors automatically close vented skylights when rain is detected, ensuring no water enters your bathroom.
| Feature | Benefit |
| Automatic Closing | Prevents water damage during unexpected rain. |
| Convenience | No need to manually operate the skylight. |
| Increased Lifespan | Protects the skylight mechanism from wear and tear. |
Yes, skylights can effectively illuminate small spaces, making them appear larger and more inviting.
Here are a few popular design choices:
A bathroom skylight can enhance other design elements:
Regular maintenance for skylights is essential to ensure they remain functional and appealing. Inspect the roof around the skylight for any signs of damage or leaks that could let the sun in improperly.
Cleaning the cavity and replacing old seals will enhance light filtering capabilities, allowing natural light to brighten your space. Neglecting these tasks could look uninviting and lead to costly repairs.
Regular cleaning is essential for maintaining clear views and functionality:
Perform bi-annual checks:
Investing in a bathroom skylight, whether it’s a skylight window, roof window, or considering a skylight replacement, can vastly improve the usability and aesthetic appeal of your space. With proper selection, installation, and maintenance, a skylight in the bathroom is a beautiful and functional feature that adds value to any home.
Stay tuned for more home improvement tips and guides!
Feel free to reach out if you have further questions or need professional advice on bathroom skylights!
