Ever catch yourself staring at your roof and wondering… what are shingles actually made of?
You're not alone. Most of us don’t think much about what’s up there until a leak happens, shingles go missing, or it’s time for a roof replacement quote that makes you do a double take.
Here’s the deal: the materials your shingles are made of matter. They affect how well your roof holds up in bad weather, how long it lasts, and how much it’ll cost you over the years. And with all the different types of shingles out there, it helps to know what you’re looking at and what you’re paying for.
So if you’ve ever asked yourself, what are shingles made of, or wondered which type might be best for your home, you’re in the right place. In this post, we’ll break it all down: what shingles are made of, how they’re made, the most popular types, and even how some of them can be recycled.
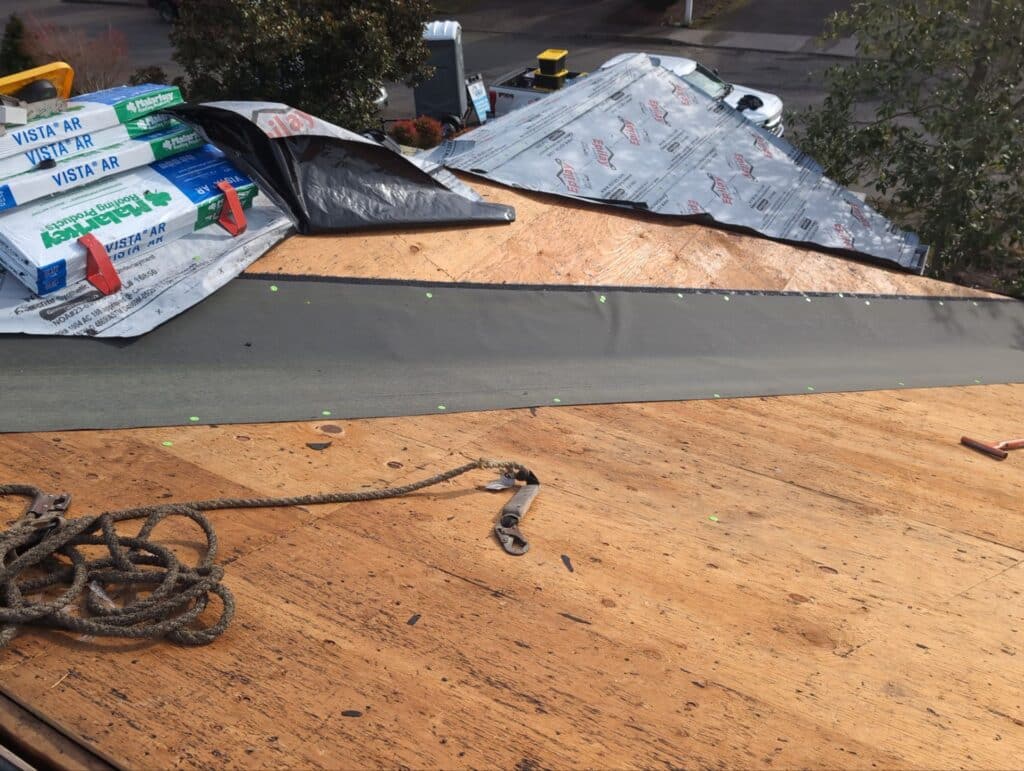
If you're trying to figure out why some roofs seem to last for decades while others wear out fast, it all comes down to what the shingles are made of. Especially with asphalt shingles the most popular choice for homeowners there’s more going on than just what you see on the surface.
This is the layer that gives your shingles their shape and strength. Today, most modern shingles are made with a fiberglass mat because it's fire-resistant, durable, and holds up well in different weather. Older shingles used organic materials like paper or wood fiber, but they don’t offer the same level of reliability.
Think of it like the frame of your house everything else gets built on top of it.
Next comes the asphalt coating, which seals the mat and helps keep water out. It’s a key part of what makes asphalt roofing such a trusted option. When it rains, this layer works to stop moisture from seeping into your roof. It also keeps the shingle flexible, so it doesn't crack or split when temperatures swing.
Imagine your roof as a shield this is the layer doing most of the heavy lifting when it comes to waterproofing.
Those little colored bits on top of your shingles? They’re more than just for looks. Granules protect the asphalt from sun damage, help with fire resistance, and even come in reflective options that can make your home more energy-efficient. Some shingles may also have algae-resistant granules to prevent those dark streaks you see on older roofs.
If you've ever noticed how hot a car roof gets in the sun, you’ll appreciate how these tiny granules help your home stay cooler.
This is the part that bonds the shingles together. When installed, the sun activates a sticky strip that helps each shingle hold onto the next. That way, during high winds or storms, your shingles are less likely to lift or blow off.
Think of it like roofing glue that works automatically once it heats up it’s simple but effective.
You won’t see this once the shingles are on your roof. The release film is only there while the shingles are in the package. It stops the adhesive strip from sticking to the other shingles too soon. Once they’re installed, the film has done its job and doesn’t play a role anymore.
Basically, it keeps things neat during shipping, so your roofer doesn’t have a mess on their hands before the job even starts.
Did You Know?
Asphalt shingles are installed on more than 75% of U.S. homes as of 2024.
That’s not just a fun fact it tells you just how trusted this roofing material really is.
If you've ever held a roofing shingle, you might not think much of it but there's actually a lot going on in that single piece. The way shingles are made is a big reason why some roofs last longer and hold up better than others.
It starts with a base layer, usually fiberglass. This gives the shingle its strength, kind of like the bones of a house. That base gets soaked in asphalt, which is what makes it waterproof and able to take on weather without falling apart.
While it’s still hot, granules are pressed into the top. These are those gritty bits you can see and feel they give shingles their color, help block sunlight, and keep the asphalt from breaking down too fast.
Once that’s done, a strip of adhesive goes on. That’s what helps shingles stick together when they’re installed especially important when the wind picks up. After cooling, the shingles are trimmed, stacked, and packed up for delivery.
So next time you're on your porch during a rainstorm, just remember: your roof’s holding up thanks to a pretty smart manufacturing process.
Not all shingles are created equal and if you're looking at replacing your roof, it’s worth knowing what your options are. Here’s what homeowners are actually using, and why.
This is the most common roofing choice out there, and for good reason. They're simple, cost-effective, and they do the job well. You’ve probably seen 3-tab shingles or architectural shingles in your neighborhood already.
They’re great if you want a roof that goes on fast, lasts 20–30 years, and doesn’t require a ton of upkeep.
If you're going for that classic, natural look maybe for a cottage-style home or something with character wood shingles or shakes can be a good fit. They’re usually made from cedar and offer a lot of charm.
Just know they do take a bit more care, especially in areas with a lot of moisture or bugs.
Metal roofing used to be mainly for barns and industrial buildings, but it's become a stylish pick for homes too. It lasts a long time, holds up in storms, and reflects heat so it can help keep your home cooler in the summer.
If you're in an area that gets hail or high winds, this might be worth a closer look.
These are the premium picks. Slate and clay tile roofs look amazing, last pretty much forever, and are great if you're aiming for a more traditional or high-end aesthetic.
The tradeoff? They’re heavy so your home needs to be able to support the weight and they’re more expensive upfront.
Want the look of wood or slate without the extra hassle? Composite shingles are made from a mix of materials, and they’ve come a long way in recent years. They’re light, easy to install, and often made from recycled products, which is a plus if you’re thinking green.
They’re a smart choice if you want something low-maintenance but still stylish.
If you’ve been trying to figure out whether to go with composite or stick with traditional shingles, you’re not alone. It’s one of the most common questions homeowners ask during a roof replacement.
If you’re after a longer-lasting, low-maintenance roof and you’re okay spending a bit more upfront, they might be the better fit. But if you just need something reliable and budget-friendly, asphalt still gets the job done.
When it’s time for a new roof, the old one doesn’t have to end up in a landfill. That’s good news not just for the planet, but for anyone who wants to make smarter, more sustainable home choices.
Most asphalt shingles are made with materials that can actually be reused in things like paving roads. It’s a pretty cool process and it’s growing fast. In fact, recycling just one ton of shingles saves about a barrel of oil. Multiply that by a whole neighborhood, and you’re making a real difference.
If you're working with a roofing contractor, ask if they offer recycling as part of the removal process. Some cities even have drop-off locations. Plus, more shingle brands are now offering green certifications and reflective materials that help with energy efficiency.
Bottom line? If you're getting a new roof, it’s a chance to do something good without extra effort.
Not all roofs are built the same and where you live plays a big part in what works best. Here’s a quick look at what makes sense based on your climate:
It all comes down to choosing a roofing material that works with not against your environment.
Choosing a roofing material isn’t always simple but it matters more than you might think. Your roof does a lot: it protects your home, keeps energy costs down, and adds curb appeal whether you’re planning to stay or eventually sell.
In this post, we covered the basics of what roof shingles are made of, how they’re built, and the pros and cons of each type. From classic asphalt shingles to long-lasting slate or composite roofing, there’s no one-size-fits-all answer but there is a choice that fits your home, your climate, and your plans.
If you're still not sure which roofing option makes the most sense for you, or if you'd like to talk through your options with someone who’s seen it all, reach out to the team at IBEX Roof. We’ll walk you through what works best based on your needs, location, and budget.
Still have questions or ready to get started? Let’s talk contact us today for a free consultation and feel confident in the roof over your head.
When you look up at your roof, all you see are shingles or maybe metal panels—but there’s a whole lot more going on underneath! One of the most critical yet often overlooked parts of your roof is roof sheathing (also known as roof decking). It’s the unsung hero that provides the strength and stability your roof needs to hold up against the elements.
So, what exactly is sheathing on a roof, and why does it matter? Let’s dive in.
Roof sheathing is the base layer of wood panels that sits directly on top of your roof’s framing. It acts as the foundation for your shingles, tiles, or metal roofing, ensuring everything stays in place and your roof can handle whatever Mother Nature throws its way.
There are two main types of roof decking:
When it comes to the best roof sheathing, you’re usually choosing between two materials: OSB (oriented strand board) roof sheathing and roofing plywood. Each has its pros and cons.
Both materials work well for most roofs, and your choice will depend on budget, climate, and personal preference.
Roof sheathing thickness matters because it determines how much weight your roof can support. Typical thicknesses include:
Your contractor will determine the right thickness based on building codes, climate, and roofing material.
Plywood sheathing is the most common type of sheathing used as roof sheathing. It provides a strong base for the rest of the roofing components and is an ideal choice for roof sheathing.
When considering what you need to know about roof sheathing, remember that it must be able to hold the weight of heavier material without compromising the structure. If you have an old roof, you might need to replace your sheathing to ensure longevity.
Every roofing project should start with a guide to roof sheathing, detailing how sheathing can hold up against the elements. If you choose to replace roof sheathing, plywood for roof sheathing is often the best for your roof.
Ultimately, the right material for roof sheathing will support the roof rafters or trusses effectively, ensuring your home remains safe and sound.
Roof sheathing is a crucial component of your roof system, providing support for the entire roof. It’s essential to know about roof sheathing to maintain a fortified roofing structure. Generally, roof sheathing should be replaced during a roof replacement or if damaged roof sheathing is identified during a roof inspection.
Understanding the types of roof sheathing is vital; there are two types of roof sheathing commonly used for roof applications. Roof sheathing is typically made from plywood or oriented strand board (OSB), which can hold the weight of the roof. If your roof sheathing wasn’t properly installed or is too old, it may need to be replaced, especially if you’re dealing with a roof repair situation.
Your sheathing is designed to last decades, but there are some signs that it might need replacement:
If your roof is being replaced, your contractor will inspect the sheathing to see if any boards need swapping out. This is an important step to ensure your new roof lasts as long as possible.
Replacing sheathing can add to the cost of a new roof, but it’s often necessary. Here’s why:
Some roofing contractors include a set number of replacement boards in their estimates, while others charge separately. Always ask how sheathing replacement is handled before signing a contract!
Your roof sheathing may not be visible, but it plays a crucial role in keeping your home safe and secure. Whether you opt for OSB roof sheathing or roofing plywood, ensuring you have the right material and thickness will help extend the life of your roof.
If you’re considering a new roof or suspect your sheathing might need an upgrade, reach out to IBEX Roof—we’re here to help you make the best decision for your home. A strong roof starts with a solid foundation, and that foundation is your roof sheathing!
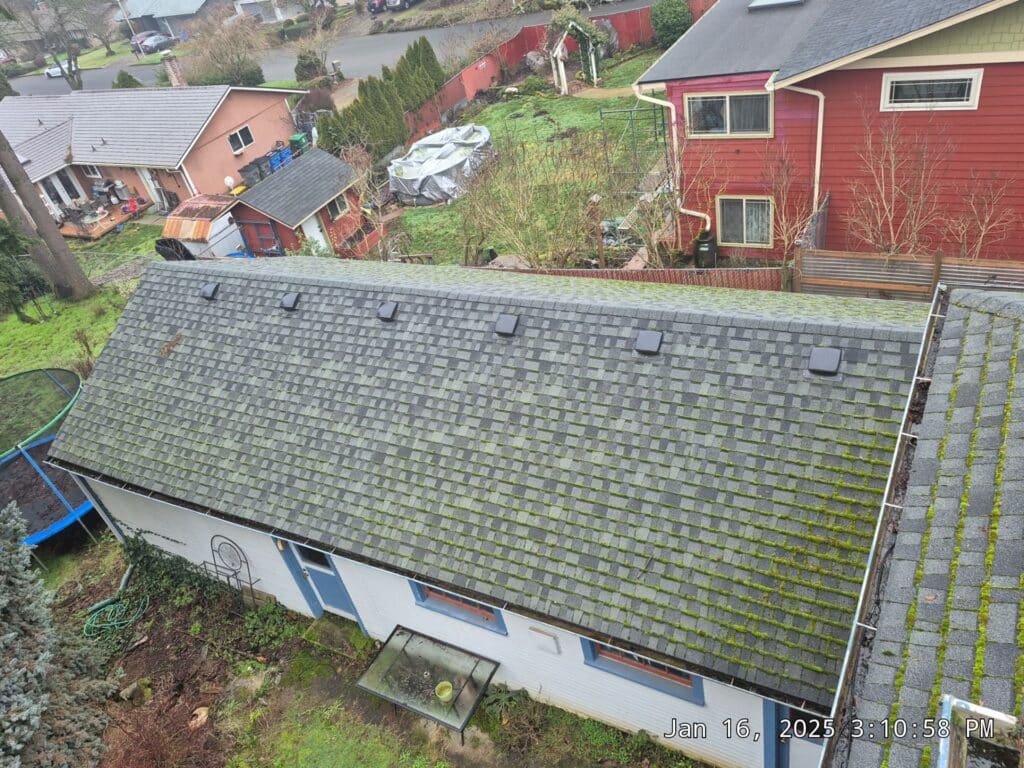
Hello, there, Portland homeowners! Have you ever looked up at your roof and noticed some unwelcome green visitors settling in? That’s right—we're talking about roof moss. It's a common issue here in our lush, green city. But fear not; we've got all the information you need to tackle moss removal and keep your roof healthy and long-lasting!
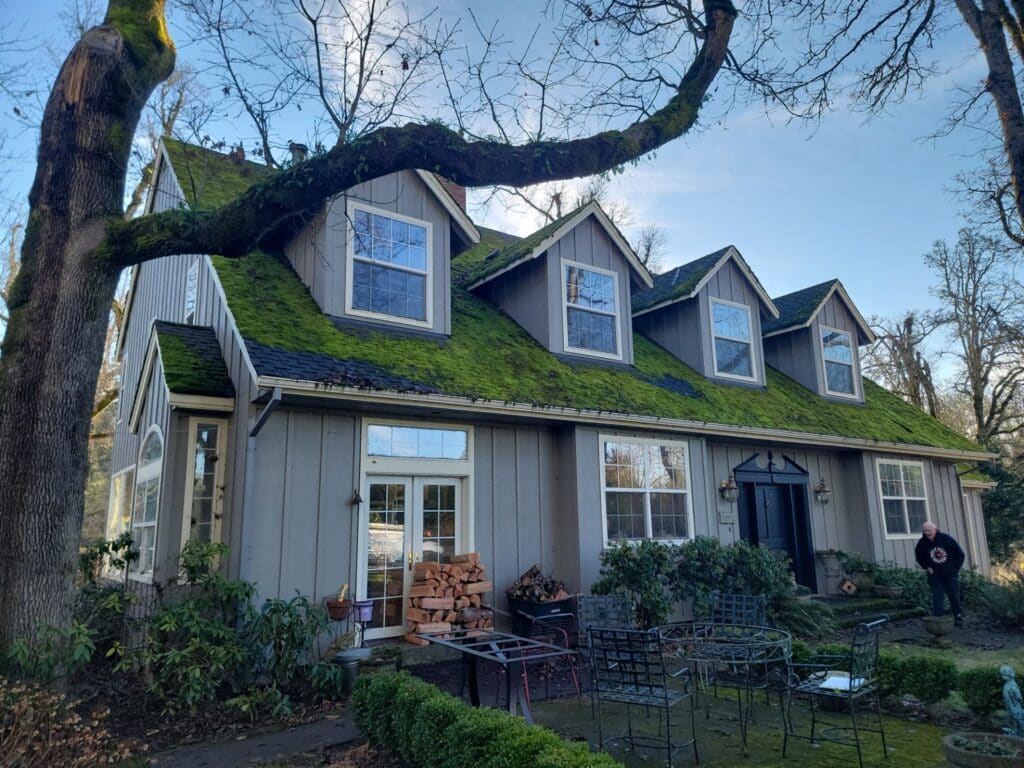
Moss is more than just a bit of green fuzz. It’s a simple plant that loves Portland’s damp, moderate climate. It thrives in shaded areas and holds moisture like a sponge on your roof shingles, leading to potential damage if left unchecked. Moss can be charming in a forest but not on your roof!
Why should you care about some green fuzz on your roof? Well, here’s the kicker—moss can cause significant damage over time, making it essential to clean your roof regularly. It retains moisture, which can lead to roof shingles warping or even rotting. Moving from moss removal into costly roof repairs isn’t a journey you want to take.
Ouch, nobody wants that!
Spotting moss early can save you a headache later. Here are some telltale signs:
Routine roof maintenance inspections are vital. Here's how you can stay ahead:
A careful eye today can prevent a significant moss headache tomorrow!
Not all moss removal requires chemicals. Here are some eco-friendly options:
| Pros | Cons |
| Eco-friendly | Labor-intensive |
| No chemical use | Might not reach all areas |
If you need to bring out the big guns, chemical treatments might be necessary.
Using chemicals requires a careful approach, making sure you follow Portland’s environmental guidelines.
Sometimes the best solution is calling in the cavalry—a roof cleaning service.
Professional help ensures that moss removal doesn’t compromise the integrity of your roof’s structure. The cost might be higher upfront, but it protects the roof’s longevity.
Regular roof maintenance can prevent moss from returning:
Alter the environment to make it less moss-friendly:
Consider materials that naturally resist moss growth. Options like metal roofs or specially treated shingles can save you from future problems, while a proper cleaning method can help remove the moss that may accumulate over time.
Portland offers plenty of local resources for roof care:
Be aware of Portland’s regulations on chemical use for moss removal. Adhering to these ensures you’re not harming the local ecosystem while protecting your roof.
To recap, effective moss removal from your roof involves timely inspection, choosing the right removal method, and ongoing roof maintenance. Remember, a little prevention goes a long way in preserving the integrity of your roof shingles and ensuring your roof isn’t unexpectedly stained, leaking, or damaged!
It’s time to inspect your roof. If you see the beginnings of a moss invasion, take action today to secure your home and its value. Got stories or questions about your mossy encounters? Share them in the comments below—we’d love to hear from you!
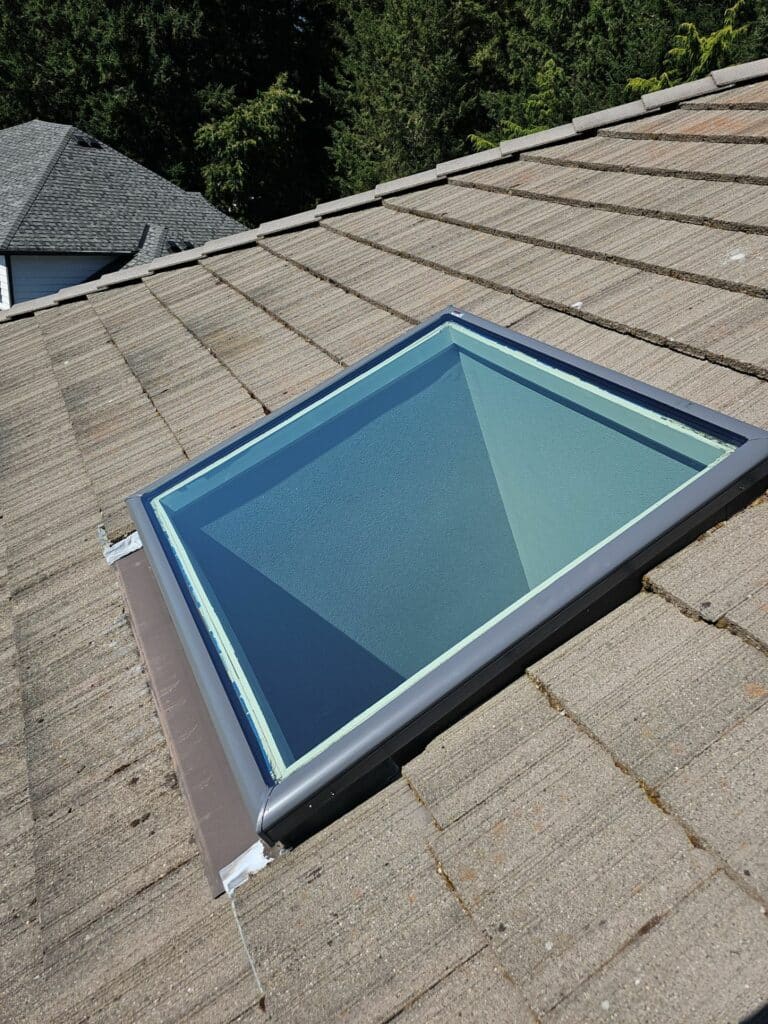
Skylights for bathrooms are an amazing addition to any house. They turn drab, dark bathrooms into bright, natural light-filled areas. They provide numerous benefits, offer various design options, and if installed correctly, can dramatically improve the aesthetics and functionality of your bathroom. This guide covers everything you need to know about bathroom skylights, from their benefits to types, installation tips, common concerns, and maintenance requirements.
Installing a skylight in your bathroom can help a lot by providing natural daylight and fresh air. A solar powered fresh air skylight can eliminate condensation that forms, improving ventilation. If your bathroom is windowless, consider a Velux sun tunnel® skylight to brighten the space.
During your renovation, you might knock a hole right in the roof to install a plumb skylight set. The solar powered feature allows you to open the skylight for exhaust and fresh air, enhancing the ambiance around the vanity. This essential for your bathroom upgrade will elevate your home’s appeal.
With skylights and roof windows, you can let the sun shine in, making your bathroom feel brighter. The pitch of the roof is crucial; proper installation ensures water protection. Opt for argon-filled pane options to minimize heat loss during winter and keep it cool hot in summer.
By installing skylights, you’ll stay in the loop on energy-efficient designs. A 10-year warranty can provide peace of mind, ensuring that your investment in windows and skylights pays off.
Natural light can have transformative effects on your bathroom. Here are some key benefits:
Yes, some skylight windows, specifically vented ones, can aid with ventilation. By allowing moist, damp air to escape, they help maintain air quality, reducing the risk of mold and mildew.
A strategically placed roof window can help control humidity levels in your bathroom. Proper ventilation reduces the buildup of steam and condensation, thereby preserving the integrity of bathroom fixtures.
When choosing a bathroom skylight, the options are abundant. Here are a few popular types:
Velux Skylights are renowned for their durability and efficiency:
| Feature | Description |
| Durability | Made from high-quality materials that ensure longevity. |
| Energy-efficient | Often come with double glazing to enhance thermal performance. |
| Versatility | Available in various models such as fixed, vented, and solar-powered. |
A solar tube, also known as a sun tunnel, channels natural light through a reflective tube from your roof to the bathroom ceiling, making them perfect for small spaces.
Advantages of Solar Tubes:
| Feature | Traditional Skylights | Sun Tunnels |
| Size | Larger and more robust | Smaller, compact design |
| Light Distribution | Direct and intense | Diffused and even |
| Installation Cost | Generally higher | More affordable |
| Aesthetic | Offers a clear view of the sky | Limited to light provision |
While DIY installation is possible, it can be complex and risky. Professional installers offer:
Many homeowners express concerns with sun tunnel skylight installations in bathrooms due to potential issues like condensation forming and bad weather affecting flashings. Proper ventilation with a bathroom exhaust or exhaust fan is essential to keep the bathroom fresh and prevent stale air.
When considering where to put a skylight, the roof structure must support it effectively. Light would enter the en suite through built-in glass windows, but glare from the sun may vary based on the design. An opening skylight with a diffuser can help control brightness.
For one room, using a sun tunnel skylight can redirect light into the room without the worry of excessive glare. The three layers of argon gas insulation in modern skylights enhance energy efficiency, making them a pleasant addition even in challenging climates.
Condensation is a common issue, but it can be minimized:
If condensation is not managed, mold can indeed form:
Rain sensors automatically close vented skylights when rain is detected, ensuring no water enters your bathroom.
| Feature | Benefit |
| Automatic Closing | Prevents water damage during unexpected rain. |
| Convenience | No need to manually operate the skylight. |
| Increased Lifespan | Protects the skylight mechanism from wear and tear. |
Yes, skylights can effectively illuminate small spaces, making them appear larger and more inviting.
Here are a few popular design choices:
A bathroom skylight can enhance other design elements:
Regular maintenance for skylights is essential to ensure they remain functional and appealing. Inspect the roof around the skylight for any signs of damage or leaks that could let the sun in improperly.
Cleaning the cavity and replacing old seals will enhance light filtering capabilities, allowing natural light to brighten your space. Neglecting these tasks could look uninviting and lead to costly repairs.
Regular cleaning is essential for maintaining clear views and functionality:
Perform bi-annual checks:
Investing in a bathroom skylight, whether it’s a skylight window, roof window, or considering a skylight replacement, can vastly improve the usability and aesthetic appeal of your space. With proper selection, installation, and maintenance, a skylight in the bathroom is a beautiful and functional feature that adds value to any home.
Stay tuned for more home improvement tips and guides!
Feel free to reach out if you have further questions or need professional advice on bathroom skylights!
As a homeowner, maintaining the integrity of your property is paramount. One crucial aspect of this upkeep is ensuring that your gutters are in top-notch condition. Gutters play a vital role in protecting your home from water damage by efficiently channeling rainwater away from the foundation. When it comes to choosing the right gutter system, seamless gutters stand out as a superior option. In this blog post, we will delve into the benefits of seamless gutters and why they are worth the investment.
Gutter Meaning: Gutters are an essential component of any home's drainage system. They collect rainwater from the roof and direct it away from the house to prevent water damage.
What Are Seamless Gutters: Seamless gutters are custom-made gutters that are manufactured on-site to fit the exact measurements of your home. Unlike traditional sectional gutters, seamless gutters have no seams except at the corners and downspouts.
Seamless Gutter Installation: The installation of seamless gutters involves a specialized machine that crafts the gutters to the precise dimensions of your home. This seamless design ensures a perfect fit and reduces the risk of leaks and clogs.

When considering seamless gutters, one of the standout advantages is the enhanced curb appeal they offer. Unlike sectional gutters, seamless gutters provide a clean and seamless look to the exterior of your home. Here are a few ways seamless gutters can boost your home's aesthetics:
Water damage can wreak havoc on your home's structure and foundation. Seamless gutters are designed to efficiently channel water away from your property, reducing the risk of water-related issues. Here's why seamless gutters excel in preventing water damage:
While the initial cost of seamless gutters may be higher than traditional gutters, the long-term benefits often outweigh the investment. Here's how seamless gutters can lead to cost savings over time:
In terms of installation and maintenance, seamless gutters offer convenience and efficiency. Here's what you need to know about the installation and upkeep of seamless gutters:
In conclusion, seamless gutters are a worthwhile investment for any homeowner looking to protect their property from water damage and enhance its curb appeal. While the initial cost may be higher, the long-term benefits of seamless gutters in terms of durability, aesthetics, and cost savings make them a superior choice. Consider upgrading to seamless gutters for a hassle-free and efficient drainage solution for your home.
Ready to explore seamless gutter options for your home? Contact us at IBEX Roof to learn more about seamless gutters and their cost-effective benefits.
Are seamless gutters worth it? Absolutely. Invest in seamless gutters today for a more secure and visually appealing home.
Imagine this scenario: you're relaxing at home when you suddenly notice water dripping from your ceiling. The panic sets in as you realize you have a ceiling leak. What should you do? In this comprehensive guide, we'll walk you through the steps to take when faced with a water leak from your ceiling. Time is of the essence, so let's dive in and learn how to effectively address this emergency situation.
The first step in handling a ceiling water leak is locating the source of the problem. Check the following areas to pinpoint where the water is coming from:
| Potential Source | Description |
| Roof Damage | Missing shingles, damaged flashing, or clogged gutters can lead to water seeping into your home. |
| Plumbing Issues | Leaky pipes, burst water heaters, or faulty bathroom fixtures may cause water to leak into your ceiling. |
| Condensation | Excessive moisture and poor ventilation can result in condensation buildup, leading to ceiling leaks. |
By identifying the source of the leak, you can better understand the necessary steps to address and repair the issue.
When dealing with a ceiling water leak, safety should be your top priority. Follow these safety tips to effectively manage the situation:
Once you've managed the immediate safety concerns, it's essential to seek help from qualified professionals to address the ceiling leak. Consider the following when contacting experts:
By consulting with experienced plumbers or roofing specialists, you can ensure that the source of the leak is accurately identified and repaired.
After the leak has been addressed, it's crucial to mitigate water damage and implement preventive measures to avoid future ceiling leaks. Follow these steps:
Water leaks can pose health risks, including mold growth and indoor air quality issues. Here's how to address potential health concerns associated with ceiling leaks:
By prioritizing health and safety measures, you can safeguard your well-being in the aftermath of a ceiling water leak incident.
In times of crisis, knowing how to respond to a ceiling water leak can make all the difference in minimizing damage and ensuring a swift resolution. By following the steps outlined in this emergency guide, you can take proactive measures to address the leak, protect your home, and safeguard your health. Remember, swift action is key in handling a ceiling leak effectively.
We hope this guide equips you with the knowledge and confidence to tackle a water leak from your ceiling with composure and efficiency. Stay informed, stay safe, and stay prepared for any future challenges that may come your way.
We're here to help—feel free to reach out with any questions or share your experiences in dealing with ceiling leaks. Your feedback is invaluable as we continue to provide support and guidance to our community.
Incorporating the recommended steps and safety measures outlined in this blog post will equip you with the tools to effectively respond to a ceiling water leak. Remember, prompt action and expert assistance are key in successfully addressing and resolving such emergency situations. Stay informed, stay proactive, and protect your home from the potential impacts of water leaks.
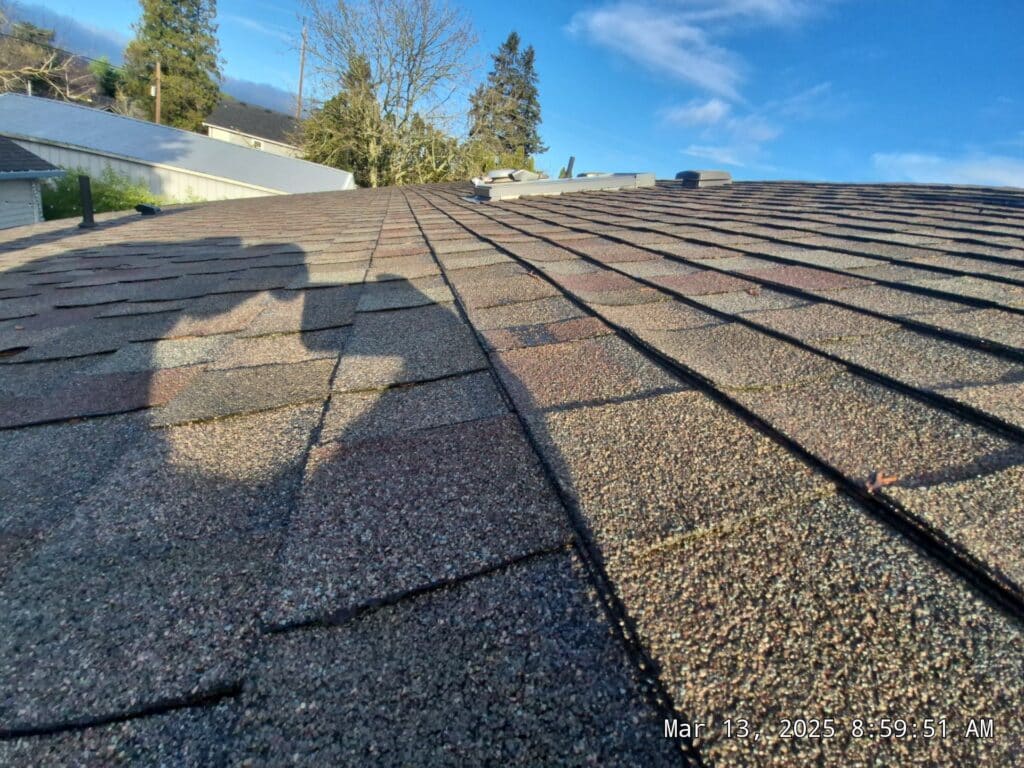
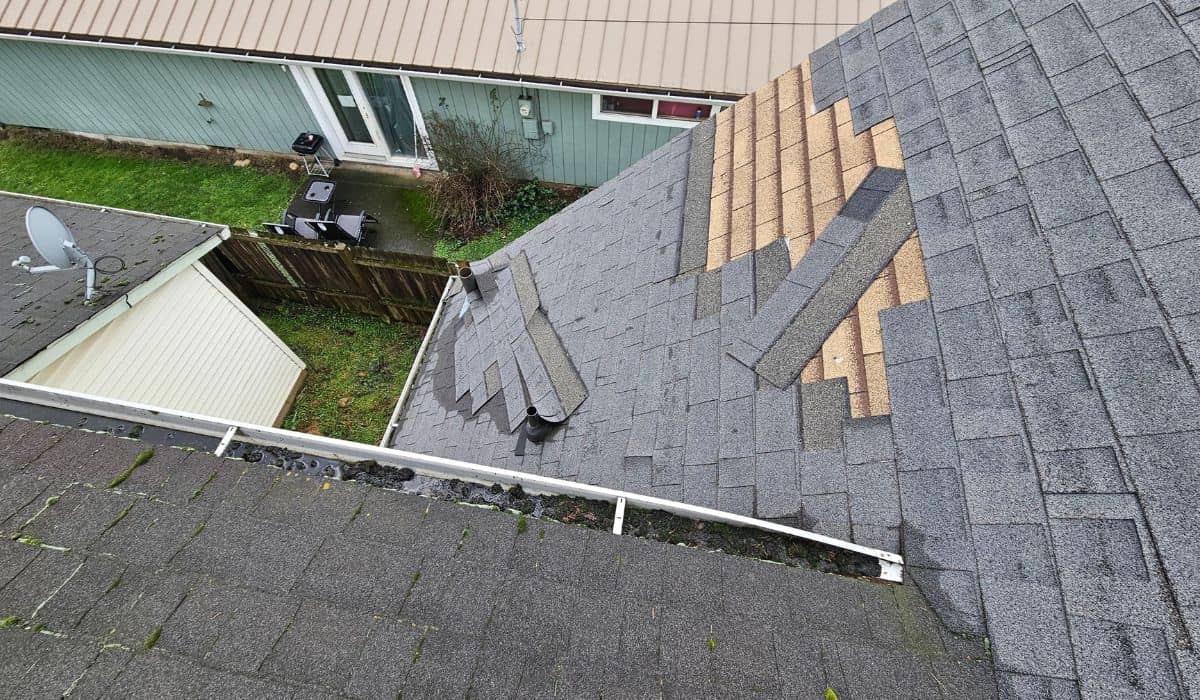
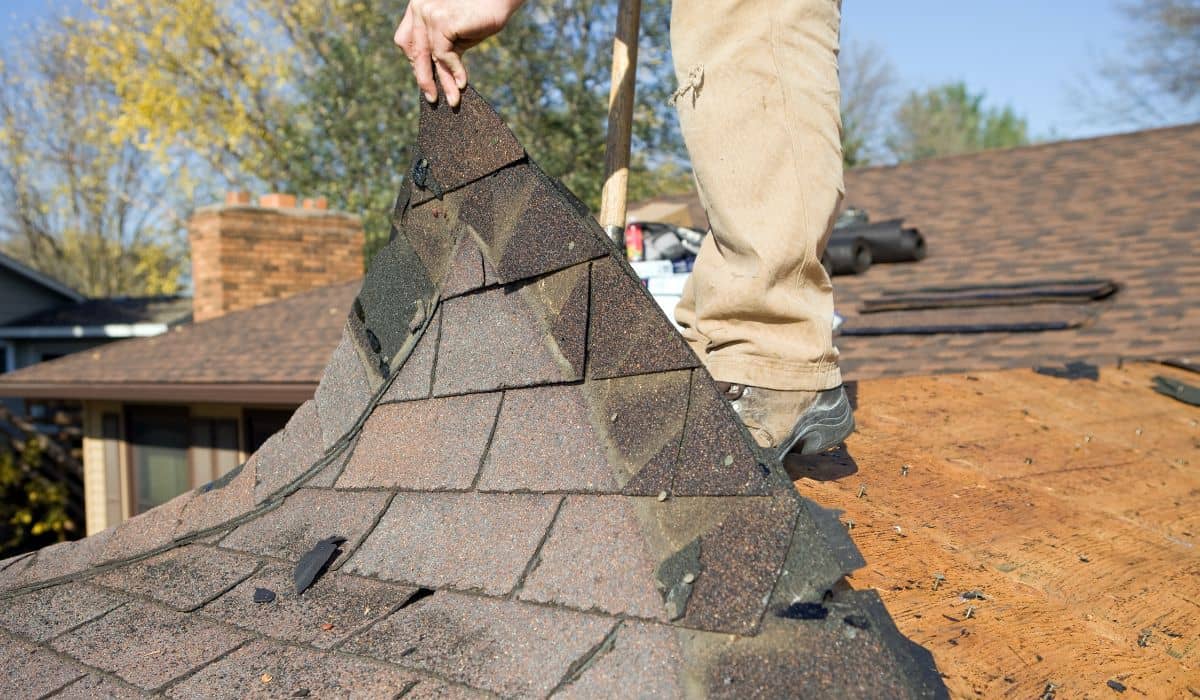
A leaky roof can cause significant damage to your home if not addressed promptly. Finding and fixing a roof leak is crucial to maintaining a safe and dry living space. In this blog post, we will delve into the common causes of roof leaks, how to identify the source of a leak, essential tools and materials for repairs, and step-by-step instructions for DIY roof leak repair.
Water stains on ceilings, dampness in the attic, and mold growth are telltale signs of a roof leak. To locate the exact source of the leak, follow these steps:
Before starting the repair work, gather the following tools and materials:
| Tools | Materials |
| Caulk gun | Shingles |
| Flashing materials | Sealants |
| Ladder | Roof patches |
| Pry bar | Roof cement |
Ensure you follow safety precautions when working on your roof to prevent accidents.
Regular roof inspections, maintenance, and roof repair are key to preventing roof leaks. Here are some preventive measures to consider: installing proper step flashing, maintaining your roof vents, and ensuring your shingle roof is in good condition.
Remember, investing in quality roofing materials and professional installation can also help prevent future leaks.
Taking care of your roof and promptly addressing roof leaks can save you from costly repairs and damage to your home. By following the tips and techniques outlined in this guide, you can maintain a dry and secure living space for years to come.
If you have any further questions or require professional assistance, do not hesitate to contact a roofing contractor for expert advice and repairs.
In conclusion, a well-maintained roof is crucial for a leak-free home. By following the steps outlined in this guide, you can effectively repair roof leaks and ensure the longevity of your roof. Remember, regular maintenance and prompt repairs are key to preventing costly damage. Stay proactive and attentive to your roof's needs for a secure and dry living environment.
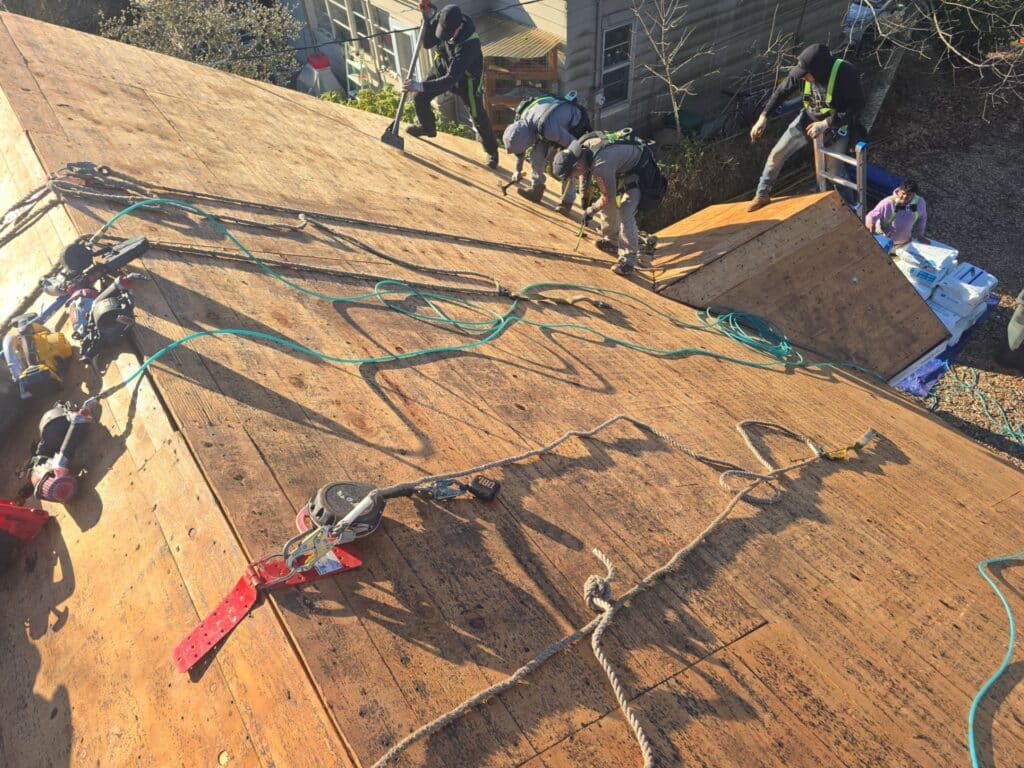
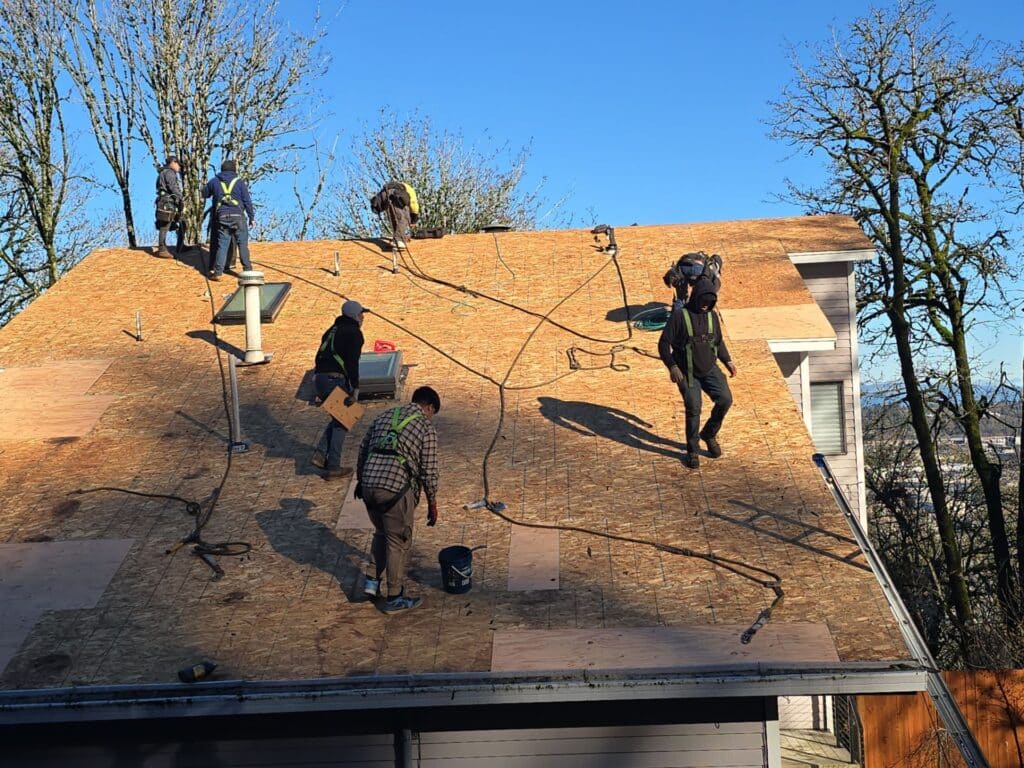
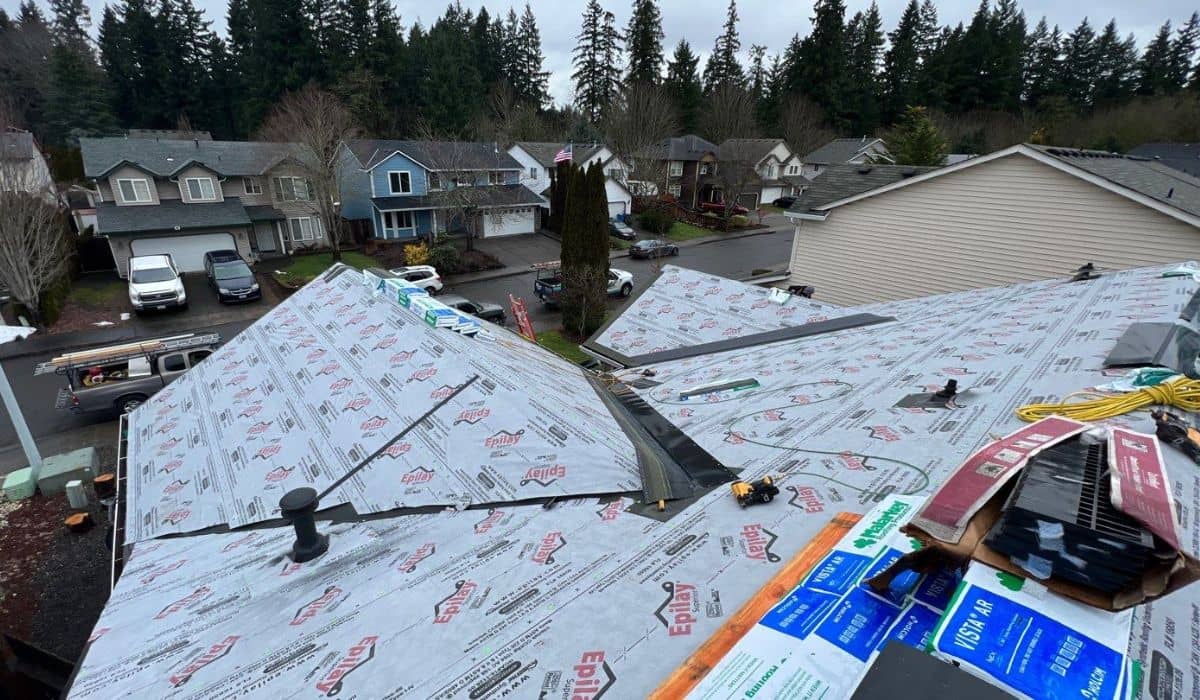
Imagine waking up to a leaky roof during a heavy downpour. The urgency to fix it becomes imminent, and you wonder, "How long will it take to replace my roof?" In this blog post, we will explore the various factors that determine the timeline of a roof replacement project.
Replacing a roof is a significant undertaking for any homeowner. It not only ensures the safety of your home but also protects you from the elements. However, one burning question that often arises is, "How long does it take to replace a roof?"
The duration of a roof replacement project depends on several factors, including the size of your roof, its complexity, the materials used, weather conditions, and the expertise of your roofing contractor. By understanding these factors, you can better plan and anticipate the timeline for your roof replacement.
Before diving into the world of roof replacement timelines, it's essential to begin with a thorough assessment of your roof. Engaging a professional roofing contractor to inspect your roof will provide crucial insights into its condition, material, and overall complexity. During the assessment, potential issues such as hidden damage or structural defects may also be uncovered, which can impact the timeline.
Adequate preparation is key to ensuring a smooth and efficient roof replacement process. Before the project commences, several steps need to be taken, including obtaining any necessary permits, scheduling the project with your contractor, and selecting the appropriate roofing materials.
The size and complexity of your roof play a significant role in the overall timeline of the project. Roofs with multiple pitches, chimneys, skylights, or dormers require extra time for precise installation. Here is a breakdown of how the size and complexity of your roof can affect the timeline:
| Roof Size | Time for Replacement |
| Small (1,000-1,500 sq. ft.) | 1-2 days |
| Medium (1,500-3,000 sq. ft.) | 2-3 days |
| Large (3,000+ sq. ft.) | 3+ days |
Weather conditions can significantly impact the duration of a roof replacement project. Extreme temperatures, rain, or high winds may require adjustments to the schedule. It is crucial to have a flexible plan if inclement weather arises during the project. Here's how weather conditions can impact the timeline:
| Weather Condition | Impact on Timeline |
| Rainy Days | Delayed project; work may need to be rescheduled |
| High Winds | Unsafe working conditions; work may be halted |
| Extreme Temperatures | Limited working hours to avoid issues with adhesive materials |
The choice of roofing material is another critical factor affecting the timeline. The installation process varies for each type of material. Here are some common roofing materials and their respective installation durations:
The process of removing the existing roofing materials and disposing of them properly can also impact the timeline. Factors such as the number of old layers, damaged underlayment, or the presence of hazardous materials can add extra time to the project. A thorough roof inspection will help determine the extent of removal and disposal work required.
Now that we have covered the factors that influence the timeline, let's take a closer look at the roof replacement process itself. The entire process generally consists of the following stages:
To ensure a smooth and efficient roof replacement process, it's essential to hire a reputable and experienced roofing contractor. A skilled contractor will not only provide expertise but also complete the project within the estimated time frame. Conduct thorough research, read customer reviews, and seek recommendations when selecting a roofing contractor.
When a roof needs replacement, the question of how long it will take is often at the forefront of a homeowner's mind. By considering factors such as the size and complexity of the roof, weather conditions, material selection, and engaging the right contractor, you can gain a better idea of the timeline for your roof replacement.
Remember, a timely roof replacement is crucial for preventing further damage and protecting your home. While individual circumstances may vary, an average roof replacement project can take anywhere from a few days to a few weeks. To obtain a more accurate estimate for your specific project, it's best to consult with a professional roofing contractor.
By investing the necessary time and effort into understanding the factors that affect the timeline, you can plan accordingly and ensure a successful roof replacement that will safeguard your home for years to come.
CertainTeed is a leading manufacturer of durable and high-quality shingles for roofs. They specialize in asphalt shingles, which are a popular choice for homeowners due to their affordability and durability. CertainTeed offers a wide range of shingle options, including architectural shingles. These shingles are designed to mimic the appearance of more expensive materials like slate and wood shake, giving homeowners the opportunity to achieve a premium look for their roof without the high cost.
One of CertainTeed's most popular architectural shingles is the Landmark series, which offers a variety of colors and styles to suit any home design. The Landmark shingles are known for their exceptional quality and performance, as they are made from high-grade asphalt and built to withstand the elements. With a reputation for excellence and reliability, CertainTeed shingles are favored by homeowners and highly recommended by roofing professionals. For those looking for a trusted roofing manufacturer, CertainTeed is a top choice, alongside competitors like GAF.
Certainteed Black Granite is a popular roofing shingle option for homeowners looking for a durable and aesthetically pleasing roofing material. Made from a blend of durable asphalt and ceramic granules, these shingles are designed to withstand harsh weather conditions and provide long-lasting protection for the home.
The black granite color adds a touch of sophistication and elegance to any home's exterior, enhancing its curb appeal. With a limited lifetime warranty, homeowners can have peace of mind knowing that their investment is protected. Additionally, Certainteed Black Granite shingles are designed to be energy-efficient, helping to reduce energy costs and contribute to a more sustainable environment.
Easy to install and maintain, these shingles are an excellent choice for homeowners who want a high-quality and visually appealing roofing option. Whether it's a new construction or a roof replacement project, Certainteed Black Granite shingles are a reliable and stylish choice that will enhance the beauty and protection of any home.
Certainteed's Colonial Slate is a versatile and timeless roofing option. With its blend of gray and brown tones, it adds a classic and elegant touch to any home. The shingles are designed to replicate the look of natural slate, but at a fraction of the cost. This makes Colonial Slate a great choice for homeowners who desire the aesthetic appeal of slate without breaking the bank. Not only does this roofing option enhance the curb appeal of a house, but it also offers exceptional durability and weather resistance.
The shingles are made from high-quality materials that can withstand harsh weather conditions, including strong winds and heavy rain. Additionally, Certainteed's Colonial Slate shingles come with a lifetime limited warranty, providing homeowners with peace of mind. Whether you have a traditional or modern-style house, Colonial Slate is a reliable and attractive roofing option that will protect your home for years to come.
Certainteed Slate Gray is a popular roofing material known for its durability and aesthetic appeal. Made from a blend of natural materials and advanced polymer technology, the slate gray shingles offer the look of traditional slate without the high cost and maintenance.
The color Slate Gray adds a touch of sophistication to any home, complementing a variety of architectural styles. The shingles are designed to withstand harsh weather conditions, including high winds, heavy rain, and extreme temperatures. They also have excellent fire resistance, giving homeowners peace of mind. With a limited lifetime warranty, Certainteed Slate Gray shingles provide long-lasting protection and beauty for years to come.
The high-quality materials and attention to detail in the manufacturing process ensure a superior product that will enhance the curb appeal and value of any property. Whether for a residential or commercial project, Certainteed Slate Gray is a reliable and attractive roofing option.
Certainteed's Smoke Quartz offers homeowners a sleek and sophisticated option for their roofing needs. This shingle color features a unique blend of shades of grey and black, creating a modern and eye-catching look for any home.
The Smoke Quartz shingles are made with high-quality materials that ensure durability and longevity. Whether battling harsh weather conditions or resisting algae and mold growth, this exceptional shingle can withstand it all. Moreover, Certainteed's Smoke Quartz shingles come with a limited lifetime warranty, providing homeowners with peace of mind and protection against any defects.
Not only does the Smoke Quartz shingle offer superior performance, but its architectural style and stunning color make it the perfect addition to any residential property. With Certainteed's Smoke Quartz, homeowners can enhance their home's curb appeal and make a statement that will last for years to come.
Certainteed's Victorian Blue is a versatile and visually appealing shingle option for homeowners looking to enhance the curb appeal of their homes. This particular shade offers a classic and elegant touch to any architectural style, whether it be Victorian or contemporary. The deep blue color adds depth and richness to a roof, creating a striking contrast against other exterior elements. In addition to its aesthetic appeal, the Victorian Blue shingle is also highly durable and reliable.
It is designed to withstand harsh weather conditions and resist the growth of algae and mold. This means that homeowners can enjoy a beautiful roof for many years to come, without having to worry about constant maintenance and repairs. With its combination of style, durability, and functionality, Certainteed's Victorian Blue shingle is a great choice for those seeking a timeless and long-lasting roofing solution.
If you are in need of a quote for your roofing project, look no further! Give us a call today at (360) 938-40093 and our office will be more than happy to assist you. Our team at IBEX Roofing is dedicated to providing top-notch service and exceptional results.
We specialize in installing high-quality roofing materials, such as certainteed shingles, that not only protect your home but also enhance its overall look. Our wide range of certainteed shingles colors allows you to choose the perfect style that matches your home's aesthetic. Whether you prefer a classic, timeless look or a more modern and vibrant appearance, we have the options to meet your needs. Don't hesitate to reach out to us today - we are ready to provide you with a competitive quote and get started on your roofing project! .
