Roof repair is an important part of keeping your home safe and lasting for a long time. But many people don't know how much it will cost to fix their roofs. In this blog, we'll talk about the factors that affect the cost of roof repair, talk about the average costs, and give you some helpful information about IBEX Roof as a reliable roofing option.
Your roof is a very important part of keeping your home safe from the weather. Wear and tear can happen over time, which means it may need to be fixed or replaced. Knowing how much a roof repair will cost is important for planning and making smart decisions. Let's look at the main things that affect how much it costs to fix a roof.

Several factors contribute to the overall cost of roof repair. It's essential to consider these aspects before estimating the expenses.
The type of roofing material used significantly affects the repair costs. Different materials have varying prices and require distinct repair techniques. For instance, repairing a shingle roof may be less expensive compared to repairing a metal or tile roof.
The size and complexity of your roof are crucial factors in determining repair costs. Larger roofs generally require more materials and labor, resulting in higher expenses. Additionally, roofs with intricate designs or unique features may pose challenges during repairs, contributing to increased costs.
The extent of damage to your roof directly impacts the repair costs. Minor issues like loose shingles or small leaks may be relatively inexpensive to fix. However, significant structural damage or widespread leaks will require more extensive repairs, leading to higher expenses.
The location and accessibility of your property can affect the cost of roof repair. If your home is situated in a remote area or has limited accessibility, it may be more challenging for contractors to transport materials and complete the repairs efficiently. These factors can contribute to increased costs.
Labor costs vary depending on the region, contractor's expertise, and the complexity of the repairs. Hiring a reputable roofing professional is essential to ensure high-quality workmanship and long-lasting repairs. However, experienced contractors may charge higher rates, which should be factored into the overall cost estimate.
The cost of roof repair can vary significantly based on the factors mentioned above. Here is a general breakdown of the average costs associated with different types of repairs:
Minor roof repairs typically include fixing small leaks, replacing a few missing shingles, or repairing damaged flashing. On average, these repairs may cost between $150 and $400, depending on the extent of the damage and the materials required. Keep in mind that these are approximate figures and can vary based on your location and specific circumstances.
Moderate roof repairs involve addressing more significant issues such as extensive leaks, damaged sections of the roof, or replacing a larger number of shingles. The cost for these repairs can range from $500 to $1500, depending on the size of the affected area and the complexity of the repair work.
In cases where the damage to your roof is extensive, such as widespread leaks, significant structural issues, or the need for a complete roof replacement, the costs can be substantial. Roof replacements typically cost between $5000 and $10,000, or even more, depending on factors like the size of your roof, the materials chosen, and any additional features or modifications required.
Getting roof repairs done quickly has a number of perks. By acting right away, you can stop your roof from getting worse and save money on fixes in the future. Timely fixes help keep your home's structure strong, stop water leaks that could cause mold or other damage inside, and extend the life of your roof. It is best to do regular checks and fix any problems right away to avoid having to do a lot of work or replace something.
It's important to choose a reliable roofing option when you need to fix or replace your roof. IBEX Roof is a reliable company that is known for its high-quality products and skilled work. They have a lot of choices for roofs to fit different budgets and tastes. IBEX Roof is made to last, resist the weather, and look good. This gives homeowners peace of mind and long-term safety for their homes.
Roof repair prices depend on many things, such as the type of roofing material, the size and complexity of the repair, the amount of damage, the property's location and how easy it is to get to, and the cost of labor. It's important to take care of roof repairs right away to avoid more damage and more expensive fixes down the road. By using a reliable roofing system like IBEX Roof, residents caA professional roofer repairing a damaged roof. make sure that their roofs will last and stay in good shape.
If you own a property with a roof, you're bound to face maintenance issues at some point. One common problem is granular loss, which can lead to a damaged roof if left unaddressed.
Granular loss can occur due to several reasons such as exposure to natural elements, heavy rain, and age-related deterioration.
In this post, we’ll discuss what granule loss is, its causes, how you can prevent it from happening, and provide an in-depth guide on how to repair it.
Granules are small, sand-like particles that are applied to the surface of shingles to protect them from UV rays and harsh weather conditions. When granules start to fall off, it’s called granule loss.
Granule loss can occur due to various causes, such as:
It’s not always easy to spot granule loss on shingles. However, some signs may indicate that you have granule loss on your roof. These signs include:
Granular loss can cause severe damage to your roof, leading to costly repairs or even replacement. Here are some effects of granular loss:
Granular loss can shorten the lifespan of your roof. Without the protective layer of granules, your roof is exposed to the elements, causing it to deteriorate more quickly.
Granular loss can lead to water damage on your roof. Without the protective layer of granules, water can seep through the roof's surface, causing leaks and other water-related issues.
If left unaddressed, granular loss can lead to structural damage. The water damage caused by granular loss can weaken the roof's structure, leading to more severe damage.
Prevention is always better than cure. Here are some tips to help you prevent granule loss on shingles:
If you're not comfortable repairing granular loss on your own, you can seek the assistance of a professional. IBEX Roof is a leading company in roof repair and maintenance.
We specialize in repairing all types of roofs, including those with granular loss. Our team of roof experts can inspect your roof, identify the problem, and provide a solution that fits your budget.
We offer a range of services, including roof repair, maintenance, and roof replacement. We use only high-quality materials and employ experienced roofing contractors to ensure that our clients receive the best service possible. We also offer a warranty on our work, which gives our customers peace of mind.
Granule loss on shingles is a common issue that homeowners face. Understanding the causes and signs of granule loss can help you prevent severe damage to your roof. By following the prevention tips mentioned in this post, you can ensure your roof stays healthy and lasts for many years.
If you're a homeowner, you know how crucial it is to keep your home in good condition. One of the most common issues homeowners face is a leaking roof. A leaking roof can cause significant damage to your home, and if left unaddressed, it can lead to costly repairs. In this post, we'll discuss everything you need to know about repairing a leaking roof.
Before we dive into how to fix a leaking roof, let's first understand what causes roof leaks, the signs of a leaking roof, and the different types of roof leaks.
Roof leaks can be caused by several factors. One of the most common causes of roof leaks is damaged or missing shingles. If your roof is missing shingles or has damaged shingles, it can allow water to seep into your home. Other causes of roof leaks include clogged gutters, damaged flashing, and cracked vent boots.
There are several signs that your roof may be leaking. The most obvious sign is water stains on your ceiling or walls. You may also notice damp spots on your floors or mold growth. Another sign of a leaking roof is a musty odor in your home.
Roof leaks can be categorized into two types: internal leaks and external leaks. Internal leaks occur inside your home and are typically caused by plumbing or HVAC issues. External leaks occur on your roof and are caused by issues with your roof.
Now that we understand the different types of roof leaks let's get into how to fix a leaking roof. Before we begin, it's essential to take safety precautions to prevent accidents.
Before you start repairing your leaking roof, make sure you have a sturdy ladder and wear slip-resistant shoes. You should also wear gloves and eye protection to protect your hands and eyes from debris.
To repair a leaking roof, you'll need the following tools:
Here's a step-by-step guide to fixing a leaking roof:
Fixing a leaking roof can be a DIY project, but there are times when you should call a professional. Let's discuss when it's best to call a professional and the signs you need to look for.
Fixing a leaking roof can be a DIY project if the damage is minimal and you have the necessary skills and tools. However, if the damage is extensive, it's best to call a professional. A professional roofing contractor has the experience and knowledge to fix the damage correctly, ensuring that the repair will last for a long time.
Here are some signs that you need to call a professional:
Preventing roof leaks is essential to keep your home in good condition. Here are some ways to prevent roof leaks:
Regular maintenance is essential to prevent roof leaks. Clean your gutters regularly, trim trees that are close to your roof, and ensure that your roof is free of debris.
Regularly inspecting your roof can help you identify any damage early. Look for missing or damaged shingles, clogged gutters, and cracks in your vent boots.
Hiring a professional roofing contractor to inspect your roof regularly can help prevent roof leaks. A professional roofing contractor can identify any issues with your roof and fix them before they cause significant damage.
Conclusion
Fixing a leaking roof can be a daunting task, but with the right tools and skills, it's a DIY project that can save you money. However, if the damage is extensive, it's best to call a professional. Preventing roof leaks is essential to keep your home in good condition, so regularly inspecting and maintaining your roof can help identify any issues before they become a significant problem. Remember to always take safety precautions when working on your roof to prevent accidents.
If you notice damp walls or water dripping around your fireplace, it’s likely that you have a chimney leak. As with any leak, chimney leaks need to be dealt with swiftly. Otherwise, you risk a lot more damage to your home, such as mold, rot, or, in the worst case, a collapsing chimney.
The solution to your leaking chimney will vary depending on the reason why it’s leaking in the first place. Here are a few of the most common reasons why your roof is leaking around the chimney.
Metal flashing helps prevent water from getting into the joints where your chimney meets your roof. It can deteriorate over time, exposing joints to water and cause a leaking chimney. You can fix minor cracks in flashing using FlashSeal or another type of flashing repair product. If your flashing is severely damaged or very old, then you should consider replacing it altogether.
There are some types of brick that are more porous and likely to leak than others. Too much sand in mortar also causes it to be more absorbent and susceptible to causing a chimney leak. When your chimney doesn’t have any cracks, spray water repellent on your chimney to prevent it from absorbing water and turning into a leak. Mortar repair products can be used for minor cracks in the mortar. But if there are big gaps in your brick and mortar, then you should get it repaired by a professional.
A chimney crown, also known as a chimney wash, is used to cover the top opening of your chimney. Ideally, it should be made out of concrete, metal, or stone. However, many are made out of mortar, which is less desirable as mortar is not waterproof and breaks down a lot faster. Damaged chimney crowns are hard to detect unless you are getting your chimney swept or inspected.
If there are minor cracks in your chimney crown, seal it using a crown sealing product like CrownSeal. Minor cracks can quickly turn into more extensive damage, so it’s best to extend the life of your chimney crown by repairing small cracks as soon as possible. Otherwise, you may have to replace your chimney crown altogether. If you don’t already have one, consider getting a chimney cap to go over your chimney crown for more protection.
It’s possible your chimney may have a poorly designed valley that collects debris and water rather than directing it off your roof. You can rectify a bad valley with a cricket installation. A chimney cricket will prevent water from collecting in the downward slope around your chimney.
The ideal solution to fixing a leak is to find any cracks or minor damages on your roof before you experience any leaking at all. IBEX Roof can help inspect your roof and chimney to get on top of necessary minor repairs before they turn into larger problems.
A small leak can sometimes mean big damage in your roof and finding the source of a leak is usually not an easy task. Damp walls, discoloration on your ceiling, or dripping water are all signs of a leak, and it’s important to find out where the leak is coming from. If you suspect you have a leaking chimney, give IBEX Roof a call and we can help find the source of your leak and help you find the best solution to fix it fast.
Here’s a storm damage checklist for your reference to clearly understand what type of damage your roof may have endured:
If you’re a resident of the Pacific Northwest, chances are that you have encountered rough weather more times than you can count.
From hailstorms to heavy winds and torrential rain, storms can cause a lot of potential damage to your homes, especially the roof!
So, once a storm has passed, the first thing you should do is check for storm damage.
Walk around the perimeter of your house to check for visible signs of roof damage. This includes broken or missing shingles, curled shingles, dented flashing, exposed roof deck, granule loss, etc.
If you spot these damages from ground level, it’s time to hire a roofing company to fix these issues as soon as possible.
Take note of the area around your house and look for damaged fences, fallen tree limbs, broken posts, and patio. Also, check the ground for shingles or other roofing components that might have blown off during the storm. This will help you identify roof damage that is not visible from the ground.
The gutters, roofing vents, and overhangs can get dented or filled with loose leaves and debris. If they are clogged or dented, you should clean them out and get them fixed to avoid further damage due to standing water.
The windows around your house can get damaged too. Check the windows for cracks, loose weatherstripping, and torn screens. If the windows are damaged, you should get them fixed or replaced soon, as cracked windows cannot sustain harsh weather for long.
Even if your roof seems apparently unharmed from the exterior, there are chances of unseen leaks present under the shingles, roof deck, or underlayment that can lead to serious damage later on. To spot leaks, inspect the ceiling, light fixtures, and attic of your home for brown water spots on the inside walls. If you find any seepage, it means the roof is leaking. Find the source of the leak, and get it repaired instantaneously.
Moisture can also seep into the structure of your house through the basement and crawlspace. Storms can lead to standing water in these spaces of your home that can weaken the foundation, seep into the walls, and cause moisture accumulation, which is a serious problem on its own!
If you find any of the discussed signs and symptoms for storm damage inside, outside, or on the roof of your home, you should hire a roofing contractor as soon as possible to fix all the major and minor issues.
Contact us for help with your Storm Damage!
Storm damage is imminent! However, if you inspect your roof and exterior right after a storm and take timely action, you can avoid further damage and save time, money, and lives!
Here is a full inspection checklist for a full view!
If you’re getting a new roof for your house or the old one renovated, you must have come across the term “Roofing Square” either from your contractor or the supplier. So, what is a roofing square? To put it simply, it’s a unit of measurement that helps in calculating the total amount of material required for roof building. How does one calculate the number of roofing squares, and how does it help estimate the total material required?
A roofing square is a 10 x 10 area on the roof that equals 100 square feet. The number of roofing squares helps contractors calculate the total square footage of your roof, and determine the exact amount of material required to build the roof. This includes the underlay and bundles of shingles.
As a homeowner or someone involved in the construction industry, understanding roofing squares is crucial. When planning a roofing project, having a grasp of this concept allows you to communicate effectively with contractors, suppliers, and other professionals involved. It enables you to make informed decisions, avoid costly mistakes, and ensure the project's success.
The number of shingles in a square can vary depending on the specific type and size of the shingle. A square refers to a measurement used in the roofing industry that equals 100 square feet. Roof shingles are typically sold in bundles, and the number of shingles in a bundle can also vary based on their size.
On average, a bundle of shingles can cover approximately 33 square feet of roof area. This means that three bundles are needed to cover one roofing square. So, if we consider a standard roof size of 100 square feet, we would need around nine bundles of shingles to completely cover it. However, it's important to note that these numbers can vary depending on the specific product and manufacturer. Therefore, it's always recommended to consult the product specifications or seek advice from a professional when determining the exact number of shingles needed for a specific roof.
The cost per square is a term used in the roofing industry to determine the price of a new roof or a roof replacement. A square, in this context, refers to a unit of measure equal to 100 square feet of roof area.
The cost per square is determined by various factors including the type of shingle you choose, the size of your roof, the pitch of your roof, and the difficulty of the job. Generally, the cost per square depends on the materials used and the labor required to install them. For example, if you opt for high-end shingles, the cost per square will be higher than if you choose a more budget-friendly option. Additionally, a steep roof will require more caution and specialized equipment, which can increase the cost per square. Therefore, when considering a new roof or roof replacement, it is important to consult with a roofer who can accurately estimate the cost per square based on the specific details of your roof.
The first step in calculating the number of roofing squares is to find out the total square footage.
For this, you have to measure the length and width of your roof planes. The number of roof planes depends on the style of your roof. For instance, a gable roof has two planes, one at the front and one at the back. Similarly, a shed or flat roof has just one plane. The length multiplied by the width of a roof plane gives you the square footage of that particular roof plane. If your house has three roof planes, add the square footage of all 3 to get the total square footage of your roof. Now, divide the total square feet by 100 to get the number of roofing squares.
It may seem like a lot of math, but trust us, it’s quite essential when it comes to roof building. Don’t worry, though. Our team will do the math for you! By calculating the right amount of materials, we can ensure that you have just enough left over at the end for future repairs. We’ll also order your materials for you. At IBEX Roof, we’ve got you covered every step of the way!
Roofing projects can vary significantly in cost due to several factors. Some of the key elements that influence roofing costs include:
Considering these factors and understanding the concept of roofing squares can help homeowners and contractors develop accurate cost estimates.
Roofing squares play a vital role in determining material costs and, consequently, overall project expenses. By knowing the number of roofing squares required, contractors can calculate the total cost of materials needed for the project. This information is crucial in budget planning and ensuring that the project remains within financial constraints.
When seeking bids from roofing contractors, providing them with accurate measurements in roofing squares is essential. It allows contractors to assess the scope of the project accurately and provide more precise quotes. Moreover, this ensures that all contractors are bidding on the same project specifications, making it easier to compare offers.
Choosing the right contractor is paramount to the success of any roofing project. It is advisable to research and gather recommendations from friends, family, or reputable online platforms. Additionally, check for licenses, insurance, and customer reviews to ensure the contractor's reliability and expertise.
If you are in need of roofing services, look no further than IBEX Roof. We are a trusted and reliable roofing company that specializes in all aspects of roof maintenance and repairs. Whether you need us to inspect, repair, or replace your roof, we have got you covered.
Our team of experienced and skilled roofers will ensure that your roof is in top shape, providing you with the protection and peace of mind you need. We understand that investing in a new roof can be a significant undertaking, which is why we are committed to delivering quality services at affordable prices. Our customer service team is always ready to answer any questions or concerns you may have, and our technicians are equipped with the latest tools and techniques to handle any roofing project efficiently and effectively. Don't wait until your roof is beyond repair, get in touch with IBEX Roof today and let us take care of all your roofing needs.
Is your roof leaking? Are its shingles falling off? Are you experiencing mold growth or roof algae on your shingles? If yes, it means your roof has completed its life cycle; it’s time to get a new roof! And when you’re getting a new roof, the first question that arises in your mind is: How many layers of shingles can I have on my roof?
Well, according to most building codes, you can have a maximum of two layers of shingles on your roof. Furthermore, based on the condition of your roof, you get to decide whether you need a complete roof replacement or just add a new layer of shingles on top of the existing ones. If you ask us, we suggest tearing down the existing roof and getting a new roof altogether! Let’s discuss the number of layers of shingles and tell you why you should do a complete tear-off rather than layering shingles on top of each other.
The number of layers of shingles allowed on a roof depends on the type of roofing material used. For instance, if you’re installing asphalt shingles, cedar shakes, or rubber shingles, the maximum number of layers can be two. On the other hand, metal roofs or concrete roofs will pretty much stop at one layer. Whether you’re getting a new roof or adding shingles on top of the existing ones, the highest you can go is two layers.
Now, let’s discuss why a tear-off replacement is better than multiple layers of shingles on your home.
While adding a new layer of shingles on top of the old ones seems like a good way to save time and money, it is not a viable option in the long run. Here’s why:
When building a roof from scratch or replacing an old one, people tend to avoid tearing it off completely to save time and money. However, while adding multiple layers of shingles seems a good idea in the short term, it can lead to more damage and cost a lot of money in the long run. The solution? Stick to the rules and keep your shingles limited to two layers.
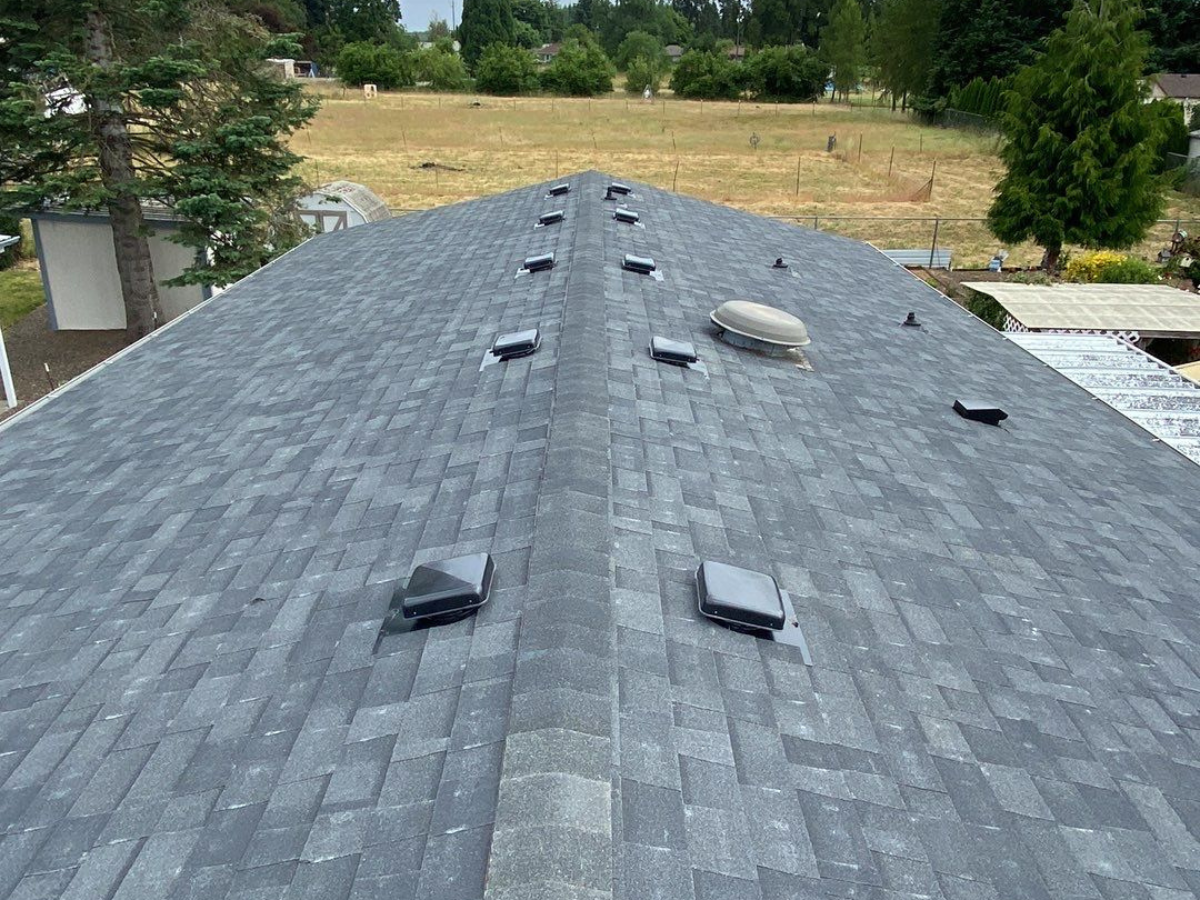
There are many ways to ventilate your home and one of the most common is with a box vent. That said, your choice of box vent is essential when it comes to the preservation of your roof and your home along with it. Installing the wrong box vent could lead to dangerous leaks and unnecessary repair costs.
Box vents are square-shaped exhaust vents made for expelling hot air from your home. They are installed high on your roof but not on the ridge. They are non-mechanical, meaning they rely on natural airflow and wind to rid your home of hot air. Most roofs will require multiple box vents to ensure that no dangerous hot air remains in your attic. Their ability to be placed anywhere on a roof makes them ideal for houses with complicated roofing systems where ridge vents may not be feasible.
Ventilation is an often-overlooked element when one is thinking about building a home or even replacing a roof. Just like a person, a house needs to be able to breathe to remain healthy. Fresh air must be coming in while dirty air is expelled. Box vents work on the latter side and ensure that no hot, polluted air is contaminating your home. Without this exhaust system, your home would be exposed to leaks, roof damage, peeling paint, and an overburdened HVAC system. Not to mention unhealthy air quality for you to breathe, too.
Many places will try to sell you on why a plastic box vent is the way to go because it is cheap and allegedly less likely to dent than a metal box vent. While this is true — a metal box vent will cost around fifteen dollars more than your typical plastic vent and metal may dent when impacted — the key is that metal does not crack as easily as plastic.
The biggest flaw in plastic box vents is their ability to crack. Large hail may dent a metal vent, but it will not destroy its ability to function. A cracked plastic vent will succumb to the elements, particularly in the winter. In the summer, however, plastic has the tendency to curl and discolor. This not only allows for debris and water to get into your home but also stands out as an ugly blemish on your roof.
The simple fact is that a plastic box vent is built to last around 10 to 15 years. A metal vent built out of aluminum can easily last as long as 50 years. This means that it will most likely outlive your roof since it is recyclable and can be used on your next roof. Yes, metal box vents are more expensive than plastic, but if you want your vent to beat the elements, then they are the superior way to go.
Patching holes is a common roof repair that is important to get done as soon as you realize there is a problem. You may notice there is something wrong if there’s a leak in your home and your drywall is wet. Holes in your roof can also lead to pest infestations, which, over time, can get worse if not fixed. Here’s what you need to know if you’re trying to patch a roof hole.
Some roof repairs may seem simple enough that you may want to try fixing it yourself. If you are proficiently handy around the house, you could try to do it on your own. However, NEVER climb onto your roof without the proper safety precautions, and do not climb your roof when it is raining or if your roof is wet. You should also never climb your roof if you suspect there to be rotten areas; one wrong step and you could be falling through your roof! If you do think that there is major damage underneath your shingles, call a professional roofer for an inspection.
The first step to knowing where you should patch your roof is finding where the damage is. You may know there’s a problem because your walls or ceiling are wet or because there’s a leak, but you may not know where the source of the leak is right away. Therefore, we have to narrow down where the damaged area may be.
Begin by going to your attic and looking for areas of moisture, such as a leak or wet stains. From the outside, you can also try to spot missing or damaged shingles, as well as any penetrations in your roof, including the chimney, vents, or anything else that goes through your roof. If you can’t find the source of your leak in your attic, run water from your hose onto different sections of your roof. Have another helper watch out for visible drips from the inside of your house to confirm whether or not the area you are watering is the damaged part of your roof.
Holes in your roof can be caused by a number of things, including fallen tree limbs, wood rotted over time, or pesky animals creating an entrance through your roof from what used to be a small crack. It might also be an old roof penetration you want to get rid of altogether. Depending on what type of damage or hole you are patching in your roof, there may be different steps and precautions you need to take.
Here are just some basic materials you might need to patch a hole in your roof:
Step 1: Climb onto your roof. As mentioned above, climbing your roof is extremely dangerous and you should always take the proper safety precautions before going on top of your house. Make sure your ladder is 100% secure before climbing up.
Step 2: Remove the shingles and nails that are covering the damaged area on your roof. Use a pry bar to slightly lift up the shingles above the damaged area (be careful not to damage them.)
Step 3: Use a pry bar to slightly lift up the shingles above the damaged area. If the hole in your roof’s plywood is irregular or an odd shape, use your reciprocating saw to cut out a square or rectangle shape around the hole. Remove the wood.
Step 4: Install a 2-by-4 plank underneath the hole; the plank should be three times the width of the opening. Then, cut your plywood to be the exact size and shape of the hole. Make sure the plywood you are using is the same thickness as your existing roof. Then, insert the new plywood into the hole. Nail the plywood sheet to the plank underneath and cover the wood borders and bracing screws with roofing tar.
Step 5: Lay tar paper over the area with missing shingles, making sure the top of the paper is slipped under the flaps of the shingles above the now-repaired area. Nail the tar paper on every 12-18 inches along the perimeter. If you used more than one sheet of tar paper, nail down any overlapping areas, as well.
Step 6: Lay on the new asphalt shingles, starting with the bottom row of shingles. Secure each shingle with three roofing nails across the horizontal center-line and coat each nail with roofing adhesive for water protection. Tuck the top new shingles underneath the shingles you previously lifted up before, then press down on the lifted shingles so that they are laying on top of your new shingles.
Patching holes in the roof is a common roof repair. However, it still involves a lot of care and safety precautions; stay safe and make sure to not cause any further damage to your roof! If you have done roof work before, then you may want to try fixing it yourself. But if you cannot get to your roof safely, suspect there is major damage on your roof that can’t be seen, or if you can’t find the damaged area on your roof, then it’s time to call a professional roofer.
The roofing experts at IBEX Roof are equipped to inspect your roof safely, even if dangerous areas cannot be seen. We can also come and inspect your roof before you notice any damage to make sure your roof is protecting your home the way it should. We aim to provide the best customer service and quality work to our customers. If you need some roof work done, fill out our online form or call 360-218-3104 to get a free estimate today!
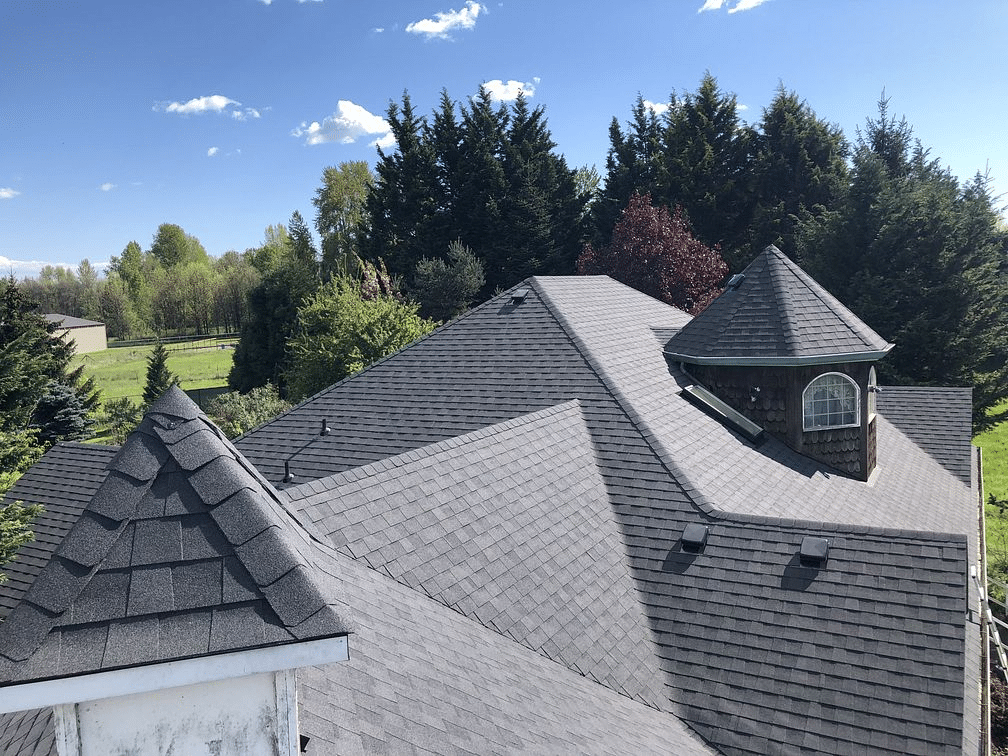
It’s easier to tell there’s a problem with your roof when shingles are missing, cracked, or crooked. However, damaged shingles are not the only reason why a roof may be considered damaged. Your roof is made up of a lot more than just its shingles, in fact. Another major part of your roof is the roof decking or sheathing underneath. These are thin boards of wood underneath your shingles that provide the structure of your roof. Because these boards sit underneath your roof, is it harder to see when there is damage and, the dreaded word, ROT.
When your roof is working properly, it should be shedding water away from your home, into your gutters, and out the downspout. When you have damaged shingles or vulnerable areas in your roof, though, water can seep underneath the shingles and onto your roof decking. Because your roof decking is made out of wood, it will start to deteriorate over time, especially if it doesn’t properly dry out. When there is constant moisture underneath your roof, it’s only a matter of time that will start to decay and, eventually, rot.
Because your roof decking sits underneath your shingles, it’s difficult to tell when there is wood rot or damage outside of a professional inspection. As a note, we NEVER recommend homeowners climb their own roofs to check for wood rot because those rotted areas can easily break under your step.
There are two types of wood rot: wet rot and dry rot. Some signs of wood rot include:
If you suspect your roof has experienced wood rot, call our team at IBEX Roof. We will schedule you for a roof inspection as soon as possible! If wood is rotting, it is likely there is an underlying leak that needs to be repaired; the longer you wait, the more damage you risk on your roof. Being as proactive as possible will make it less likely you will need to replace your entire roof.
Our goal is to make sure your roof lasts as long as possible. The best way to do so is by scheduling annual roof inspections to stay ahead of your roof’s upkeep. At IBEX Roof, we pride ourselves on being fully transparent with our customers: no secrets, no surprises, and no uncertainty! We will never sell you any services you don’t need because we are here for you for the long haul. Give us a call today and let’s make sure to stay on top of your roof’s health!
