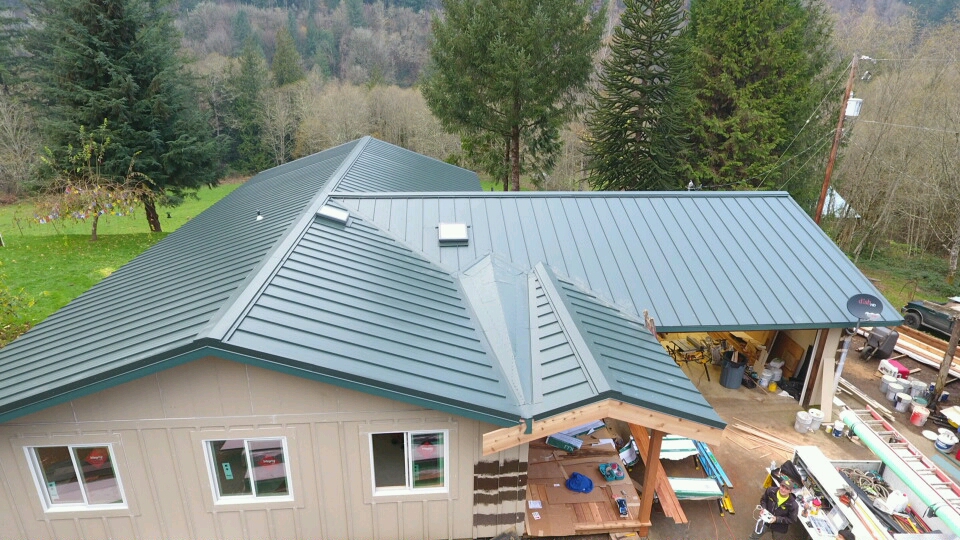
CertainTeed is a leading manufacturer of durable and high-quality shingles for roofs. They specialize in asphalt shingles, which are a popular choice for homeowners due to their affordability and durability. CertainTeed offers a wide range of shingle options, including architectural shingles. These shingles are designed to mimic the appearance of more expensive materials like slate and wood shake, giving homeowners the opportunity to achieve a premium look for their roof without the high cost.
One of CertainTeed's most popular architectural shingles is the Landmark series, which offers a variety of colors and styles to suit any home design. The Landmark shingles are known for their exceptional quality and performance, as they are made from high-grade asphalt and built to withstand the elements. With a reputation for excellence and reliability, CertainTeed shingles are favored by homeowners and highly recommended by roofing professionals. For those looking for a trusted roofing manufacturer, CertainTeed is a top choice, alongside competitors like GAF.
Certainteed Black Granite is a popular roofing shingle option for homeowners looking for a durable and aesthetically pleasing roofing material. Made from a blend of durable asphalt and ceramic granules, these shingles are designed to withstand harsh weather conditions and provide long-lasting protection for the home.
The black granite color adds a touch of sophistication and elegance to any home's exterior, enhancing its curb appeal. With a limited lifetime warranty, homeowners can have peace of mind knowing that their investment is protected. Additionally, Certainteed Black Granite shingles are designed to be energy-efficient, helping to reduce energy costs and contribute to a more sustainable environment.
Easy to install and maintain, these shingles are an excellent choice for homeowners who want a high-quality and visually appealing roofing option. Whether it's a new construction or a roof replacement project, Certainteed Black Granite shingles are a reliable and stylish choice that will enhance the beauty and protection of any home.
Certainteed's Colonial Slate is a versatile and timeless roofing option. With its blend of gray and brown tones, it adds a classic and elegant touch to any home. The shingles are designed to replicate the look of natural slate, but at a fraction of the cost. This makes Colonial Slate a great choice for homeowners who desire the aesthetic appeal of slate without breaking the bank. Not only does this roofing option enhance the curb appeal of a house, but it also offers exceptional durability and weather resistance.
The shingles are made from high-quality materials that can withstand harsh weather conditions, including strong winds and heavy rain. Additionally, Certainteed's Colonial Slate shingles come with a lifetime limited warranty, providing homeowners with peace of mind. Whether you have a traditional or modern-style house, Colonial Slate is a reliable and attractive roofing option that will protect your home for years to come.
Certainteed Slate Gray is a popular roofing material known for its durability and aesthetic appeal. Made from a blend of natural materials and advanced polymer technology, the slate gray shingles offer the look of traditional slate without the high cost and maintenance.
The color Slate Gray adds a touch of sophistication to any home, complementing a variety of architectural styles. The shingles are designed to withstand harsh weather conditions, including high winds, heavy rain, and extreme temperatures. They also have excellent fire resistance, giving homeowners peace of mind. With a limited lifetime warranty, Certainteed Slate Gray shingles provide long-lasting protection and beauty for years to come.
The high-quality materials and attention to detail in the manufacturing process ensure a superior product that will enhance the curb appeal and value of any property. Whether for a residential or commercial project, Certainteed Slate Gray is a reliable and attractive roofing option.
Certainteed's Smoke Quartz offers homeowners a sleek and sophisticated option for their roofing needs. This shingle color features a unique blend of shades of grey and black, creating a modern and eye-catching look for any home.
The Smoke Quartz shingles are made with high-quality materials that ensure durability and longevity. Whether battling harsh weather conditions or resisting algae and mold growth, this exceptional shingle can withstand it all. Moreover, Certainteed's Smoke Quartz shingles come with a limited lifetime warranty, providing homeowners with peace of mind and protection against any defects.
Not only does the Smoke Quartz shingle offer superior performance, but its architectural style and stunning color make it the perfect addition to any residential property. With Certainteed's Smoke Quartz, homeowners can enhance their home's curb appeal and make a statement that will last for years to come.
Certainteed's Victorian Blue is a versatile and visually appealing shingle option for homeowners looking to enhance the curb appeal of their homes. This particular shade offers a classic and elegant touch to any architectural style, whether it be Victorian or contemporary. The deep blue color adds depth and richness to a roof, creating a striking contrast against other exterior elements. In addition to its aesthetic appeal, the Victorian Blue shingle is also highly durable and reliable.
It is designed to withstand harsh weather conditions and resist the growth of algae and mold. This means that homeowners can enjoy a beautiful roof for many years to come, without having to worry about constant maintenance and repairs. With its combination of style, durability, and functionality, Certainteed's Victorian Blue shingle is a great choice for those seeking a timeless and long-lasting roofing solution.
If you are in need of a quote for your roofing project, look no further! Give us a call today at (360) 938-40093 and our office will be more than happy to assist you. Our team at IBEX Roofing is dedicated to providing top-notch service and exceptional results.
We specialize in installing high-quality roofing materials, such as certainteed shingles, that not only protect your home but also enhance its overall look. Our wide range of certainteed shingles colors allows you to choose the perfect style that matches your home's aesthetic. Whether you prefer a classic, timeless look or a more modern and vibrant appearance, we have the options to meet your needs. Don't hesitate to reach out to us today - we are ready to provide you with a competitive quote and get started on your roofing project! .

Roofing is an essential aspect of any structure, protecting it from the elements and providing structural integrity. When it comes to roofing, it's important to understand various measurement units to accurately estimate materials and costs. One such unit is a "square." In this article, we will delve into the concept of a square in roofing, its significance, and how it influences the overall roofing process.
In roofing, a "square" is a unit of measurement used to quantify the area of a roof. One square is equal to 100 square feet. Roofing professionals utilize squares to determine the amount of roofing materials required for a particular project.
A square in roofing consists of several components, including shingles, underlayment, flashing, and other necessary materials.
Shingles are the visible outer layer of the roof and play a crucial role in protecting it from the elements. The number of shingles required for a square depends on their size, type, and the specific roof design.
Underlayment serves as a protective layer between the roof deck and the shingles. It acts as a moisture barrier and enhances the roof's overall durability. The amount of underlayment needed per square varies based on the specific roofing material being installed.
Flashing is used to prevent water from seeping into vulnerable areas, such as roof valleys, chimneys, and vents. The quantity of flashing required for a square depends on the roof's design and the number of potential leak points.
Accurately calculating the number of squares required for a roofing project requires a systematic approach. Here's how you can calculate the number of squares:
To begin, you need to measure the total area of the roof. This involves determining the length and width of each section of the roof and multiplying them together to obtain the square footage. Take note of any irregularities or unique features that may affect the measurements.
Once you have the roof's total square footage, divide it by 100 to obtain the number of squares needed. Round up to the nearest whole number since you cannot purchase a fraction of a square. It's crucial to have accurate measurements to avoid material shortages or excessive waste.
Knowing the number of squares required for your roofing project is essential for several reasons. Firstly, it allows you to estimate the cost of materials accurately. By understanding the square footage, you can calculate the necessary quantity of shingles, underlayment, flashing, and other materials, ensuring you purchase the right amount.
Moreover, understanding the number of squares enables you to plan the project's timeline and coordinate with contractors or suppliers effectively. It helps in streamlining the overall process and ensuring a smoother workflow.
Accurate square measurement offers several benefits throughout the roofing project. By precisely calculating the required number of squares, you can:
While calculating squares in roofing, certain common mistakes should be avoided to ensure accurate measurements:
Roof slope affects the surface area and, consequently, the number of squares needed. Failing to consider the slope can result in incorrect calculations. It's important to account for the pitch of the roof and adjust the measurements accordingly.
Roofing projects often require additional materials to account for waste, mistakes, or future repairs. Ignoring the waste factor can lead to insufficient materials. It's advisable to include a waste factor of around 10% to accommodate any unforeseen circumstances.
If your roof has intricate designs, such as multiple dormers or valleys, it's crucial to consider them while measuring squares. Neglecting these complexities can lead to inaccurate calculations and potential material shortages.
Understanding the concept of squares is vital for estimating roofing costs. The number of squares directly affects the amount of materials required, which influences the overall project budget. Additionally, accurately calculating squares allows you to compare quotes from different suppliers or contractors, ensuring you make informed decisions based on competitive pricing.
When it comes to roofing, selecting the appropriate materials is crucial for durability and aesthetics. Here are some common roofing materials to consider:
Shingles are available in various materials, including asphalt, wood, metal, and slate. Each type offers different advantages in terms of cost, lifespan, and appearance. Consider factors such as climate, architectural style, and budget when choosing the right shingles for your roof.
Apart from shingles, there are other essential components to consider for your roofing project. These include underlayment, which provides an extra layer of protection against moisture, and flashing, which prevents water infiltration in vulnerable areas. Additionally, ridge vents, gutters, and downspouts contribute to the overall functionality and longevity of your roof.
It is advisable to consult with a professional roofing contractor or supplier to determine the most suitable materials for your specific roofing needs. They can provide expert advice based on factors such as your location, climate, and budget.
While understanding squares and roofing materials is valuable, it is equally important to hire a professional roofer for your project. Professional roofers have the expertise and experience to accurately measure squares, select the right materials, and ensure proper installation. They can handle complex roof designs, address any challenges, and guarantee high-quality workmanship.
When hiring a roofer, consider their reputation, certifications, and customer reviews. Request multiple quotes, compare their services, and ask for references. A reliable and skilled roofer will provide you with peace of mind, knowing that your roofing project is in capable hands.
In conclusion, a square is a crucial unit of measurement in the roofing industry. Understanding the concept of squares allows you to accurately estimate the required materials and costs for your roofing project. It helps in optimizing the project timeline, minimizing waste, and ensuring efficient coordination with contractors and suppliers.
When it comes to roofing, accuracy is key. By avoiding common mistakes, considering roof slope and waste factors, and accounting for complex roof designs, you can achieve precise square calculations. Furthermore, selecting the right roofing materials and hiring a professional roofer like IBEX Roof contribute to the overall success and longevity of your roof.
Remember, a well-maintained and properly installed roof not only enhances the aesthetic appeal of your property but also provides protection and peace of mind for years to come.
When it comes to the construction of a roof, various components play crucial roles in ensuring its durability and protection against the elements.
One such important component is flashing. In this blog, we will explore flashing on a roof, its definition, significance, and its different types. Whether you're a homeowner, a roofing professional, or simply curious about roofing, understanding flashing will provide you with valuable insights into this essential aspect of roof construction.
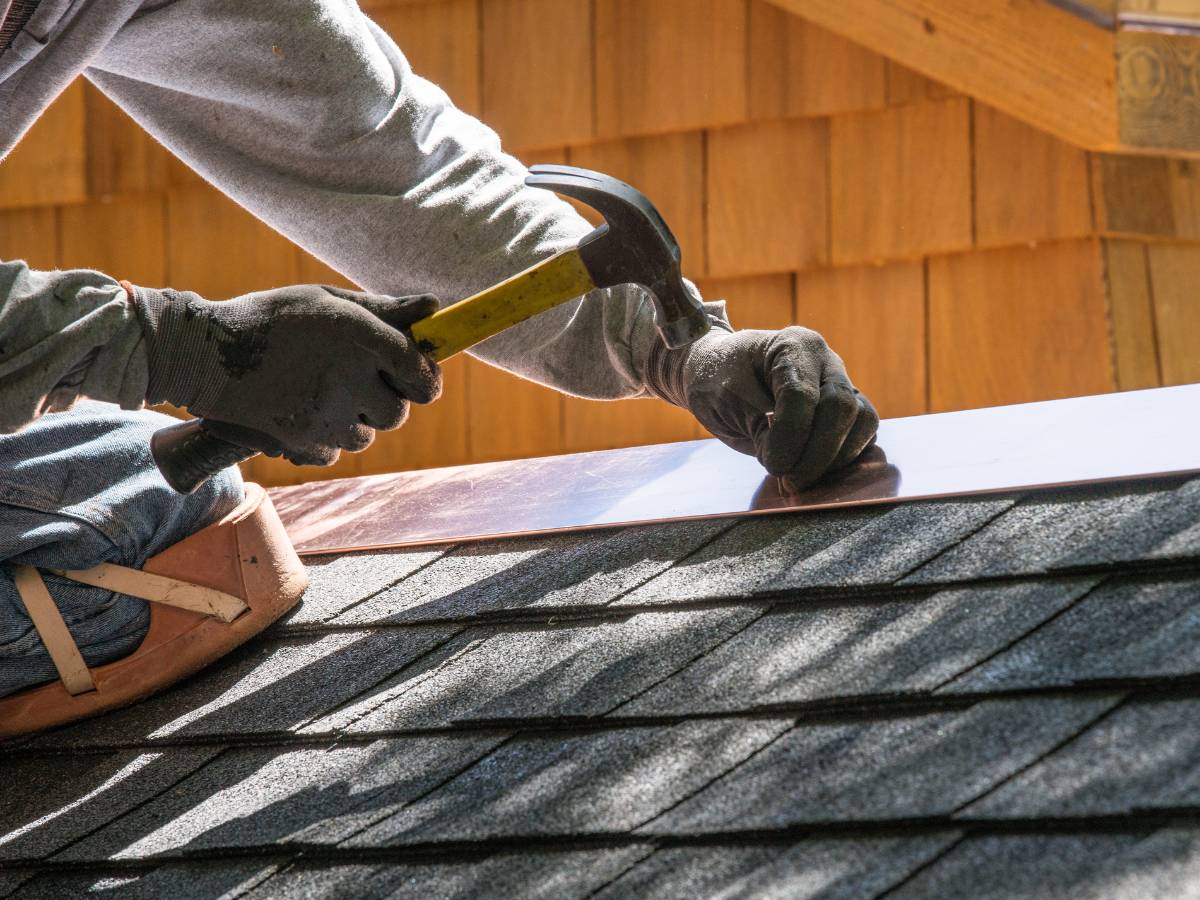
Flashing refers to a thin, weather-resistant material installed on a roof to prevent water from seeping into vulnerable areas where two different surfaces meet. It acts as a protective barrier, redirecting water away from potential entry points such as joints, edges, valleys, chimneys, skylights, and vents. Flashing plays a vital role in maintaining a watertight seal and preventing leaks, which can lead to extensive damage to the roof and the underlying structure.
Flashing is of paramount importance in safeguarding the integrity of a roof. By creating a barrier against water intrusion, flashing ensures that vulnerable areas are adequately sealed and protected. Without proper flashing, rainwater, melting snow, or moisture from other sources can penetrate the roof's surface, causing water damage, rot, mold growth, and compromised structural stability. Flashing acts as an extra layer of defense, enhancing the overall waterproofing capabilities of the roof.
Step flashing is commonly used around areas where the roof intersects with vertical surfaces, such as walls or dormers. It consists of individual metal pieces installed in a "stepped" pattern, overlapping each other, and integrated with the roofing material.
Valley flashing is installed in the valleys formed by the intersection of two roof slopes. It prevents water accumulation in these areas, allowing efficient water runoff and minimizing the risk of leaks.
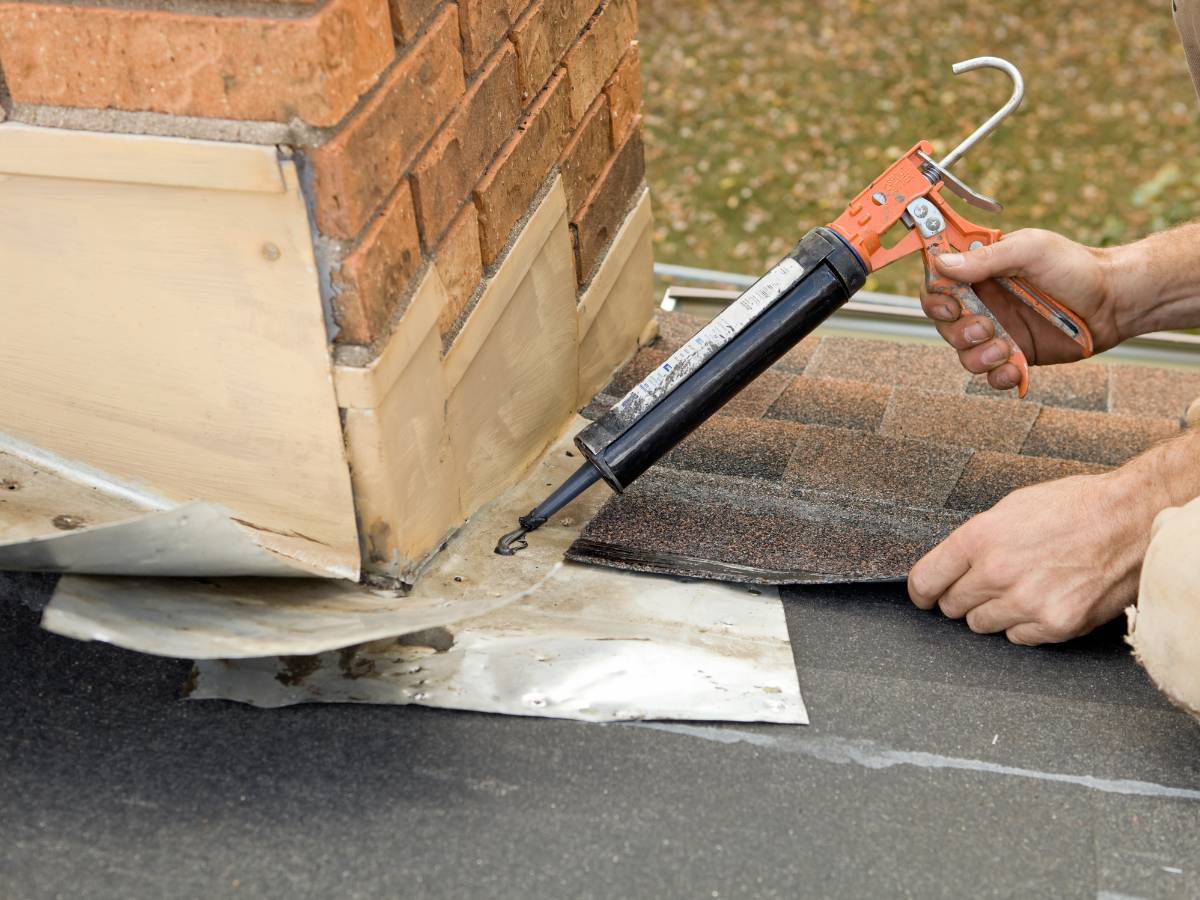
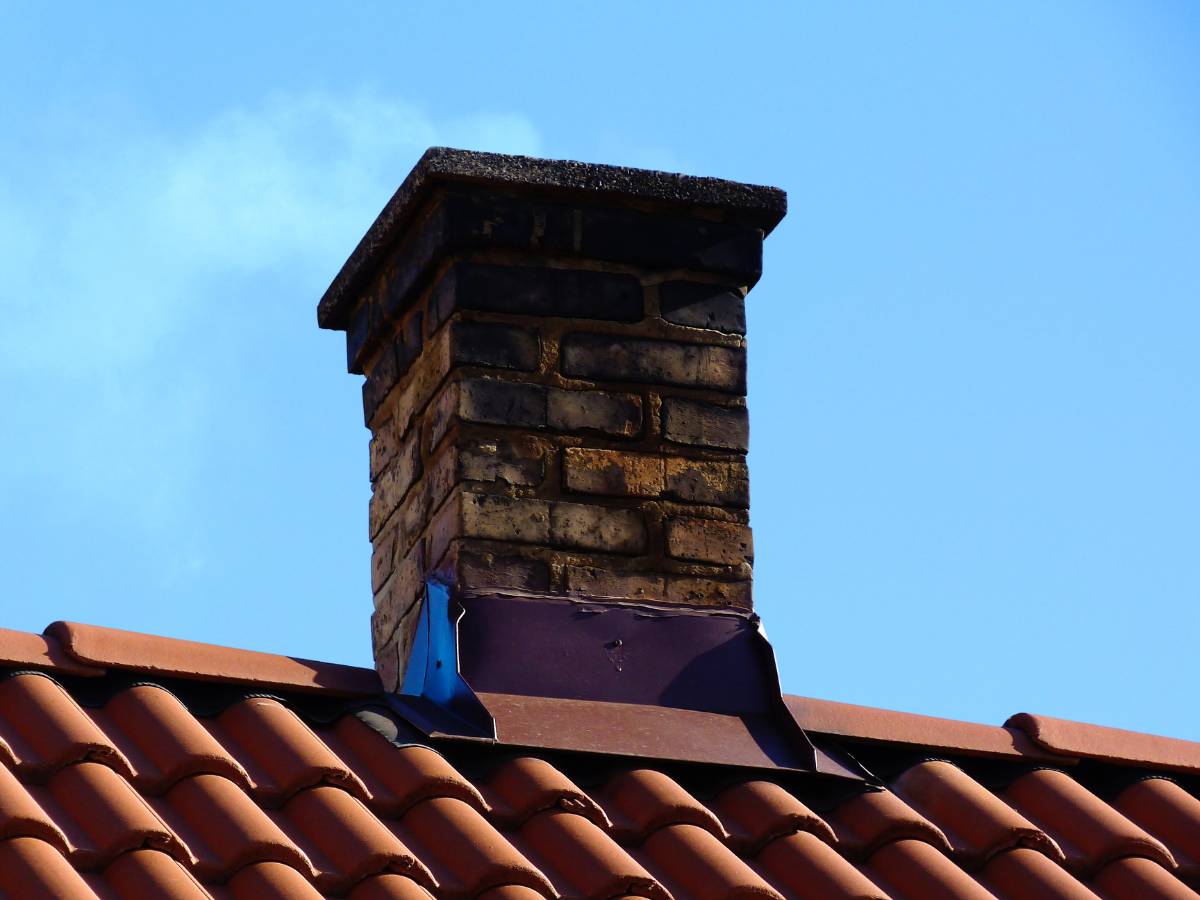
Chimney flashing is designed to protect the joint between the chimney and the roof. It typically includes both step flashing and a specialized metal piece called a chimney saddle or cricket, which diverts water around the chimney.
Drip edge flashing is installed along the roof's edges to guide water away from the fascia and into the gutters. It helps prevent water from seeping into the underlying structure and protects against wind-driven rain.
Vent pipe flashing is used to seal the openings around pipes or vents that protrude through the roof. These pipes can include plumbing vents, exhaust vents, or ventilation pipes. The flashing is typically cone-shaped, with a base that fits tightly around the pipe and a flange that integrates with the roofing material. It provides a watertight seal, preventing moisture from entering the roof through these vulnerable areas.
Properly installed vent pipe flashing not only protects against water intrusion but also ensures adequate ventilation. It allows air to flow in and out of the pipes, maintaining proper ventilation in the plumbing or exhaust systems. This helps prevent the buildup of gases, moisture, and potential damage caused by poor airflow.
Flashing works by creating a barrier that redirects water away from vulnerable areas and prevents it from seeping into the roof's structure.
It is strategically placed in areas where two different surfaces meet, such as joints, seams, and transitions. When rainwater or melting snow encounters flashing, it is guided along the surface of the flashing and directed away from the potential entry points.
The design and placement of flashing are crucial for its effectiveness. It should overlap adjacent roofing materials and be integrated seamlessly into the roof system.
This ensures that water is channeled away and does not find its way into the underlying layers of the roof. By providing a waterproof seal, flashing helps maintain the overall integrity and longevity of the roof.
Various materials are used for flashing, each with its own advantages and suitability for different applications. Some common materials include:
The choice of flashing material depends on factors such as climate, roof type, aesthetics, and compatibility with other roofing components. Consulting with a roofing professional can help determine the most appropriate material for specific requirements.
Proper installation and regular maintenance of flashing are crucial for its effectiveness and longevity. Here are some key considerations:
By incorporating regular inspection and maintenance into your roof care routine, you can proactively address any flashing issues and maintain the integrity of your roof's waterproofing system.
Recognizing signs of flashing problems is crucial in identifying potential issues and taking prompt action. Some common signs to watch out for include:
If you notice any of these signs, it is essential to consult a professional roofing contractor to assess the flashing and address any necessary repairs or replacements promptly.
Regular professional roof inspections are vital in ensuring the overall health and longevity of your roof, including its flashing system. Certified roofing professionals have the knowledge, expertise, and specialized tools to identify potential issues with flashing and other roof components.
During a roof inspection, the professional will thoroughly assess the condition of the flashing, looking for signs of damage, wear, or improper installation. They will also check for proper integration with the roofing materials, adequate sealing, and overall functionality.
By investing in professional roof inspections at regular intervals, you can identify and resolve flashing issues early on, preventing costly repairs and protecting the long-term integrity of your roof.
Flashing is a critical component of a roof's waterproofing system. It acts as a protective barrier, preventing water from seeping into vulnerable areas and causing damage to the roof and underlying structure. Understanding the importance of flashing and its different types can help homeowners and roofing professionals ensure the longevity and effectiveness of their roofs.
Regular inspection, maintenance, and prompt repairs are essential in preserving the integrity of flashing. By addressing flashing issues proactively, you can avoid potential water damage, mold growth, and structural problems. Remember to consult with a qualified roofing professional like IBEX Roof for any flashing concerns or repairs to ensure the best possible outcomes for your roof.
Roof vents play a vital role in maintaining a healthy and functional roofing system. They provide ventilation, which helps to regulate temperature, reduce moisture, and enhance the overall performance and longevity of your roof. In this article, we will explore the various types of roof vents available in the market and their benefits. So, let's dive in and discover the different types of roof vents you can consider for your home.
A well-ventilated roof is essential for the overall health of your home. It helps to prevent the buildup of excess heat, moisture, and harmful gases, which can lead to various problems such as roof deterioration, mold growth, and high energy costs. Roof vents are designed to facilitate the flow of air in and out of the attic, ensuring proper ventilation and a balanced indoor environment.
Proper roof ventilation offers several advantages. It helps to:
Passive roof vents rely on natural forces like wind and temperature differentials to create airflow. Some common types of passive roof vents include:

Ridge vents are installed along the peak of the roof, allowing hot air to escape. They work in conjunction with soffit vents, creating a continuous airflow from the bottom to the top of the attic space. Ridge vents are popular due to their effectiveness and unobtrusive appearance.
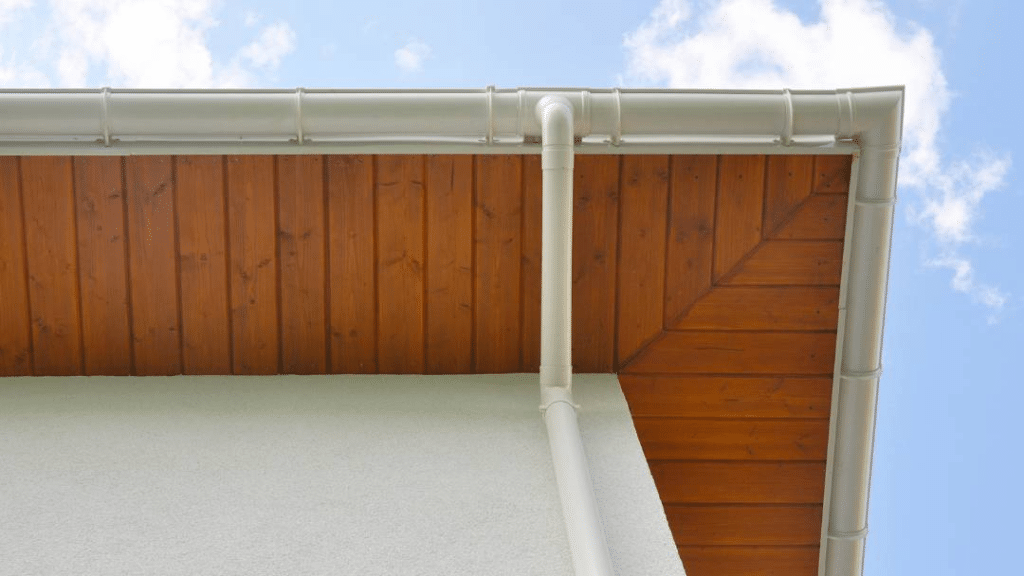
Soffit vents are installed underneath the eaves of the roof, allowing fresh air to enter the attic. They work together with ridge vents to create a balanced airflow. Soffit vents are available in various styles, including perforated, continuous strip vents, and individual panel vents.
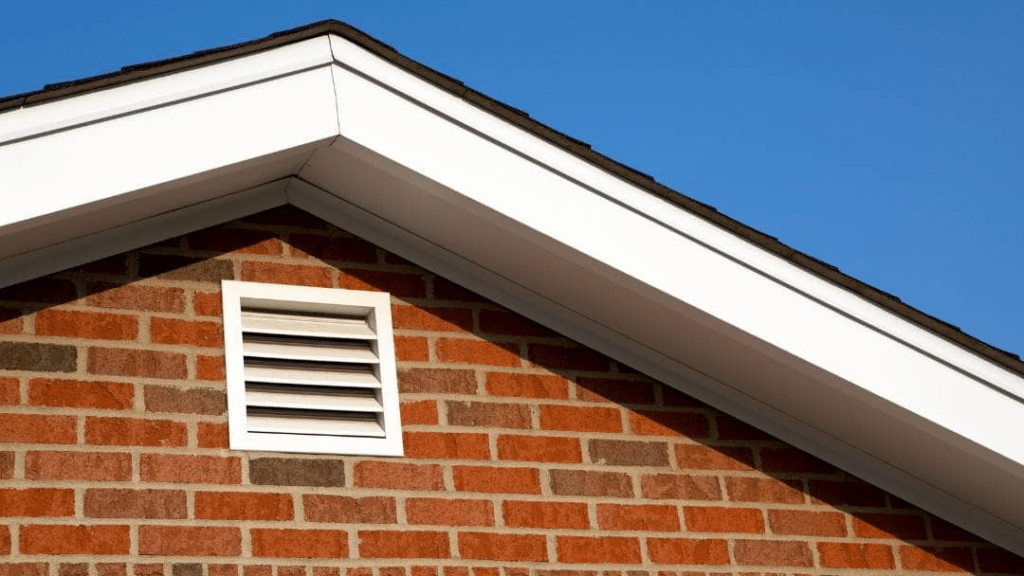
Gable vents are installed on the gable ends of the roof. They provide an additional outlet for hot air to escape and allow fresh air to enter the attic. Gable vents come in various shapes and sizes, including triangular and rectangular designs, and can add a decorative touch to the exterior of your home.
3.4 Turbine Vents

Turbine vents, also known as whirlybird vents, are powered by wind energy. As the wind blows, it causes the turbine to rotate, creating a suction effect that draws air out of the attic. Turbine vents are efficient and can help ventilate the attic even in low-wind conditions. They are commonly used in areas with consistent wind patterns.
3.5 Dormer Vents
Dormer vents are installed on the dormers of a roof. They not only provide ventilation but also add architectural interest to the roofline. Dormer vents come in different styles, including louvered, gable-end, and round designs, allowing you to choose the one that complements the overall aesthetic of your home.
Active roof vents are powered by electricity or solar energy, providing a controlled ventilation system. They are ideal for situations where natural ventilation may not be sufficient. Here are some common types of active roof vents:
Power vents, also known as electric attic fans, are installed on the roof or in the gable. They are equipped with a motor that drives a fan, actively drawing air out of the attic. Power vents are controlled by a thermostat and turn on automatically when the temperature reaches a certain threshold.
Solar vents operate similarly to power vents but are powered by solar panels. They are energy-efficient and environmentally friendly, harnessing the power of the sun to ventilate the attic. Solar vents are an excellent option for homeowners looking to reduce their carbon footprint.
Wind turbine vents, as the name suggests, use wind power to create airflow. They have a turbine-like design that rotates with the wind, pulling air out of the attic. Wind turbine vents are durable, low-maintenance, and suitable for areas with consistent wind patterns.
When selecting a roof vent, several factors should be considered:
Consulting with a roofing professional can provide valuable guidance in selecting the right roof vent for your specific needs.
Proper installation of roof vents is crucial for their effectiveness. Consider the following factors during the installation process:
The size and number of vents should be appropriate for the size of your attic. Insufficient venting can lead to inadequate airflow, while excessive venting may cause drafts and energy loss. Consult with a professional to determine the optimal venting requirements for your attic space.
The placement of roof vents is equally important. Vents should be strategically positioned to ensure maximum airflow throughout the attic space. Ridge vents should be installed along the entire length of the roof ridge, while soffit vents should be evenly distributed along the eaves. Gable vents should be placed near the peak of the gable ends, and turbine vents should be positioned where they can capture the most wind.
While some homeowners may choose to install roof vents themselves, it is highly recommended to hire a professional roofing contractor for the job. Professional installers have the knowledge, experience, and tools to ensure proper installation, minimizing the risk of leaks or other complications.
To maintain the efficiency of your roof vents, regular maintenance and troubleshooting are necessary. Here are some essential maintenance tasks:
Periodically clean the vents to remove any debris, dust, or obstructions that may impede airflow. Clogged vents can hinder ventilation and reduce the effectiveness of the system.
Perform routine inspections of the vents and surrounding areas to check for any signs of damage or deterioration. Look for cracks, loose components, or signs of pest infestation. Prompt repairs or replacements should be done to ensure optimal performance.
Be aware of common issues that may arise with roof vents. These include leaks around the vent area, damaged or deteriorated vents, or inadequate ventilation due to improper sizing or placement. Addressing these issues promptly will help maintain a healthy roof and prevent further damage.
Proper roof ventilation offers numerous benefits for both your home and its occupants:
Roof vents play a crucial role in maintaining a healthy and efficient roofing system. They provide essential ventilation, allowing for the proper flow of air in and out of the attic. By choosing the right type of roof vent, ensuring proper installation, and conducting regular maintenance, you can enjoy the benefits of improved energy efficiency, extended roof lifespan, and a comfortable living space.
1. What are the different types of roof vents?
The different types of roof vents include ridge vents, soffit vents, gable vents, turbine vents, dormer vents, power vents, solar vents, and wind turbine vents.
2. How do roof vents help with ventilation?
Roof vents facilitate the flow of air in and out of the attic, removing excess heat and moisture, and preventing issues like mold growth and roof deterioration.
3. Can I install roof vents myself?
While it is possible to install roof vents yourself, it is recommended to hire a professional roofing contractor to ensure proper installation and avoid potential complications.
4. How often should I clean my roof vents?
Roof vents should be cleaned at least once a year or whenever you notice a buildup of debris or obstruction that hinders airflow.
5. What problems can arise from improper roof ventilation?
Improper roof ventilation can lead to heat buildup, moisture-related issues, increased energy costs, premature roof deterioration, and compromised indoor comfort.
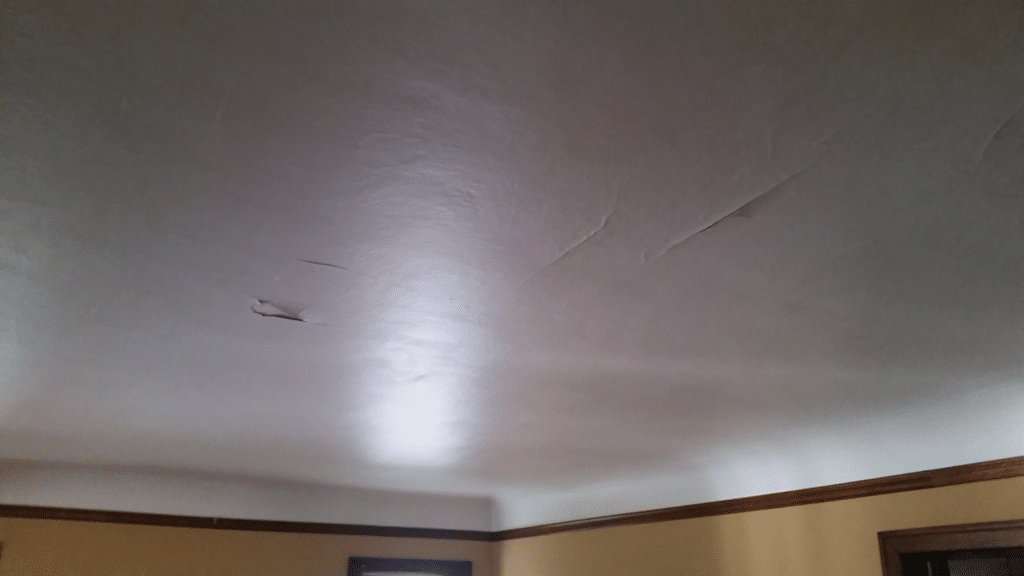
A leaking roof is a common problem for homeowners, especially during heavy rain or snow. Water entering through the roof can cause damage to the structure of the house and lead to mold and other issues if not addressed promptly.
If you've noticed signs of a leak in your roof, it's important to take action promptly to prevent further damage.
In this blog post, we'll cover how to fix a leaking roof from the inside, including identifying the source of the leak, making emergency repairs, fixing the leak from the inside, and preventing future leaks.
The first step in fixing a leaking roof is to identify the source of the problem. Signs of a leak may include water stains on ceilings or walls, dripping sounds, or wet insulation in the attic.
To find the leak from inside the house, start by looking for any obvious signs of damage to the roof, such as missing or damaged shingles or a hole in the roof.
If you're not able to locate the source of the leak from inside the house, you may need to inspect the roof from outside.

If you suspect that your roof is leaking but can't locate the source of the problem, there are a few steps you can take to find the leak from inside the house.
First, try to locate the leak visually by looking for any wet spots or water stains on the ceiling or walls. Trace the water stain to its highest point, which will usually be directly above the source of the leak.
Once you've identified the general area where the leak is coming from, use a flashlight to inspect the underside of the roof decking or the insulation in the attic. Look for signs of water damage, such as wet insulation or dark spots on the decking.
If you still can't locate the source of the leak, you may need to conduct a water test. This involves having someone on the roof with a hose spraying water in different areas while someone inside the house looks for signs of water entering the house. This method can help you pinpoint the exact location of the leak.
If you're not able to locate the source of the leak from inside the house, you may need to inspect the roof from outside. Start by looking for any obvious signs of damage, such as missing or damaged shingles or a hole in the roof.
Look for areas where the roof may be sagging or where there are signs of water damage. Check the flashing around the roof vents, chimneys, and skylights to ensure they are properly sealed.
If you're comfortable working on the roof, you can also conduct a more thorough inspection by walking on the roof and visually inspecting the shingles and decking. Use caution when walking on the roof, and be sure to wear appropriate footwear.
If you're dealing with a leaky roof in the middle of a heavy downpour, you may need to make emergency repairs to prevent further damage to your home. To make a temporary patch to stop the leak, you'll need roofing tar, a putty knife, and a piece of plywood or plastic roof covering.
To make a temporary patch to stop the leak, follow these steps:
If the leak is too big for a temporary patch, or if you don't feel comfortable making the repair yourself, consider calling an emergency roof repair service.
To fix a leaking roof from the inside, you'll need to locate the source of the leak and patch the roof from inside the house. Start by removing any insulation from the area where the leak is located, using a flashlight to help you see.
Once you've located the source of the leak, use roofing cement and a putty knife to make a temporary patch.
To fix a leaking roof from the inside, follow these steps:
If the leak is caused by a damaged shingle or flashing, you may need to replace the damaged material. Remove the damaged shingle or flashing and replace it with a new piece, making sure to seal the edges with roofing cement.
Regular inspection and maintenance of your roof can help prevent future leaks. Check your roof regularly for signs of damage, such as missing or damaged shingles or flashing, and repair any damage promptly.
Pay special attention to roof vents and other potential trouble spots, and make sure they are properly sealed. If your roof is old or showing signs of wear and tear, it may be time to consider a roof replacement.

To maintain your roof and prevent future leaks, follow these tips:
Fixing a leaking roof from the inside can be a challenging task, but with the right tools and know-how, it's possible to get the job done. If you're not comfortable making the repairs yourself, consider contacting a professional roofing service for help.
Remember, time is of the essence when it comes to fixing roof leaks, so don't delay in taking action if you suspect a problem. By staying on top of regular maintenance and repairs, you can keep your home safe and dry for years to come.
Are you tired of high energy bills and uncomfortable temperatures in your home? Attic ventilation fans might be the solution you need.
When it comes to keeping your home comfortable and energy-efficient, proper attic ventilation is key. Attic ventilation fans are one popular option for achieving this, but like any home improvement project, they come with both pros and cons. In this blog, we'll explore the benefits and drawbacks of attic ventilation fans so you can make an informed decision about whether they're right for your home.
Many homeowners don't realize how important attic ventilation is, but it's very important for keeping a home comfortable and healthy. If your attic doesn't have enough ventilation, hot air becomes trapped causing your interior home temperature to rise. This will send your energy bills through the roof. It can also leads to moisture buildup and mold growth, which can cause health problems for you and your family. Attic ventilation fans are one option for improving your attic's airflow and preventing these issues.
Attic ventilation fans are put in the roof or gable vents of your attic and are meant to pull hot air out of the space and bring in fresh, cooler air. Most of the time, they are powered by electricity and can be turned on and off by a thermostat or humidistat based on the temperature and humidity. There are two main types of attic ventilation fans: powered attic fans and solar attic fans.
Prevents Moisture Buildup: If there is too much moisture in your attic, mold can grow and the structure can be damaged.Ventilation fans can help stop this buildup of moisture and keep your attic dry and healthy by keeping the air moving.
Gable-mounted fans are installed on the gable vents of your home and draw hot air out of the attic. These fans are relatively easy to install and can be used in homes with or without existing roof vents. Gable-mounted fans can also be more affordable than other types of attic ventilation fans.
Roof-mounted fans are installed on the roof of your home and draw hot air out of the attic. These fans are typically installed in homes with existing roof vents and require professional installation. Roof-mounted fans can also be more expensive than gable-mounted fans.
Solar-powered fans are a type of roof-mounted fan that runs on solar power. These fans are an excellent option for homeowners who want to reduce their carbon footprint and energy consumption. Solar-powered fans can be more expensive than other types of attic ventilation fans, but they can also provide long-term savings on energy bills.
Attic ventilation fans can be a great way to save money on energy costs and keep your roof from becoming damaged by too much moisture. However, they do come with some drawbacks, including potential noise, energy loss in the winter, and installation costs. In the end, whether or not you install an attic fan will depend on your needs and your budget. If you're considering this project, be sure to do your research and consult with a professional to determine if attic ventilation fans are right for your home.
As a homeowner, you take pride in maintaining your property and ensuring that it looks its best. One aspect of your home's upkeep that requires special attention is your roof. A sturdy and reliable roof is essential for protecting your family and belongings from the elements. However, when it comes to roofing repairs or installation, it's crucial to choose the right contractor for the job.
In this blog post, we'll explore the top 10 reasons why you should always choose a licensed roofing contractor to take care of your roof.
A licensed roofing contractor is a trained professional who has obtained a state-issued license to work on roofs. To obtain a license, the contractor must meet certain qualifications and pass an exam to demonstrate their knowledge and skills. A licensed roofing company is required to adhere to strict standards, codes, and regulations to ensure that they provide high-quality work.
When you choose a licensed roofer, you can be confident that you're getting a professional who is well-trained, experienced, and knowledgeable about the latest roofing materials and techniques. A licensed contractor has demonstrated their ability to provide high-quality work and will ensure that your roof is installed or repaired correctly the first time.
Roofing is a hazardous job, and accidents can happen if proper safety protocols are not followed. A licensed roofing contractor understands the risks involved and takes safety seriously. They have the necessary safety equipment, training, and experience to ensure that everyone involved in the project stays safe.
Professional roofing contractors are required to carry insurance that protects you, your property, and the contractor's employees in case of an accident or injury. This insurance coverage provides you with peace of mind knowing that you won't be held liable for any accidents that occur during the project.
Roofing projects often require permits and inspections from local building departments. A licensed local roofing contractor understands the permit and inspection process and will ensure that all necessary permits are obtained and inspections are passed. This saves you time and stress by ensuring that your project is up to code and meets all local regulations.
A licensed roofing contractor takes their job seriously and is committed to providing professional, high-quality service. They will communicate with you throughout the project, answer any questions you may have, and ensure that you're satisfied with the work they've done.
A local roofing contractor provides a warranty on their workmanship. This means that if any issues arise with your roof due to faulty installation, the contractor will come back and fix the problem at no cost to you. This warranty provides you with added protection and ensures that your roof is installed correctly the first time.
A licensed roofing company is accountable for their work. If you have any issues with the project or the contractor's work, you can file a complaint with the licensing board. The board will investigate the complaint and take appropriate action to ensure that the contractor meets their obligations.
Licensed roofing contractors provide competitive pricing for their services. They have the necessary tools, equipment, and experience to complete the project efficiently and effectively. This means that you'll get high-quality work at a fair price.
Building codes can be complex and difficult to navigate. A local professional roofer understands the local building codes and regulations and will ensure that your project meets all necessary requirements. This knowledge ensures that your project is up to code and won't cause any issues in the future.
A licensed roofer has a reputation to uphold. They want to maintain a positive reputation in the community and will do everything they can to ensure that their customers are satisfied with their work. You can check online reviews and ask for referrals to get an idea of a contractor's reputation before hiring them. Choosing a licensed contractor with a good reputation ensures that you'll receive high-quality work and excellent customer service.
Choosing a licensed roofing contractor is a smart investment for your home. You'll get high-quality work, peace of mind knowing that your project meets all local regulations, and added protection through insurance and warranties. A licensed contractor is also committed to professionalism, safety, and accountability, ensuring that you'll receive excellent customer service and a positive experience throughout the project. So, when it's time to repair or install your roof, be sure to choose a licensed roofing company to ensure that your home stays protected and looks its best.
As the year comes to a close, we wanted to express our thanks to our customers and our crew. We hope you had a wonderful Christmas weekend and have a fantastic New Year. Here's to 2023!
When building a roof, if the attic isn’t properly ventilated, all your money will be wasted! You must be wondering why attic ventilation is so crucial and what it has to do with roofing? A properly ventilated roof gives way to a steady airflow that keeps the roof functioning properly and keeps the overall internal temperature of your home within bearable levels. Why else is attic ventilation important? Let’s discuss.
Everyday tasks like cooking and bathing produce a lot of moisture inside our homes. Some external factors, such as excessive rain, also create an overall damp environment. These moisture vapors are in the form of warm and damp air that moves upward toward the ceiling. In houses where there is improper attic ventilation, the moisture gets trapped inside and turns into condensation on the underside of the roof. This process, if left untreated, gives rise to mold and mildew growth in the house.
So, if your attic or roof is properly ventilated and has an insulation system, it prevents condensation and the growth of mold and fungus.
During summer, when the outside temperature goes up, so does the temperature inside our homes. As a result, we resort to using air conditioners. However, if your roof or attic does not have proper ventilation, the heat gets trapped inside our homes, making it warmer and causing the air conditioning to work more than usual.
So, if you want your home to be cooler and your electricity expenses to go down, make sure your roof is ventilated. Or better, invest in a solar-reflective cool roof to reduce roof temperature and heat transfer in your house.
A roof is supposed to last anywhere from 25 to 50 years! However, poorly ventilated attics can affect your roof. It can cause mold growth, heat buildup, and moisture retention, which can cause the underlayment to swell or rot, affect the wood framing, and crack the shingles. This increases the chances of the roof collapsing or the shingles coming off.
So, if you’re getting high-quality roofing products for roof building, make sure there’s proper attic ventilation
Every new roof comes with a warranty; if your roofing material gives in or fails within a specific time, the manufacturer replaces or repairs it without charging anything. However, if you don’t have a proper ventilation system, the manufacturers will likely declare your warranty void. In such a case, you will have to pay for a roof replacement or repairs from your own pocket.
Attic ventilation is a serious component of an effective roof. If ignored or not done properly, it can result in grave consequences. The damage caused by improper ventilation not only puts your health and safety at risk but can be heavy on the pocket too!
So, stop putting yourself and others at risk, and get a proper attic ventilation system. Give IBEX Roof a call so that we can help insulate your roof better than ever!
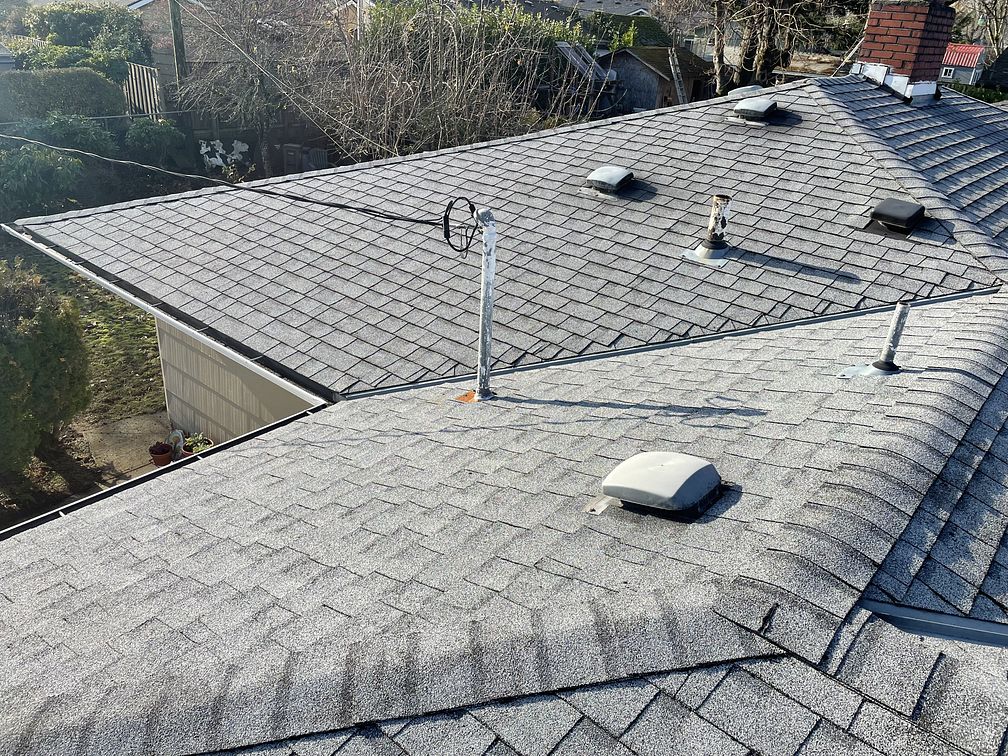
Although there are plenty of different ways to keep your home airy and fresh, if you want to keep your home ventilated, you need to install a proper ventilation system in your attic.
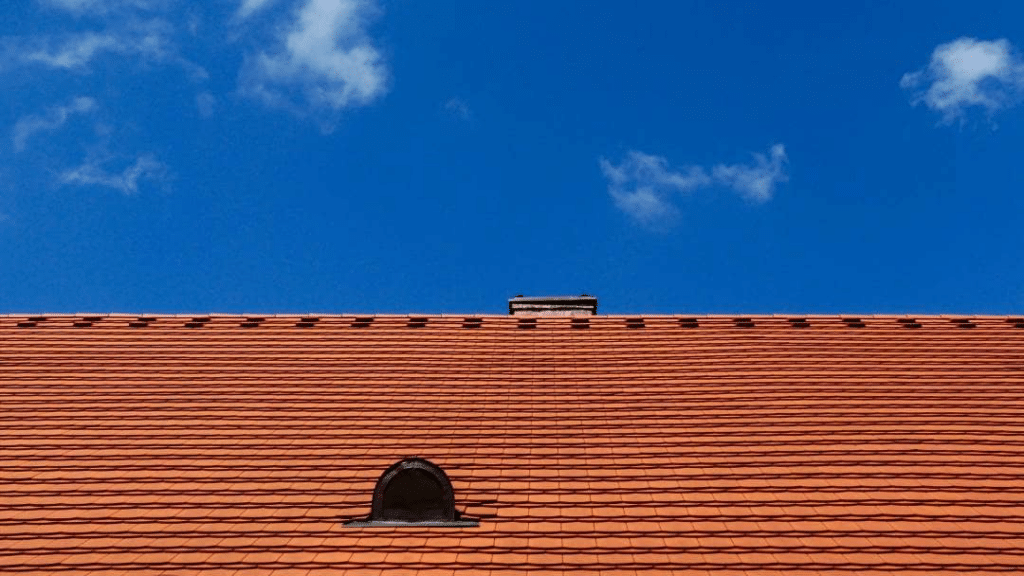
As the name implies, they are square-shaped exhaust vents that pull out the hot air from your house, making it cooler. They provide an opening in the attic for the release of hot air and moisture from your house. They are static as they don’t have any moving parts, thus relying on the natural airflow to keep your interior cool.
But why are they so important?
We often overlook the importance of a proper ventilation system when building a house. Our everyday chores build up hot air and moisture inside our home that need to be let out; otherwise, it can cause mold buildup, peeling paint, and put an extra burden on the air conditioning resulting in increased energy bills.
A box vent is the solution to all these issues! It helps release the hot and humid air from the house and makes way for cool and fresh air. This improves the air quality inside your home and minimizes mold and bacteria build-up, promoting a healthy lifestyle.
They come in plastic and metal, and many people find it difficult to decide which one to go for. Although plastic is cheaper and doesn’t dent easily, they are not as durable and long-lasting as metal. Our team will often see plastic box vents that are cracked and broken on roofs we work on. That’s why we always suggest going for metal box vents if you want to save costs in the long run.
Box vents are quite common for a number of reasons:
However, we always want our customers to know what to expect. Because box vents are non-mechanical (static), they don’t have any moving parts. As a result. here are some things to consider:
If you’re looking to improve your roof’s ventilation, consider asking our team about metal box vents. They let the hot and humid air out of your house while keeping it cool. Plus, the installation is quick and cost-effective!
