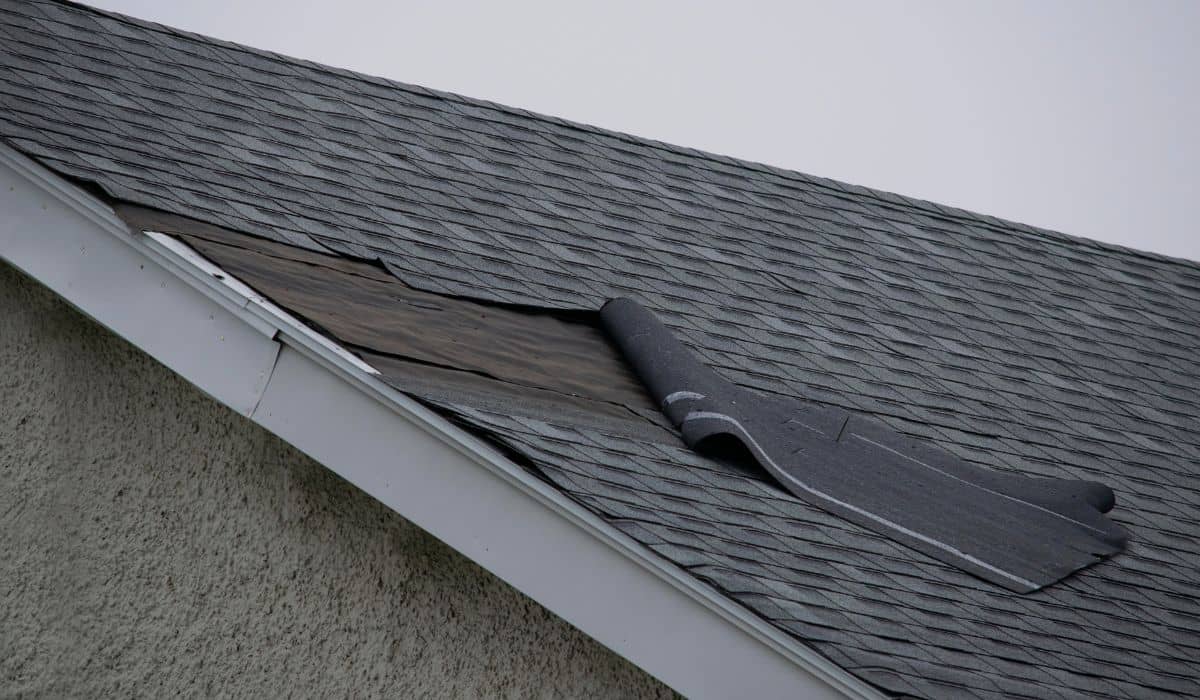
Maintaining a well-maintained roof is essential for the longevity and safety of your home. One common issue that homeowners face is damaged or worn-out shingles. It is crucial to replace these damaged shingles promptly to prevent further damage and costly repairs. In this blog post, we will guide you through the step-by-step process of replacing roofing shingles, ensuring that your roof remains in great condition.
Before starting the shingle replacement process, gather all the necessary tools and materials to ensure a smooth experience. Here's a list of what you'll need:
Choosing appropriate replacement shingles is also crucial. Consider the following factors:
Before starting the shingle replacement process, conduct a thorough inspection of your roof to identify damaged or missing shingles. Additionally, check for any underlying issues such as rot, mold, or leaks.
Ensure that you can safely access the roof by following these steps:
Start the shingle replacement process from the top of the roof, working your way down. Follow these steps to safely remove damaged shingles:
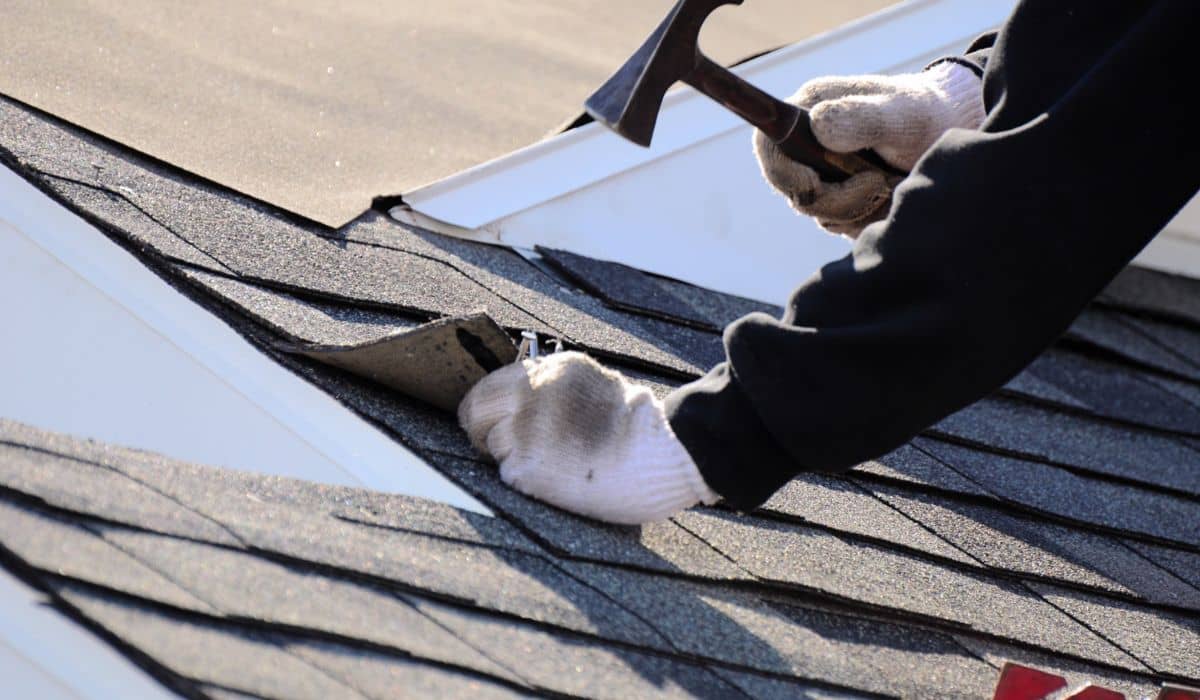
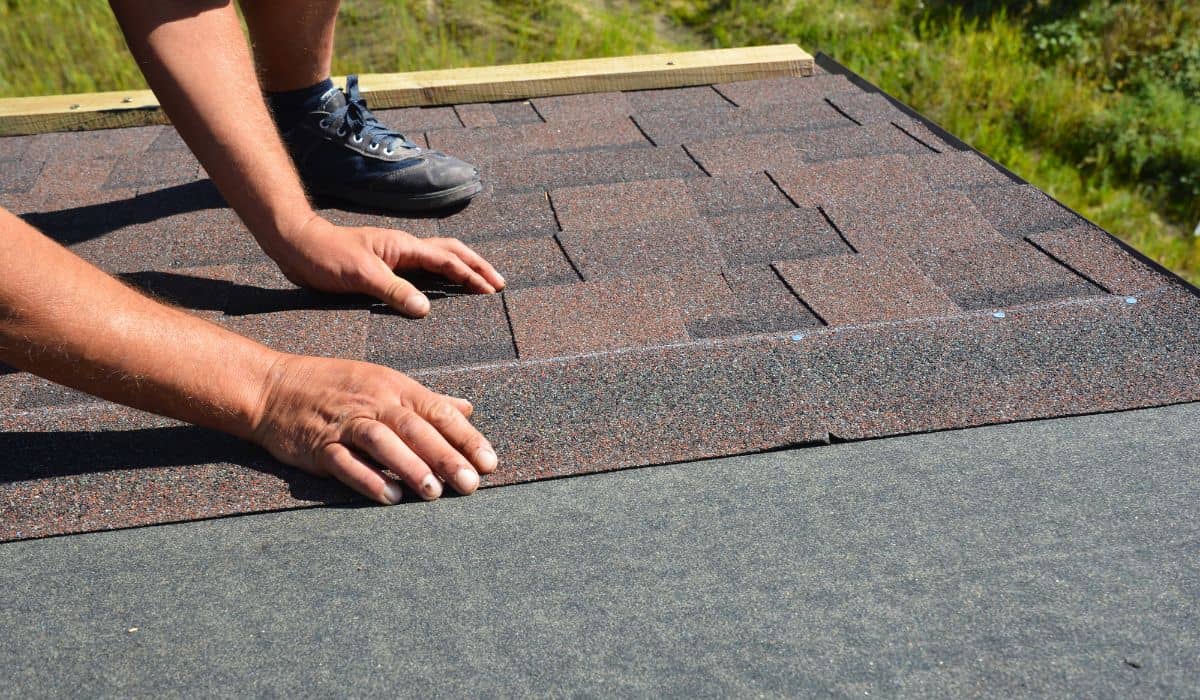
With the damaged shingles removed, it's time to install the replacement shingles. Follow these steps for a successful installation:
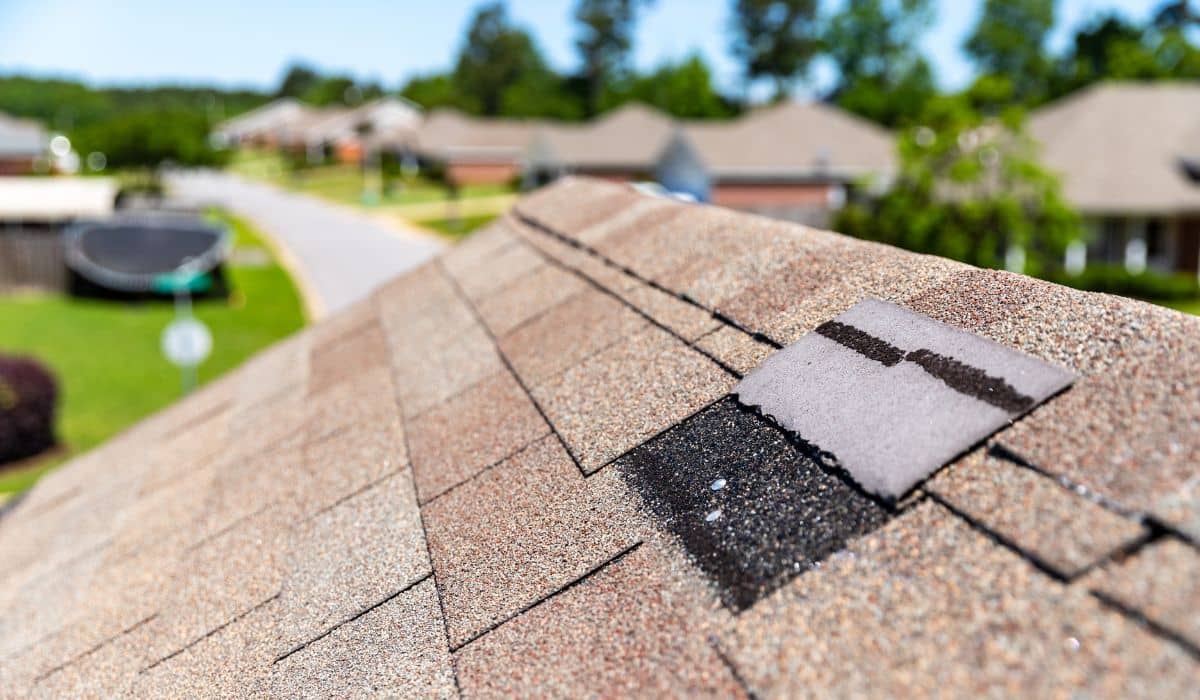
Once the shingle replacement is complete, it's important to inspect the replaced shingles for any issues. Clean up the work area and dispose of old shingles properly. Additionally, ensure that the roof looks even and aesthetically pleasing.
After completing the shingle replacement, it's important to continue regular roof maintenance to prolong its lifespan. Here are some tips:
The lifespan of roof shingles can vary depending on the material and the climate in which they are installed. In general, asphalt shingles can last anywhere from 15 to 30 years, while metal, wood, and slate shingles can last 50 years or more. It is recommended to inspect your roof annually, and after any severe weather, to check for any damage or signs of wear and tear.
If you notice missing, cracked, or curling shingles, or if your roof is approaching the end of its expected lifespan, it may be time to consider replacing them. Regular maintenance and prompt replacements can help extend the lifespan of your roof and prevent any potential water damage or leaks.
Replacing damaged shingles on your roof is an essential part of roof maintenance. By following the step-by-step process outlined in this blog post, you can ensure that your roof remains in good condition, protecting your home from water damage and maintaining its aesthetic appeal. Remember to prioritize roof maintenance and promptly replace damaged shingles to avoid further issues down the line.
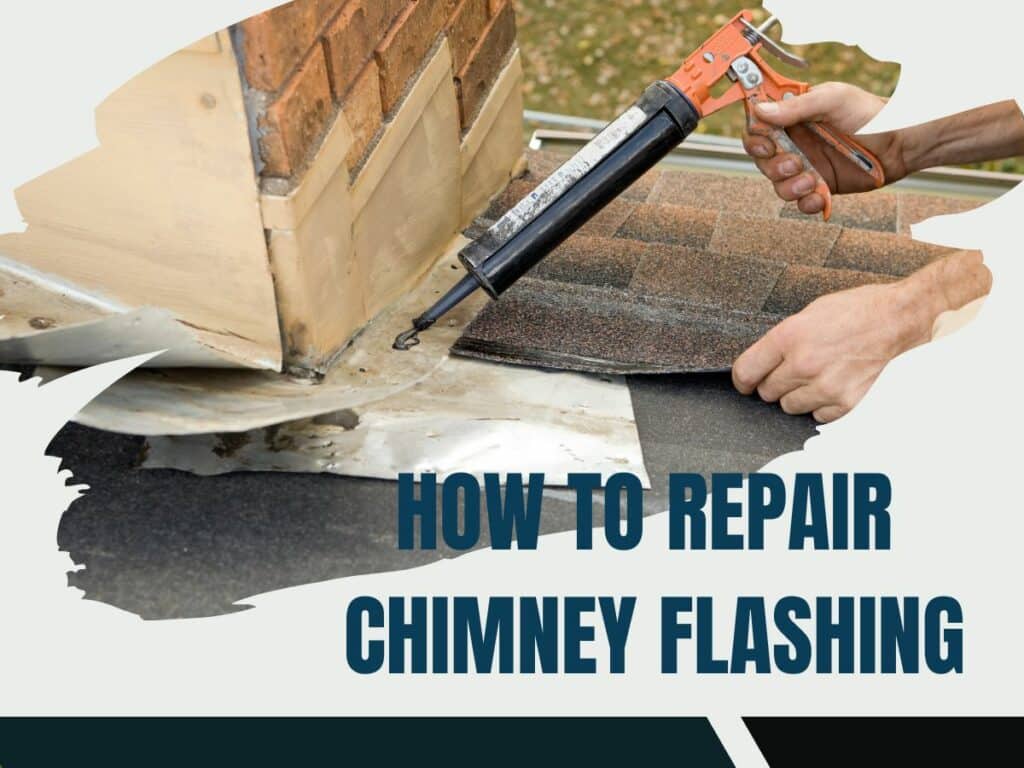
Chimney flashing, a crucial component of roof architecture, plays a vital role in maintaining the health and safety of every home. It prevents water leakage around the base of your chimney, averting potential water damage.
A well-maintained chimney flashing can significantly reduce costs, headaches, and dangers down the line. In this blog post, we're going to dive deep into the world of chimney flashing repair and unpack everything you need to know about it.
Chimney Flashing is a layer of waterproof material—often made of sheet metal—that's installed where the chimney meets your roof slope. Its function is to direct water away from the chimney. There are two main types of flashing: base flashing and cap flashing, both of which are sometimes referred to as step flashing. Understanding roofing terms like these can be invaluable when assessing your roof and chimney's needs.
A leaking chimney flashing might be the culprit if you are noticing water around your chimney area. Flashing problems often stem from regular wear and tear. For example, old flashing might corrode over time, or installed flashing might not be watertight due to poor installation, thereby causing a leaky chimney. It's essential for homeowners to recognize the signs of faulty flashing and address them promptly.
To repair chimney flashing, you will need the following tools and materials:
Every chimney and home may have unique requirements, so be flexible and reactive to the demands of your repair process.
If the flashing is bent, damaged beyond repair, or complex in design, it may be time to call in flashing repair services. A roofing professional can provide proper flashing techniques, install a roof if necessary, and ensure the flashing is installed neatly.
Regular maintenance can help prevent leaky chimneys and water damage. Inspecting your chimney system a couple of times a year wouldn’t hurt. Look out for signs of wear on the flashing and the mortar joints. If problems arise, a timely repair or replacement of a damaged chimney flashing can save much does it cost later on.
Maintaining your chimney flashing is proactive homeownership. With vigilant monitoring, the right tools, and, if necessary, professional help, you can keep your home healthy and leak-free. So, whether you are looking to install flashing around the chimney, repair your chimney flashing, or merely understand how your home functions, consider your chimney flashing.
Are you considering replacing your roof in Lacey? If so, it's important to choose a roofing material that offers both durability and aesthetic appeal. One such option to consider is a composite shingle roof. In this blog post, we will explore the top 10 benefits of a composite shingle roof in Lacey.
Composite shingle roofs are known for their exceptional durability. These shingles are highly resistant to damage from weather elements such as wind, rain, and hail. Compared to other roofing materials, composite shingles have a longer lifespan, making them a wise investment for homeowners in Lacey. With a composite shingle roof, you can have peace of mind knowing that your roof will protect your home for years to come.
When it comes to roofing options, composite shingle roofs are an affordable choice. The cost-effectiveness of composite shingle roofs makes them an attractive option for homeowners on a budget. Additionally, these roofs require minimal maintenance, reducing future expenses. By opting for a composite shingle roof, you can achieve both quality and affordability.
Composite shingle roofs come in a wide variety of colors and styles, allowing homeowners in Lacey to find the perfect match for their home's aesthetic. Whether you prefer the look of slate, wood shingles, or asphalt shingles, composite shingles can mimic the appearance of these expensive roofing materials. The versatility of composite shingles gives homeowners the opportunity to enhance the curb appeal of their homes.
Composite shingle roofs can be designed to have reflective properties, reducing heat absorption and lowering energy costs. These energy-efficient roofs can help homeowners maintain a comfortable indoor temperature throughout the year while reducing the need for excessive air conditioning. Additionally, homeowners may qualify for energy-efficient tax credits and incentives by installing a composite shingle roof.
One excellent advantage of composite shingle roofs is their fire-resistant properties. Compared to other roofing materials, composite shingles provide increased safety for homeowners. With a composite shingle roof, you can have confidence knowing that your home is well-protected against potential fire hazards. Furthermore, the fire resistance of composite shingle roofs may result in reduced home insurance premiums.
Installing a composite shingle roof is a relatively straightforward process. The simplicity of the installation not only reduces labor costs but also ensures quicker project completion. Moreover, homeowners face minimal disruption during the installation process, allowing them to enjoy their newly installed roof sooner.
Composite shingle roofs can be made from recycled materials, reducing their impact on the environment. By opting for a composite shingle roof, homeowners can contribute to sustainable practices and minimize waste. Additionally, at the end of their lifespan, composite shingles can often be recycled, further reducing their environmental footprint.
Investing in a composite shingle roof can significantly increase the value of your home in Lacey. These roofs enhance a home's curb appeal, making it more attractive to potential buyers. Additionally, a durable and energy-efficient roof is seen as a valuable asset, contributing to the overall market value of the property.
Composite shingle roofs provide effective sound insulation, reducing the levels of outside noise inside the home. This benefit can greatly improve the quality of sleep and overall comfort for homeowners in Lacey. With a composite shingle roof, you can create a quieter and more peaceful living environment.
Most composite shingle roofs come with a generous warranty, providing homeowners with peace of mind. The warranty ensures that the roof is protected against manufacturing defects and premature damage. It is crucial to choose a reputable roofing contractor that offers a solid warranty package when installing a composite shingle roof.
In conclusion, a composite shingle roof offers numerous benefits for homeowners in Lacey. From durability and affordability to energy efficiency and increased home value, a composite shingle roof is a wise investment. When replacing your roof, consider the advantages of a composite shingle roof and choose a roofing material that will protect and enhance your home for years to come.
For more information or to schedule a consultation with a roofing professional, contact Roofing Experts. Our team of experienced roofers can assist you in selecting and installing the perfect composite shingle roof for your home in Lacey.
In this blog post, we will explore the vital role of roofing contractors in maintaining the safety, durability, and visual appeal of roofs. Whether you're a homeowner or a business owner, understanding what a roofing contractor does can help you make informed decisions about your roofing needs. So, let's dive into the world of roofing contractors and explore their services in detail.
A roofing contractor is a licensed professional responsible for various services related to roofs, including installation, repair, and maintenance. They specialize in working with different types of roofing materials and have the expertise needed to ensure a quality job. Hiring a roofing contractor is essential as they possess the knowledge, skills, and tools required to deliver reliable and effective roofing services.
Here are some key services that a professional roofing contractor provides:
When you hire a roofing contractor, the first step is an initial consultation. During this phase, the contractor will visit your property to assess the condition of your roof. They will inspect both the external and internal elements to identify any potential issues. This assessment includes checking for leaks, damaged shingles, structural damage, and signs of wear and tear.
Additionally, a thorough understanding of the building's architecture, climate, and purpose is critical. This enables the roofing contractor to recommend the most suitable roofing materials for your specific needs and preferences.
One of the primary roles of a roofing contractor is roof installation. They possess the expertise necessary for proper installation techniques, ensuring a seamless and durable roof system. Depending on the type of roofing material chosen, such as asphalt shingles, metal roofing, or tile, the contractor will follow industry best practices to deliver a high-quality result.
A roofing contractor is also well-versed in roof replacement, should your existing roof be beyond repair or reach the end of its lifespan. They will guide you through the process, providing you with options for different roofing materials and explaining the benefits and drawbacks of each.
Roofs are exposed to various elements, making them prone to damages over time. A professional roofing contractor is skilled in identifying and resolving roof repair issues promptly. Whether it's fixing a leak, replacing damaged shingles, or addressing structural damage, they have the expertise to assess the problem and implement the necessary repairs.
Regular maintenance is vital for ensuring the longevity of your roof. A roofing contractor will perform routine inspections, cleaning gutters, inspecting flashings, and identifying potential problems early on. By addressing minor issues before they escalate, you can save a significant amount of money and prevent further damage to your roof.
Apart from installation, repair, and maintenance, roofing contractors often offer additional services to enhance the functionality and efficiency of your roof. These services may include gutter installation, attic insulation, skylight installation, and more. By utilizing these additional services, you can improve the overall performance and energy efficiency of your roofing system.
A successful roofing project relies heavily on the expertise of the contractor you hire. When it comes to your roof, you want to ensure you are working with a reputable and experienced professional. Here are the key reasons why you should hire a roofing contractor:
Now that you have an understanding of the crucial role of a roofing contractor, you can make informed decisions when it comes to your roofing needs. Whether it's installation, repair, maintenance, or additional services, hiring a professional contractor like IBEX Roof ensures a high-quality result, durable materials, and optimal performance for your roof. So, when you need roofing services, make sure to do your research, read customer reviews, and hire a reputable and experienced roofing contractor for the job.
Remember, your roof is an investment in the safety and security of your property. Hire a professional roofing contractor to get the job done right the first time and enjoy a functional and visually appealing roof for years to come.
In the world of roofing, composition shingles have become increasingly popular due to their affordability, versatility, and durability. If you're considering a new roof or a roof replacement, understanding the composition of shingles will help you make an informed decision.
This comprehensive guide will delve into the basics, types, and installation process of composition shingles, ensuring you have all the knowledge you need before embarking on your roofing project.

Composition shingles, also known as asphalt shingles, are a type of roofing material commonly used on residential roofs. They are made from a combination of fiberglass or organic mats, asphalt, and mineral granules. This composition contributes to their durability and performance.
Asphalt shingles are the most common type of composition shingles found in residential roofs. They are manufactured by bonding together layers of asphalt and granules.
Fiberglass shingles are another type of composition shingle that uses a fiberglass mat as the base material. They have gained popularity due to their versatility and affordability.
Organic shingles, on the other hand, use an organic mat as the base material. They are made of felt, recycled paper, or wood fiber soaked in asphalt.

Before installing composition shingles, certain factors need to be considered:
The installation process involves several key steps:
Deciding whether to hire a professional roofing contractor or undertake the installation as a DIY project depends on several factors:
To maximize the lifespan of composition shingles, certain maintenance practices should be followed:
To extend the lifespan of your composition shingles, consider the following:
The cost of a composition roof can vary depending on several factors. The size and slope of the roof, as well as the specific materials used, can all impact the overall cost.
On average, homeowners can expect to pay between $6,000 and $9,000 for a composition roof installation. However, it is important to note that this is just a general estimate, and prices can vary significantly based on location and individual circumstances. Additionally, the cost may also include other factors, such as removal and disposal of the old roof, as well as any necessary repairs or modifications.
It is recommended to obtain multiple quotes from reputable roofing contractors in order to get a more accurate idea of the cost. Overall, while a composition roof can be a more affordable option compared to other types of roofing materials, it is still a significant investment that should be carefully considered.
Composition shingles are a popular and versatile option for residential roofs, offering an array of benefits such as cost-effectiveness, durability, and ease of maintenance. By understanding the basics, various types, and installation process, you can confidently select the most appropriate composition shingle for your needs. Remember to consider pre-installation factors, choose the right professional or DIY approach, and prioritize regular maintenance to ensure the longevity of your composition shingle roof. With proper care, your composition shingles will provide you with a resilient and aesthetically pleasing roof for years to come.
Roofs are one of the most crucial components of any structure, protecting us from the elements. However, over time, roofs may develop leaks that require prompt repair to prevent further damage and costly repairs.
In this comprehensive guide, we will delve into the factors that influence roof leak repair costs and provide an estimated breakdown of expenses. By understanding these cost factors, homeowners can make informed decisions about addressing roof leaks and potentially save on repair costs.
Before exploring the cost factors, let's briefly understand the common causes of roof leaks. Some of the most common causes include:
It's crucial to accurately identify the source of the leak to ensure effective repairs. Water stains on ceilings, dampness in the attic, or visible water intrusion are signs that your roof may have a leak.
Various factors affect the cost of roof leak repairs. Here are some key elements to consider:
The type of roof you have plays a significant role in repair costs. Different roofing materials require unique repair techniques and materials. Let's explore a few common roof types:
| Roof Type | Description |
| Shingle Roof | The most common roofing material, cost-effective and versatile. |
| Tile Roof | Environmentally friendly and durable but can be more expensive to repair. |
| Metal Roof | Long-lasting and resistant to fire and extreme weather, costly to repair. |
| Flat Roof | Commonly found in commercial buildings, requires specialized repair methods. |
Ensure you hire a professional experienced in repairing your specific roof type to avoid further damage or improper repairs.
The severity and location of the leak can significantly impact repair costs. Some leaks may be minor and easily accessible, while others may be more extensive and harder to reach. For example:
The size of your roof influences repair costs. Larger roofs require more labor, materials, and time for repairs. Contractors may charge based on the square footage of the roof, so be aware of this when estimating repair expenses.
The accessibility of the damaged area also affects repair costs. Factors such as roof pitch, height, or obstacles like trees or power lines can increase labor and equipment requirements, potentially driving up costs.
In some cases, roof leaks can cause additional damage that needs repair. Common additional repairs may include:
It's vital to address these additional repairs in conjunction with fixing the roof leak to avoid future problems and expenses.
Accurately estimating roof leak repair costs involves considering multiple factors. Let's break down the key cost components:
To assess the extent of the damage and determine the repair requirements, it's advisable to enlist the help of a professional. While some contractors provide free or low-cost inspections, be cautious of potential upselling. Obtain multiple quotes and consider the reputation and experience of the roofing professionals.
Different roofing materials vary in cost. Here's an estimate of typical roofing materials and their costs:
| Roof Material | Average Cost per Square Foot |
| Asphalt Shingle Roof | $1.50 - $5.00 |
| Metal Roof | $5.00 - $12.00 |
| Tile Roof | $7.00 - $20.00 |
| Flat Roof | $5.00 - $10.00 |
Keep in mind that these costs are approximate and can vary depending on factors such as material quality and location.
Labor costs depend on various factors like location, contractor expertise, and the complexity of the repair. Contractors may charge hourly rates, fixed rates, or per square foot rates. Obtaining multiple quotes is crucial to compare labor costs and ensure you're getting a fair price.
Besides materials and labor, there may be additional expenses involved, such as permits, equipment rentals, or disposal fees. Discuss these potential costs with your contractor to avoid surprises in the final bill.
Providing an exact figure for roof leak repair costs is challenging due to the numerous influencing factors. However, as a rough estimate, minor repairs may cost anywhere between $200 and $500, while more extensive repairs can range from $500 to $1500 or more. Additionally, addressing additional repairs, such as insulation or wood replacement, will increase the overall cost.
Roof repairs can sometimes be expensive, but there are ways to save on the cost. One way is to regularly inspect your roof and address any minor issues before they become major problems. Small leaks or loose shingles can worsen over time and lead to more extensive damage, so fixing them promptly can help prevent costly repairs down the road. Another way to save is to compare quotes from multiple roofing contractors.
Prices can vary greatly, so getting several estimates can help you find the best deal. Additionally, consider using quality materials that may have a higher upfront cost but can save you money in the long run. Investing in durable materials can increase the lifespan of your roof and decrease the need for frequent repairs.
Finally, consider scheduling your repair during the off-season or during slower times for roofers when prices may be more competitive. By taking these steps, you can save money on the cost of roof repair and ensure the longevity of your roof.
When it comes to roof repair, homeowners often face the dilemma of deciding whether to tackle the project themselves or hire a professional. Cost is a significant factor that plays into this decision-making process. DIY roof repair generally results in lower expenses as it eliminates the need for labor costs. Homeowners have the opportunity to purchase materials at a lower price and a chance to save on contractor fees. However, it is crucial to consider the quality of the repair work.
Professionals have the necessary skills and experience to ensure the job is done right the first time, reducing the risk of further damage and costly repairs in the future. Additionally, they often have access to higher-quality materials and equipment.
Hiring a professional also brings the advantage of insurance coverage, relieving homeowners of financial responsibility for any accidents or injuries that may occur during the repair process. While DIY repair may seem cost-effective initially, the potential for mistakes and the need for future repairs make hiring a professional a worthy investment for long-term roof maintenance.
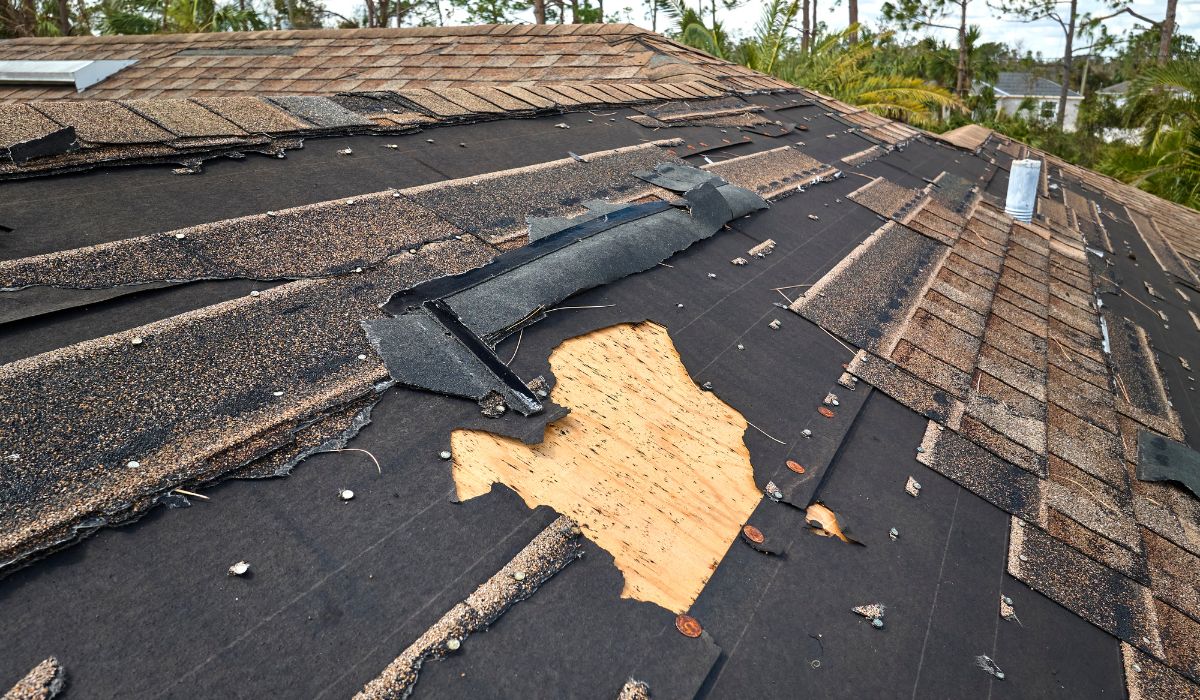
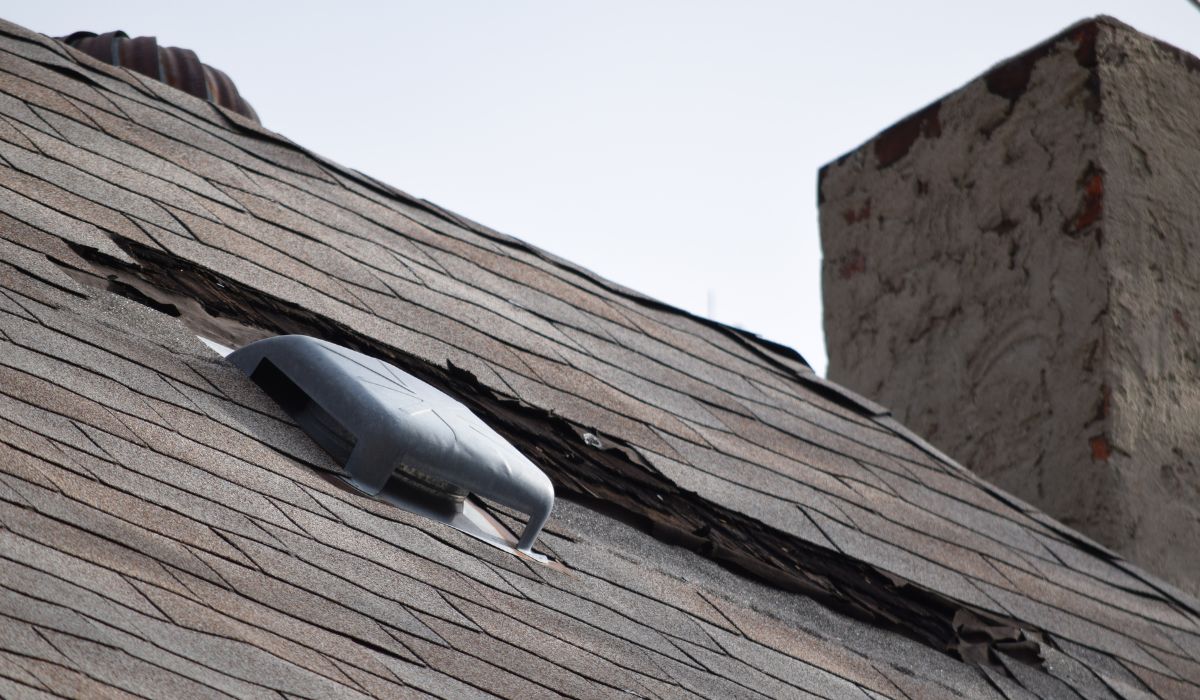
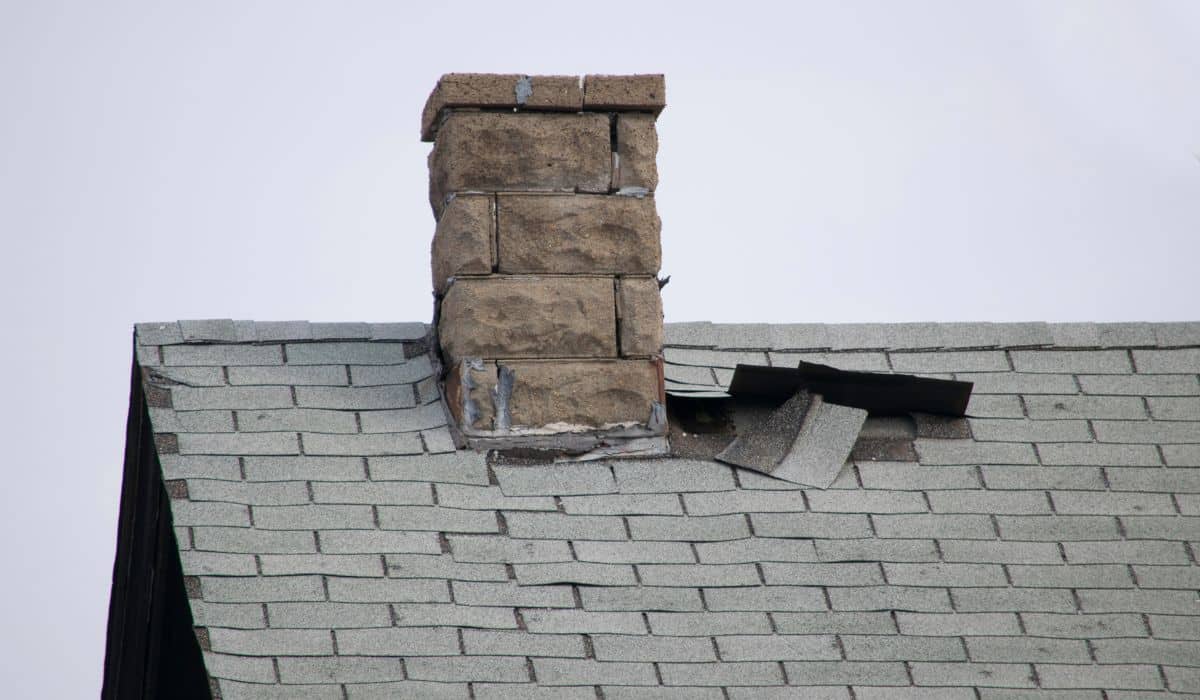
There are several signs that indicate your roof may be damaged and in need of repair. One of the most obvious signs is a leaky roof. If you notice water stains on your ceiling or walls, it is likely that there is a problem with your roof.
Another sign of roof damage is missing or loose shingles. If you see shingles that are cracked, curled, or completely missing, it is important to have them replaced as soon as possible to prevent further damage.
Additionally, if you notice any sagging areas or dips in your roof, this may be a sign of underlying structural damage.
And finally, if you see any signs of moss or algae growth on your roof, it is a sign that there may be moisture trapped underneath, which can lead to rot and decay. It is important to address these signs of roof damage promptly to avoid more serious problems down the line.
The cost of repairing a roof leak can be influenced by several factors. Firstly, the extent of the damage plays a significant role. If the leak is minor and localized, the repair costs would likely be lower compared to a major leak that has caused extensive damage to the roof structure. Secondly, the type of roofing material used can impact the cost of repairs.
Materials like slate or tile tend to be more expensive to repair due to their higher cost and the specialized skills required. In contrast, repairing asphalt or metal roofs can be relatively less expensive. Additionally, the accessibility of the roof can affect the cost.
If the roof is difficult to access, such as in multi-story buildings or with limited workspace, the repair costs may be higher due to the extra time and effort required. Lastly, the geographical location can also be a factor.
In areas with a higher cost of living, such as cities, the repair costs may be higher due to increased labor and material costs. Overall, a combination of these factors determines the cost of repairing a roof leak.
Roof leak repairs are essential to safeguard your property and prevent further damage. By addressing leaks promptly, you can save on costly repairs in the long run. IBEX Roof, as a licensed, insured, and bonded roofing contractor in Washington and Oregon, specializes in comprehensive roof leak repairs.
No matter the size or complexity of the repair, IBEX Roof is equipped to handle the task. Our transparent pricing, free estimates, and commitment to using high-quality materials make us the trusted choice for all your roofing needs. Don't let a minor leak turn into a major issue. Contact IBEX Roof at (360) 637-4065 for a free estimate or consultation.
This post was written in collaboration with IBEX Roof, specialists in roof leak repairs and trusted roofing contractors in Washington and Oregon.
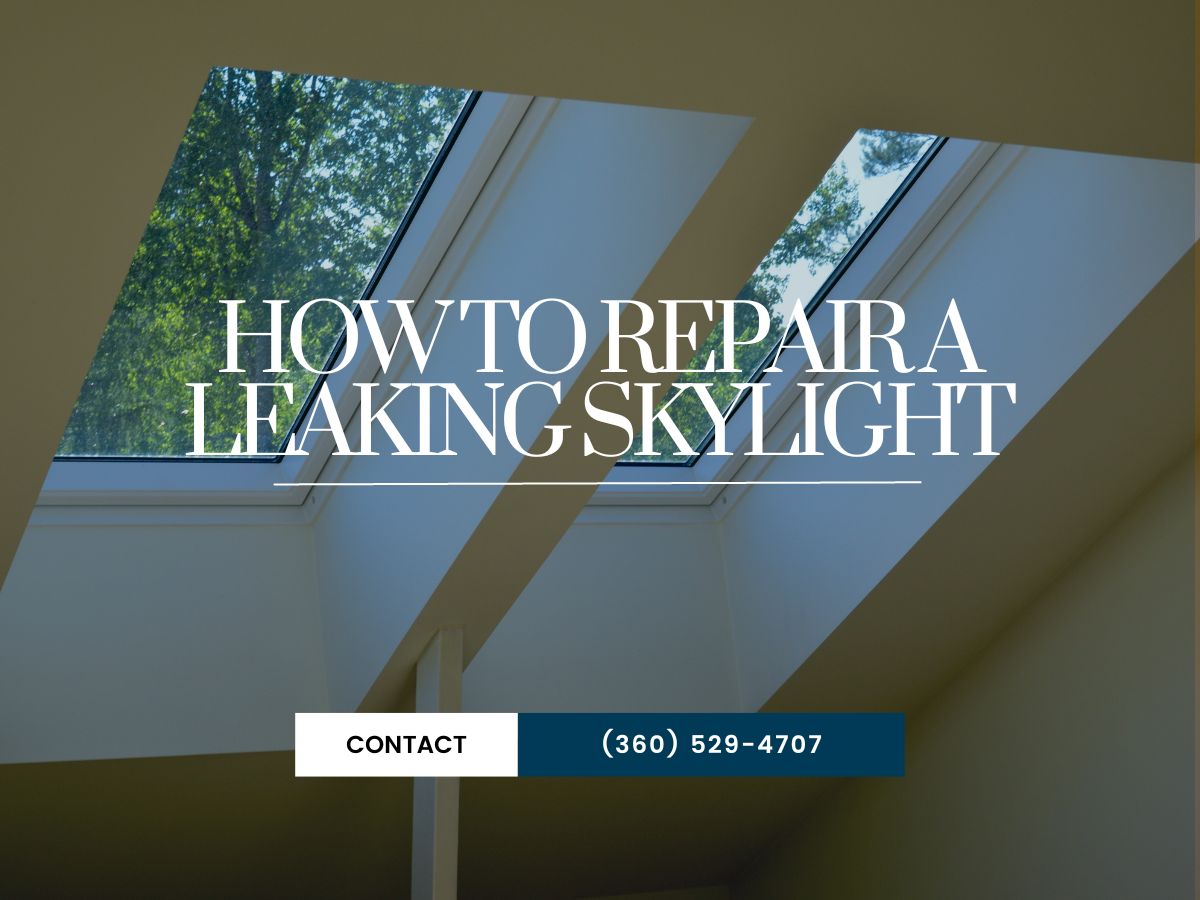
Skylights are a wonderful addition to any home or commercial property, providing natural light and a unique view of the sky above. However, a leaking skylight can quickly turn this feature into a source of frustration and potential damage. If you're dealing with a skylight leak, it's essential to address the issue promptly to prevent further problems. In this blog post, we will guide you through the process of repairing a leaking skylight and provide valuable tips on maintenance to ensure a leak-free skylight for years to come.
The first step in fixing a leaking skylight is to identify the source of the problem. Determining the cause will help you implement the most effective repair strategy. Here are some common causes of skylight leaks:
To determine the exact cause of the leak, inspect your skylight thoroughly. Look for signs of damage, such as cracked glass, deteriorated flashing, or gaps around the skylight frame.
Before embarking on your skylight repair journey, make sure you gather all the necessary tools and materials. Here's a handy checklist:
Using high-quality materials is crucial for a long-lasting and effective solution. Cheap or subpar materials might only provide temporary relief and result in recurring leaks.
Now let's dive into the step-by-step process of repairing a leaking skylight. Before we begin, it's important to note that while some minor skylight leak repairs can be successfully done by homeowners, complex repairs or recurring leaks often require the expertise of a professional roofing contractor like IBEX Roof. Safety should always be a top priority when working at heights.
Step 1: Safety precautions and working at heights
Step 2: Temporary measures to prevent further water damage
Step 3: Repairing damaged or deteriorated flashing
Step 4: Replacing cracked skylight glass
Step 5: Correcting any installation errors
Step 6: Properly sealing the skylight to prevent future leaks
Regular maintenance is key to preventing future skylight leaks. Here are some essential tips to keep your skylight in optimal condition:
While minor repairs can often be handled by homeowners, it's important to know when to seek professional assistance. Consider these situations:
Remember, the cost to repair a skylight will depend on various factors such as the extent of damage, the type of skylight, and the complexity of the repair job. It's always a good idea to consult with a professional roofing company for an accurate assessment and cost estimate.
In conclusion, a leaking skylight can cause significant damage if not addressed promptly. By following the steps and tips outlined in this blog post, you can effectively diagnose and repair skylight leaks. However, if you encounter complex issues or if safety is a concern, it's best to seek the assistance of a professional skylight contractor like IBEX Roof. Their expertise and commitment to quality will ensure a long-lasting and leak-free skylight for your home. Don't let a leaking skylight dampen your enjoyment of natural light and beautiful views; take action and repair it today!
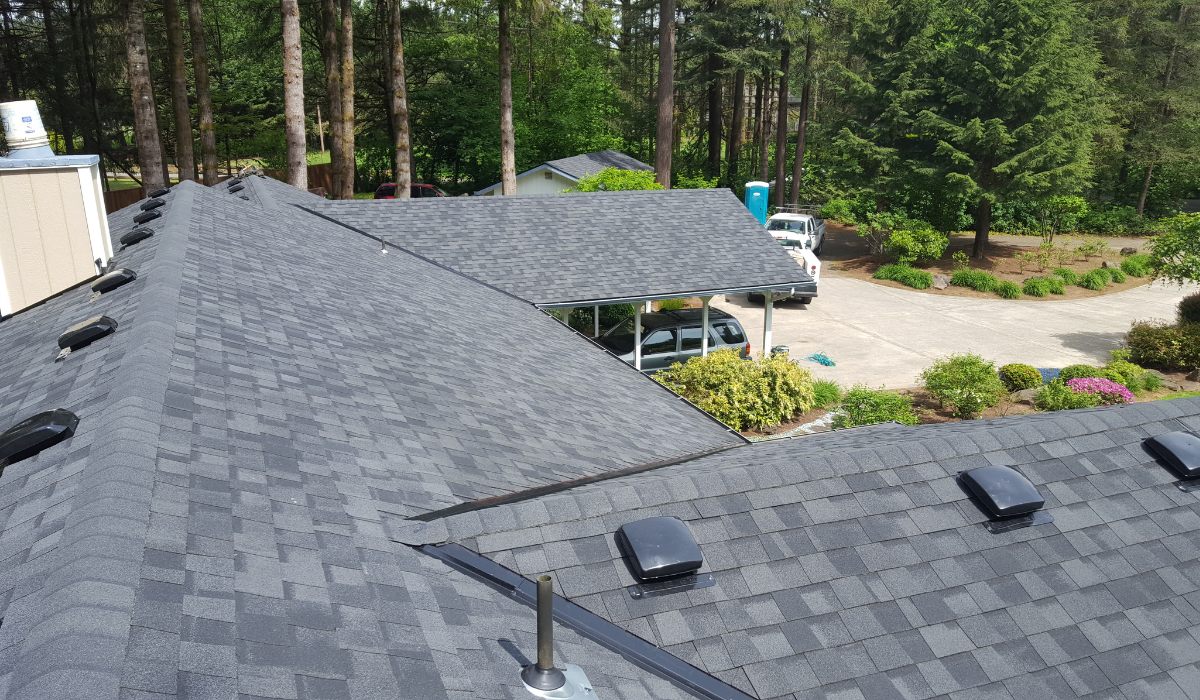
At IBEX Roof, we take great pride in providing high-quality roofing services to homeowners in Washington and Oregon. With our licensed, insured, and bonded roofing contractors, we offer trusted and certified expertise in roof inspection, maintenance, and storm damage repair. As part of our commitment to excellent customer service, we also offer a blog with roofing-related tips and guides. In this blog post, we will delve into the different types of roof valleys and their importance in protecting your home from water damage.
Roof valleys are the critical junctures where two roof slopes meet. They play a crucial role in redirecting water towards gutters and downspouts, preventing water infiltration and potential leaks. Without proper installation and maintenance of roof valleys, your home's structural integrity could be compromised.

One common type of roof valley is the open valley. In this design, metal flashing is exposed and not covered by shingles. This type of valley provides improved water flow and allows for easier detection of potential issues. It is essential to use proper underlayment in open valleys to ensure a watertight seal. IBEX Roof recommends the use of ice and water shield, a self-adhering membrane that provides an extra layer of protection against leaks in open valleys.
Another popular type of roof valley is the closed valley, where shingles overlap the metal flashing, providing a seamless appearance. Closed valleys have the advantage of preventing debris accumulation and offering increased durability. However, it is crucial to regularly clean and maintain closed valleys to prevent clogging and water backup.
Woven valleys, also known as "weave" valleys, involve alternate layers of shingles on each side of the valley. This type of valley offers improved aesthetics and increased water shedding capability. Proper installation techniques are crucial for woven valleys to ensure longevity and prevent leaks.
California cut valleys require cutting one side of the valley shingles to create a clean, straight line. This type of valley improves water flow and reduces the risk of debris accumulation. It is necessary to hire experienced roofing contractors to ensure proper installation of California cut valleys for optimal performance.
The choice of valley type depends on several factors, including roof slope, climate, and architectural style. Steep roofs may require specific valley types to handle water flow adequately, while areas with heavy rainfall might benefit from closed-cut valleys. Consulting with a professional roofing contractor is essential to determine the most suitable valley type for your specific needs.
At IBEX Roof, our experienced and knowledgeable roofing contractors understand the intricacies of roof valleys. They possess the expertise to inspect and maintain valleys to enhance their durability and prevent potential issues. Hiring professionals for roof valley installation and repairs ensures that work is done correctly, resulting in a roof system that performs optimally and protects your home for years to come. Our expertise in storm damage roof repair further adds to the reliability of our services.
In line with our commitment to unmatched customer service, IBEX Roof is accredited by the Better Business Bureau, and our customers consistently rate us highly. Our professionalism, quality workmanship, and environmental concerns have earned us a stellar average rating of 4.8 stars based on 787 customer reviews.
In conclusion, understanding the different types of roof valleys is essential for protecting your home from water damage. Whether you opt for open, closed, woven, or California cut valleys, proper installation and maintenance are crucial. By relying on the expertise of professional roofing contractors, like those at IBEX Roof, you can ensure that your roof valleys are consistently in excellent condition. Don't forget to explore our blog for more roofing-related tips and guides!
Request a free, no-obligation estimate today and experience the difference IBEX Roof can make for your home.
Are you a homeowner or property owner in need of roofing services? Whether you require a roof replacement, repair, or maintenance, it's essential to have a solid understanding of the anatomy of a roof. Knowing the various components that make up your roof, from the underlayment to the flashing and ventilation system, can greatly benefit you during any roofing project. In this blog post, we will delve deep into the anatomy of a roof, highlighting the benefits of this knowledge and how it can lead to a successful roofing experience. At IBEX Roof, our team of experienced professionals is here to provide top-notch roofing services for all your needs. Contact us at (360) 529-3518 today.
To comprehensively understand the anatomy of a roof, it's important to familiarize yourself with the key components that make up your roof system. Let's explore each component in detail:
The roof deck forms the foundation of your roof and provides structural support. It is typically made of plywood or oriented strand board (OSB) and is directly attached to the home's truss system or rafters. The roof deck serves as the base onto which all other roofing layers are applied.
The underlayment acts as a protective barrier between the roofing material (such as shingles or metal) and the roof deck. It defends against water infiltration and helps prevent damage caused by leaks. Common underlayment materials include asphalt felt and synthetic materials like synthetic underlayment. Different types of underlayment offer various levels of durability and moisture resistance.
The roofing material, often referred to as shingles, is the visible outer layer of your roof. It plays a crucial role in protecting your home from the elements and enhancing its curb appeal. There are various options available, including asphalt shingles, metal, clay or slate tiles, and cedar shake roofing. Each material has its own set of advantages and considerations, such as durability, lifespan, maintenance requirements, and compatibility with regional weather conditions.
Flashing is a crucial component that prevents water intrusion at vulnerable areas of the roof, such as valleys, chimneys, skylights, and roof transitions. It is usually made of metal or waterproof material and is strategically installed to channel water away from these vulnerable areas. Properly installed flashing prevents water damage, mold growth, and structural issues.
Adequate roof ventilation is paramount for ensuring optimal air circulation in your attic. It helps regulate temperature, control moisture levels, and prevent the formation of mold and mildew. Proper ventilation can extend the lifespan of your roof and prevent premature deterioration. There are various types of ventilation systems, including ridge vents, soffit vents, gable vents, and roof vents, each serving a specific purpose based on your roof's design and needs.
Gutters and downspouts play a critical role in directing water away from the roof and the house's foundation. Let's explore their components:
1. Gutters: Gutters collect and channel rainwater away from the roof edges, preventing water damage. They can be made from materials such as aluminum, PVC, or copper. Regular cleaning and maintenance are necessary to ensure proper functioning.
2. Downspouts: Downspouts are vertical pipes that carry the water collected by the gutters down to the ground, preventing water accumulation near the foundation. They are available in different materials like aluminum, vinyl, or copper. Proper placement and regular inspection are essential to avoid foundation damage.
Roof coverings provide the outermost layer of the roof, protecting it from the elements. Let's explore the different types of roof coverings and their characteristics:
1. Shingles: Shingles are the most common type of roof covering and are available in various materials, including asphalt, wood, slate, and metal. They offer durability, weather resistance, and aesthetic appeal. Regular inspection and maintenance are necessary to prevent leaks and damage.
2. Tiles: Tile roofs are popular for their durability, energy efficiency, and distinct appearance. Common types of tiles include clay, concrete, and composite materials. Proper installation and maintenance practices are crucial to ensure their longevity.
3. Metal: Metal roofs have gained popularity due to their exceptional durability, fire resistance, and energy efficiency. They are available in different systems, such as standing seam, corrugated panels, and metal shingles. Regular maintenance is essential for preventing corrosion and maintaining the roof's protective qualities.
Now that we have explored the various components of a roof, let's delve into the benefits of understanding the anatomy:
At IBEX Roof, we specialize in providing a wide range of roofing services to meet all your needs. Our expert team is well-versed in handling various roofing components and materials. Whether you require a roof replacement, repair, cleaning, or maintenance, we are here to deliver exceptional results. Our commitment to customer satisfaction, excellent craftsmanship, and competitive pricing sets us apart from the competition. Trust IBEX Roof to protect your roof and enhance the longevity of your home. Contact us at (360) 529-3518 to schedule an appointment or request a free estimate.
Understanding the anatomy of a roof is essential for homeowners and property owners alike. It empowers you to make informed decisions about your roof, identify issues early on, communicate effectively with roofing professionals, and prioritize safety. By knowing the various components that make up your roof system, you can ensure its longevity, functionality, and overall performance. For all your roofing needs, rely on the expertise and trustworthiness of IBEX Roof. Contact us at (360) 529-3518 and let us provide you with top-notch roofing services. Invest in the knowledge of your roof's anatomy and experience a successful roofing journey.
Are you planning a roofing project and wondering how to accurately measure your roof for shingles? One of the most crucial aspects of a successful roofing project is obtaining precise measurements. Knowing how to measure your roof correctly will ensure you purchase the right amount of shingles, save money, and prevent costly errors. In this comprehensive guide, we will walk you through the step-by-step process of measuring your roof for shingles, using the right tools and techniques to obtain accurate measurements.
Before diving into the measurement process, it's essential to familiarize yourself with different roof styles and key terminology related to roof measurement. This knowledge will help you determine the most appropriate techniques for your specific roof.
To accurately measure your roof, you should understand the following terms:
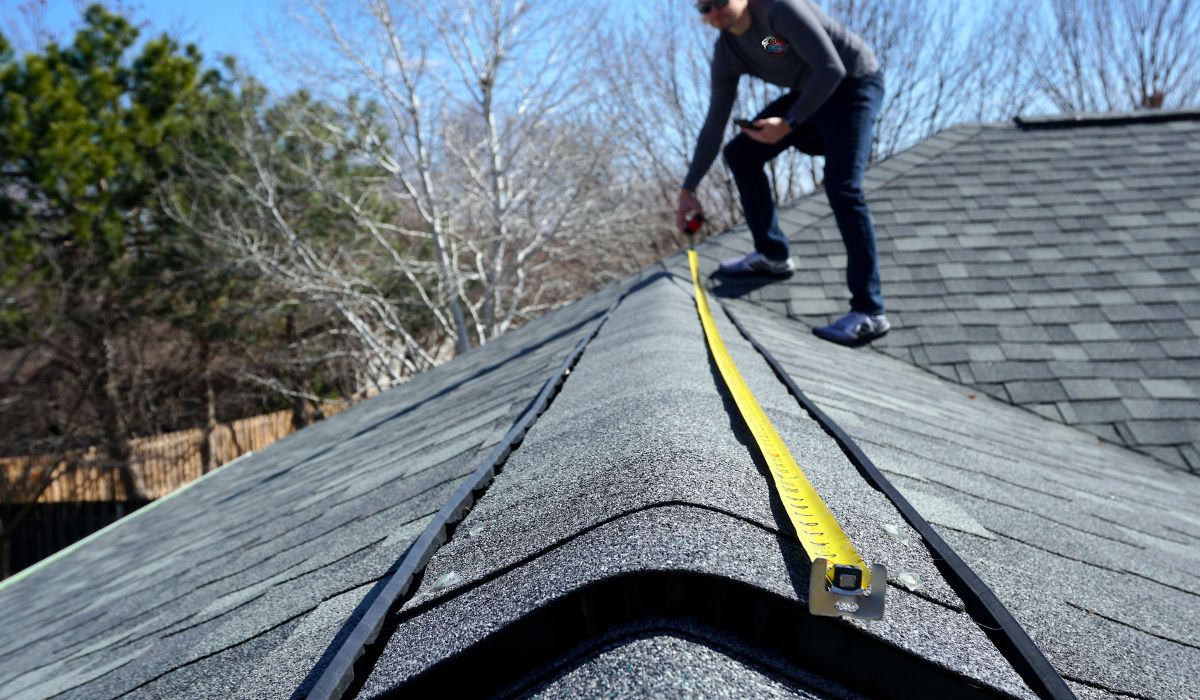
Before starting your roof measurement process, make sure you have the right tools and equipment readily available. Here are some essentials:
Now that you are familiar with the basics and have the necessary tools, let's dive into the step-by-step process of measuring a roof for shingles.

While measuring your roof, it's important to avoid common mistakes that can lead to inaccurate measurements. Here are a few to watch out for:
To ensure the most precise measurements for your roof, consider the following tips and recommendations:
Accurate roof measurements are crucial for a successful shingle installation. By following the step-by-step guide outlined in this blog post and incorporating the tips and recommendations provided, you can confidently measure your roof for shingles. Remember to account for all roof features, include waste allowance, and utilize tools and resources available to calculate the quantity of shingles needed. With precise measurements, you'll be on your way to a well-executed roofing project that achieves optimal results.
Now that you've learned how to measure your roof for shingles, you can confidently embark on your roofing journey. Measure smartly, calculate accurately, and enjoy the process of transforming your roof into a durable and aesthetically pleasing structure.
